/Super Metroid Hack/V2/Super Metroid Hack V2.0.IPS ... __V2.8.IPS
__V2.9.IPS
5.
Seraphim Tools. ...誰かさん専用のツールらしく使用禁止なようです。。。使いませんし検証しません。
2.
"Tile Table" menu.
Export
CRE Tile Table:
現在[RF-FILENAME] CRE.TTBと呼ばれる、RFで開いているSuper Metroid
ROMと同じフォルダに.TTBファイルを作成します。
この.TTBファイルには、タイルテーブルエディタがCREテーブル用に作成したタイル配置が含まれています。
タイルテーブルは、グラフィックを正しく表示するために必要です。左/右クリックでタイルを配置するためのタイルテーブルのデフォルトも保存されます。
Import CRE Tile Table:
CREタイルテーブル(.TTB)ファイルをインポートして自動保存します。
Export SCE (scenery)
Tile Table:
現在[RF-ROM名] SCE $
XX.TTBという名前で、RFで開いているROMと同じフォルダーに.TTBファイルを作成します(XX
=エクスポートを選択したときに選択されたタイルセット)
この.TTBファイルには、タイルテーブルがグラフィックを正しく表示するために必要なSCEテーブル用のタイルテーブルエディタによって作成されたタイルの配置が含まれています。
左/右クリックでタイルを配置するためのタイルテーブルのデフォルトも保存されます。
Import SCE
(scenery) Tile Table:
選択したSCEタイルテーブル(.TTB)ファイルをインポートして自動保存します。
3.
"Pallete Menu"
Export Pallete:
RF本体のメニューから Preferences -> Pallete Format で選択された出力形式でRFで開いているROMと同じフォルダーにパレットデータが保存されます。
Import Pallete:
読み込み可能な形式のファイルを選択すると保存しておいたパレットデータが読み込まれ反映されます。
4.
Currently loaded tileset.
このドロップダウンメニューからエントリを選択すると、エリアのタイルセットが編集用にロードされます。
5.
Currently loaded CRE.
このドロップダウンメニューはデフォルトでは空白になっており、MultiCREパッチを使用している場合にのみ利用可能になります。
SCEとは異なり、CREのタイルとテーブルは他の場所の異なるコードによってロードされます。
6.
CRE table address.
CREタイルテーブルは、全てで共有されます。
エクスポートしたCRE
.TTBファイルをインポートするとこの場所のデータは上書きされますが、ROM内の任意の場所を指すことができます。
7.
CRE tiles address.
CREグラフィックシートの場所は、全てで共有されます。
エクスポートしたCRE
.GFXファイルをインポートするとこの場所のデータは上書きされますが、ROM内の任意の場所を指すことができます。
8.
SCE (scenery) table address.
現在選択されているタイルセットのタイルテーブルの場所。
エクスポートしたSCE
.TTBファイルをインポートするとこの場所のデータは上書きされますが、ROM内の任意の場所を指すことができます。
9.
SCE (scenery) tiles address.
現在選択されているタイルセットのグラフィックシートの場所。
エクスポートしたSCE
.GFXファイルをインポートするとこの場所のデータは上書きされますが、ROM内の任意の場所を指すことができます。
10.
Tileset palette address.
現在選択されているタイルセットのパレットの位置。
タイルセットパレットの最大長は259バイトです。
ROM内の任意の場所を指すことができます。
11.
Overwrite / Road チェックボックス.
このチェックボックスでタイルセットポインターに対する変更を上書きするか、現在の状態で読み込むかを選択します。
12.
Overwrite / Road ボタン.
このチェックボックスでタイルセットポインターに対する変更を上書きするか、現在の状態で読み込むかを選択します。
13.
LoROM address to PC address 変換機能.
Lunar Addressと同じ働きをしますが、LoROMアドレスとPCアドレスの間で変換をします。
6文字未満の長さのPCアドレスを入力する場合は、0を入力する必要があります(例:7E9A0ではなく07E9A0、または1800ではなく001800)
14.
現在ロードされているタイルセットのカラーパレット.
色をクリックして、下の赤/緑/青のスライダーを使って編集します。
色をコピー/置換するには:
赤/緑/青のボックスをクリックしてカーソルが小さなメトロイドアイコンに変わるようにしてから置き換える色の上にドラッグ&ドロップします。
15.
Palette line.
0〜7のいずれかのボタンをクリックしパレットラインホルダーのいずれか、またはタイルテーブルエディタの4つのセクションのいずれかにドラッグ&ドロップします。
16.
RGBボックスとスライダー.
これらは、タイルセットのパレットで現在選択されている色を編集するために使用されます。
また、ボックス内にドラッグ&ドロップで現在の色をコピーします。
17.
パレットインデックスと現在選択されている色の16進数値および"Save Pallete"ボタン.
[Hex] ボックス:
16進数のカラーコードを入力すると、その色に最も近い互換性のあるSNESカラーが自動的にRGB領域に表示されます。
また、パレットにて現在選択されている色が置き換えられます。
Super Metroidで新しく色を追加する場合などにSNESカラーではない16進カラーコードを使用したい場合に便利です。
"Save Palette" ボタン:
タイルセットのパレットに対して行った編集内容を上書きします。
18.
パレットホルダーのプレビュー.
個別の色をここからドラッグしてタイルセットのパレットの色に置き換えるかパレットホルダーボタンの1つからパレットの行にドラッグして行全体を置き換えます。
19.
Palette holder buttons.
パレット行をここにドラッグアンドドロップすると、行全体を簡単に上書きしたり別のタイルセットのパレットにコピーしたりできます。
20.
タイルテーブルセクションのパレット行番号.
これらの4つの淡黄色のボックスには0〜7の数字が入っています。
これらのボックス/ボタンをクリックするとパレットの行を順に移動し、右クリックすると逆方向に移動します。
パレットのラインボタンからドラッグ&ドロップすることもできます。
21.
タイルセクションの水平/垂直フリップボタン.
各タイルセクションには、横に2つの長方形の白いボタン(水平/垂直)があり、クリックできます。
これらの白いボタンの内側にある矢印は、現在タイルのその部分にフリップを適用していることを意味します。
22.
タイルテーブルエディタ.
下の表のタイルをクリックすると編集のためにここでそのクローズアップが表示されます。
タイルのセクションをクリックすると、赤い四角のオン/オフが切り替わります。
赤い四角が表示されている場合:
タイルはSamusの後ろに表示されます。
赤い四角が非表示の場合:
Samusの前にタイルは表示されません。
23.
Copy 16x16 Tiles checkbox:
チェックボックスをオンにした状態でホワイトボックスのサイズを8 x 8ピクセルから16 x 16に変更することで、
タイルシートから一度にドラッグできるタイルの数を1から4に増やします。
Copy Tilesheet Palettes checkbox:
タイルがタイルシートからドラッグされてタイルテーブルエディタにドロップされたときにパレットの線の値をタイルグラフィックと一緒にコピーします。
(削除された機能)
16x16 Palettes checkbox:
チェックしながらパレット行からタイルテーブルエディタの任意のセクションに番号をドラッグアンドドロップすると、
そのパレット番号が1つではなく4つすべてのセクションに適用されます。
24.
Tile number.
テーブルで現在選択されているタイルの番号が表示されます。
一番左上 [ $ 000 ] から数えて、一番右下 [ $ 3FF ] で終わります。
25.
Tilesheet GFX numbers.
この4つの値は、タイルテーブルエディタの4つのセクションに対応しています。
値自体は、各タイルセクションがタイルシートから使用しているタイル番号です。
26.
Copy Tile / Paste Tile ボタン.
"Copy"をクリックすると、タイルテーブル内の他のタイルの上に貼り付けてタイルテーブルエディタでその内容を表示します。
"Past"をクリックすると、コピーしたタイルデータを貼り付けることができます。
27.
Save Table ボタン.
[保存]ボタンをクリックすると、現在開いているタイルセットのCREまたはSCEテーブルアドレスに編集内容が書き込まれます。
28.
Special GFX ドロップダウンメニュー.
このメニューのオプションはSMILE RFがあなたのためにエクスポートできるグラフィックシートです。
エクスポートされたグラフィックシート(.GFXファイル)は、他のプログラムで開いたり編集したり保存したりしてから、ROMにインポートし直すことができます。
29.
Special GFX PC address.
Special GFXドロップダウンメニューで現在選択されているエントリのPCアドレスを表示します。
一番下のドロップダウンオプションが選択されている場合このPCアドレスフィールドは編集可能になります。
自分のPCアドレスを入力してそこからグラフィックをエクスポートすることができます。
30.
Import Graphics and Export Graphics buttons.
"Export Graphics"ボタン:
開いているROMと同じフォルダに.GFXファイルが作成されます。
また、同じファイル名の.GFXファイルが既に存在する場合は上書きされます。
"Import Graphics"ボタン:
ファイル選択メニューが開き、そこから.GFXファイルを選択すると変更されたグラフィックがROMに保存されます。
31.
GFXシート用に現在選択されているパレット.
0〜7ボタンは、タイルセットのパレットに使用できる8つのパレット行(ボタンと同じパレット行)を表します。
タイルシートをプレビューもしくは、ドラッグアンドドロップしたときにパレット番号を確認できます。
32.
現在選択されているタイルシートのタイル
タイルシートの目的は、タイルをドラッグしてタイルテーブルエディタの4つのセクションの1つにタイルをドロップすることです。
タイルシートのタイルは8 x 8ピクセルの正方形です。
タイルテーブルとレベルエディタで部屋を構築するために使用される16 x 16ピクセルの各ブロックには、最大4つのタイルを配置できます。
33.
現在編集用に選択されているタイル.
ホワイトボックスはあなたが特に見るべきものです。
タイルを左クリックすると、この白いボックスがタイルの周りに表示されます。
つまり、編集のためにタイルテーブルエディタに読み込まれます。
34.
空白に見える一時的なタイル.
具体的には、それらを通過する水平の青い水平線を持つ8つの空白のタイルで他のPLMが使用します。
たとえあなたがCREテーブルを再指定したとしても、これらは決して変更されるべきではありません。
35.
CREタイルテーブルの白い「XXXX」タイル。
CREテーブルを再指定しない限り、これらのタイルを編集しないでください。
36.
CREテーブルの最後のタイル.
これは、すべての部屋が屋外で使用するデフォルトの見えないタイルです。
左上から始まりこのタイルで終わるすべてのタイルがCREテーブルを構成するものです。
合計タイルテーブルの上から32x8タイルですべてのタイルの上にあります。
CREテーブルはすべてのタイルセットに対して同じサイズで、デフォルトですべてのタイルセット間で共有されます。
37.
SCE(scenery)テーブルの最初のタイル.
これと最後の風景タイルの間にあるすべてのタイルがSCEタイルテーブルを構成するものです。
タイルテーブル全体の一番下の32 x 24タイルです。
SCEテーブルはエリアごとに異なるので、再設定するまでタイルをタイルテーブルエディタで編集したりバックアップを作成して
次のタイルセットのタイルテーブルの上書きを監視する方法を知っておく必要があります。
また、右側にあるスクロールを動かしていくと一番右下の端のタイルが最後になります。
※
Allow Clipboard Selection チェックボックス.
新しく実装された機能ですが、検証中です。
▲
∧
Palette Editor
∨
Special Palettes, Samus Palettes, Palette Editor, Palette Chooser, Palette
Options
![[IMG_013.png: palette editor]](./images/IMG_013.png "Palette Editor")
1.
"Palette" ドロップダウンメニュー.
ROM内の位置を知る必要なしに、パレットセレクタで編集するためにパレットをすぐにロードします。
デフォルトの選択は"I'm A Genius"です。これは、右側の"Address"および"length"フィールドを編集できるようにするものです。
I'm A Genius以外の別のエントリを選ぶと、そのパレットのアドレスとバンクが表示されますが、これは編集できません。
このドロップダウンメニューの内容は、関連付けられているテキストファイルを変更することで編集できます。
../SMILE RF/Files/Data/palette_entries.txt - 変更を有効にするには、RFを閉じてから再度開く必要があります。
2.
"Address" "#".
PCアドレスと既知のパレットの長さを入力すると、そのパレットはPalette Chooserで編集できるようになります。
詳しくは、パレットロケーションを見てみてください。
3.
現在選択されているパレット行.
チェックされたボタンのとなりのパレット行は、コピーボタンをクリックすることによってコピーされます。
別のボタンをチェックして"Past"をクリックすると、そのパレット行がコピーしたもので上書きされます。
4.
"Palette Chooser" (特殊パレットエディタ).
このパレットエディタは、タイルセットエディタにあるものと同じように機能します。
色をクリックしてから、RGBスライダを使用して色を変更します。
5.
"Suit" ドロップダウンメニュー.
これらの各スーツオプションには、独自の一連の条件オプションがあります。
6.
"Condition" ドロップダウンメニュー..
これらのオプションの1つを選択すると、その特定のインスタンス用のパレットがPalette Chooserで編集できるようになります。
7.
パレットプレビュー.
RGBスライダを動かすとリアルタイムに変化します。
8.
RGB (red/green/blue) ボタン.
パレットチューザの色の上に値をドラッグ&ドロップできるボタンとして使用できます。
9.
RGB (red/green/blue) スライダー.
これらを使って、現在選択されているパレットチューザの色を編集します。
10.
"Copy" "Paste" "Import" "Export" "Save ROM" ボタン.
"Copy"
現在選択されているパレット行をコピーします。
"Paste"
新しく選択したパレット行は、コピーした行で上書きされます。
一度に複数の行をコピーまたは貼り付けることはできません。
"Export"
現在RFで開いているSuper Metroid ROMと同じフォルダにパレットファイルを作成します。
"Address"と"#"の値にちなんで名付けられたファイル名で作成します。
"Preferences -> Palette Format"メニューで現在選択している内容によって作成する形式が異なります。
"Import"
パレットセレクタにロードするファイルを選択できます。
11.
RGB fading sliders.
Heat Glowのように、多くの行を含む特定のサムスコンディションパレットに役立ちます。
スクリーンショットのもう一方のRGBスライダは、左端までスクロールした場合にのみ00を表示します。
一方、これらのRGBフェージングスライダは、スクローラが中央にある場合にのみ00を表示します。
これにより、フェードアウトボタンまたはヒートグローボタンをクリックすると、パレットの選択の色の行が減ります。
12.
Fade Out, Heat Glow and Transition buttons.
"Fade Out":
上から順に、下方向に移動する行ごとに、RGBスライダの値を色の選択に表示されている通り追加します。
"Heat Glow":
上から順に、下方向に移動する行ごとに、RGBスライダの値を色の選択に表示されている通り追加します。
一番上の行から始めて真ん中の行で終わり、それから一番下の行まで同じ量を引きます。
"Transition":
上の色の行から下の色の行に向かって滑らかなトランジションを作成します。
13.
"Animated Palette" チェックボックス.
チェックされている間、色の選択の行は一定の速度で循環し色の行がどのように一緒に遷移するかのプレビューを表示します。
14.
"Animated Palette" scroller.
アニメーションパレットプレビューチェックボックスの回転速度を調整します。
15.
"Palette Line Size" "Palette Offset" スクローラー.
Palette Line Size:
色の選択の水平方向の表示色数
Palette Offset:
各パレット行の終わりにあるバイトをスキップできます。
長さが16バイト次に2バイトのデータ次に別の16バイトのパレットさらに別の2バイトのデータのパレットがある場合オフセットを2に設定します。
これは、各パレットの後でそれらの2バイトのデータをスキップします。
▲
∧ Tile Table
∨
![[IMG_014.png: tile table]](./images/IMG_014.png "Tile Table")
1.
レベルエディタで使用するために現在選択されているタイル.
右クリックしてドラッグし、最大16 x 16までの複数のタイルを選択します。
2.
"Tile Table Defaults" メニュー.
このメニューを表示するには、タイルテーブルのタイルをダブルクリックします。
選択した設定は、ダブルクリックしたタイルにのみ適用されます。
このメニューはSMILE RF内だけの設定で、ROMに変更を加えたりしません。
3.
左か右をクリックした時の既定のタイル.
その特定のタイルの既定の動作を選択するには、小さなスクローラを操作します。
各タイルには左か右の2つのデフォルトの動作を設定できます。
選択するときにタイルをマウスなどで左か右でクリックすることによって決定されます。
4.
左か右をクリックした時の既定のBTS番号.
BTS $ 00が既定で設定されていますが、お好みの数値に変更できます。
5.
"Save" "Cancel" ボタン.
既定のタイルやBTS番号を設定した情報を保存もしくは、取り消します。
このメニューはSMILE RF内だけの設定で、ROMに変更を加えたりしません。
▲
∧ Message Box Editor
∨
![[IMG_015.png: message box editor]](./images/IMG_015.png "Message Box Editor")
1.
Message box editor / preview.
使用可能な編集スペースは、開いているメッセージボックスの種類に応じてサイズが決まります。
2.
編集用に現在選択されているメッセージボックス.
このリストのエントリは上のスペースで編集のためにロードされます。
3.
現在選択されているメッセージボックスのタイルのクローズアッププレビュー.
メイン編集領域またはメッセージボックスのタイルテーブルのいずれかでタイルを右クリックして選択します。
選択したタイルを配置するには、エディタ内の任意の場所を左クリックします。
4.
マウスカーソルの周りの3×3領域のクローズアップ.
5.
使用するパレットライン.
このドロップダウンメニューから選択すると、メッセージボックスのタイルテーブルのパレットが変わります。
6.
"H-Flip" "V-Flip" チェックボックス.
現在選択されているメッセージボックスのタイルを水平または垂直に反転します。
7.
Message box tile table.
これらのグラフィックは [ $9A:B200 ]( [ PC:D3200 ] )で保存されています。
8.
Save and reload message box edits.
"Save Msg":
現在選択しているメッセージボックスに加えた変更を保存します。
"Load Msg":
メッセージボックスエディタを開いた後、または最後に"Save Msg"をクリックした後に行った編集を元に戻します。
▲
∧ Mode 7 Scene Editor
∨
![[IMG_016.png: mode 7 scene editor]](./images/IMG_016.png "Mode 7 Scene Editor")
1.
モード7編集エリア.
右クリックしてタイルを選択し、左クリックして配置します。
2.
現在開いているモード7画面.
このドロップダウンメニューの内容は編集できません。
3.
"Import GFX" "Export GFX" ボタン.
現在開いているモード7画面で使用される.GFXファイルをインポートまたはエクスポートします。
4.
現在選択されているモード7のタイル.
モード7編集エリアまたはモード7タイル表のどちらかで右クリックした最後のタイルがここに表示されます。
5.
マウスカーソルの周りの3×3領域のクローズアップ.
6.
モード7のタイルテーブル.
右クリックしてここからタイルを選択し、左クリックでメイン編集エリアに配置します。
7.
"Save Mode 7 Tilemap" ボタン.
変更を加えた情報を保存します。
▲
∧
SMILE RF Hotkey list
Keyboard shortcuts to make life easier
All windows:
- Tab - Cycle through currently opened editor
windows
- F1 - Layer 1
- F2 - Layer 2
- F3 - BTS
- F4 - Gridlines/scrolls
- F5 - PLMs
- F6 - Enemies
- F7 - Show all (F1-F6)
- F8 - Hide all (F1-F6)
- F9 - Unused
- F10 - Unused and never will be used.
- Shift + Esc - Move main SMILE RF window to 0,0
- Esc (hold + run SMILE RF.exe)
- Unload previous ROM, all editors hidden
- Ctrl + F1 - Hide/unhide Level Editor
- Ctrl + F2 - Hide/unhide Tile Table
- Ctrl + F3 - Hide/unhide Map Editor
- Ctrl + F4 - Hide/unhide FX Editor
- Ctrl + F5 - Hide/unhide Tileset Editor
- Ctrl + F6 - Hide/unhide Palette Editor
- Ctrl + F7 - Hide/unhide Task Log
Level Editor:
- Ctrl + Z - Undo (max 32)
- Ctrl + Y - Redo (max 32)
- Ctrl + E - Quickmet
- Ctrl + E (On Door) - Go to next room
- Shift + Ctrl + E (On Door) - Force open room,
temporarily add to list, doesn't alter mdb.txt
- F11 - Quick BTS A
- F12 - Quick BTS B
- 0-9, A-F - Quick BTS values
- Ctrl + Left click + drag - auto-place H-Copy and
V-Copy BTS
- Ctrl + D - Door Editor
- Ctrl + C - Clone Door
- Ctrl + L - Load Door
- Ctrl + S - Quick Save
- Shift - Show Liquid
- = - Copy/apply BTS
- Q - Metroid buddy options
- Home - Next tilesize up
- End - Next tilesize down
- PgUp - Next brightness up
- PgDn - Next brightness down
- Arrow Keys - Quickly flip tiles
- `(hold) - Show tile info in
"Level Editor" window title
- Mouse wheel click + drag - Scroll through room
- Ctrl (hold) + drag enemy - Reverse current "Snap
Enemies to Grid" setting
- Alt (hold) + drag possessor enemy - Turn off
"Move Possessors Together" setting
Tile Table:
- Home - Next tilesize up
- End - Next tilesize down
- PgUp - Next brightness up
- PgDn - Next brightness down
Tileset Editor:
- C - Copy tile in tiletable
- V - Paste tile in tiletable
- S - Save tiletable
Map Editor:
- M (click or hold) - Set room's X/Y position on
map
- H - Toggle hidden/revealed tile
- Arrow keys - Quickly flip tiles
- E - Load room that mouse
cursor is currently on
▲
∧ PART 2: CREATING A ROOM ∨
Instead of picking a room and editing that, we're going to make
a totally new, complex room from scratch and connect it in with the main game.
This guide assumes you've never touched SMILE RF or a hex editor until right
now, and that you know nothing about ROM hacking.
Depending on your monitor's resolution and general preferences, your setup
will probably look a bit different from mine, since SMILE RF is made up of
several individual windows that you can move around.
Here
is how I usually have mine arranged, with "Preferences > Auto Focus Windows"
enabled. The FX Editor and Tile Table are nice to have open like this, but only
the Level Editor is really needed. Here are some of SMILE RF's most basic
functions for editing rooms:
![[IMG_018.png: level data clipboard]](./images/IMG_018.png "Level editor clipboard")
Now, let's start creating that new room, and learning what a room actually
is
(hint: mostly just a bunch of pointers). You'll also learn some basic hex
editing, which alone opens up infinite options for your hack that SMILE RF can't
do. I'll do my best to over-explain everything and drive the point home with
lots of pictures.
1.
Download and install a hex editor.
I use
HxD (mirror download
here), and it's what you'll see in these screenshots, but
XVI32 (mirror)
is another good option because it's a single file that you don't have to
install. The instructions I give for hex editing should be easy enough to figure
out if you use a hex editor besides HxD while following this guide. Mostly,
you'll be using the "Goto" function to go to specific PC addresses ("Offsets")
in the ROM, and then editing some of the data there.
There's also
this guide that explains basic hex editing for Super Metroid much more
thoroughly.
Once you've gotten your hex editor downloaded, open the hex editor, and then
open your Super Metroid .SMC file in it (I called my ROM "rftut.SMC" as in 'RF
tutorial'). It should look about like this:
![[IMG_019.png: Super Metroid in HxD]](./images/IMG_019.png "HxD with Super Metroid open")
2.
Know what you're looking at.
Before we start making any edits to anything, there are some things to learn
first so you're not just blindly following steps without knowing why. Now that
you've got the ROM open in HxD, let's go back over to SMILE for a second and
look at the neon green drop-down room list:
![[IMG_020.png: room list]](./images/IMG_020.png "SMILE RF's room list")
You might have already wondered why the entries in this list are 5-digit
numbers/letters instead of being simply 001, 002, or something else. These list
entries are actually the PC addresses/offsets of each room header, which is
where that particular room's main data starts. This means that the data for the
very first room starts at 791F8. Now, go back over to HxD.
In HxD, click "Search > Goto..." and you'll be given a little pop-up window.
You can also bring this window up by using the Ctrl+G hotkey. Check the "hex"
and "begin" buttons, enter 791F8 as the offset, and then click OK:
![[IMG_021.png HxD goto]](./images/IMG_021.png "HxD's Goto window")
![[IMG_022.png: room 791F8 in HxD]](./images/IMG_022.png "Offset 791F8")
Underlined red: the blinking |, which is your current
location. Typing anything (0-9, A-F) will start overwriting data at this spot,
so don't do it. We're just here to look. If you don't see the blinking |
right away, scroll up or down a little bit until you find it.
Underlined green: notice that the underlined 791F and 08 together make up
791F8 (the first entry in SMILE RF's room list), and how that the blinking
| is directly to the right of 791F, and directly underneath 08. This is
a reliable way to find your way around while editing hex so that you don't have
to use Goto for nearby addresses.
Underlined pink: current PC address/offset. If you want, use your keyboard's
arrow keys to move the blinking | around and watch how the
address shown here changes to reflect its position.
Scribbled over in yellow: hex data being read as text. You can
hide this by clicking "View > Visible Columns > Hex" if you want, since it's not
required (OPTIONAL EASTER EGG: go to offset FF00 and look at the text column to
view a hidden Super Metroid special thanks credit).
And with that, you now mostly know how to use a hex editor!
3.
Counting in hexadecimal.
This is really easy to understand, and it's required knowledge. The point of
hexadecimal is being able to count up to 16 using a single digit. All hex does
is add the letters A-F after 9. Here's what counting looks like normally
(decimal, which is base 10) versus hexadecimal, which is base 16:
DECIMAL = 0 1 2 3
4 5 6 7 8 9 10 11 12 13 14 15 16 17 18 19 20 21 22 23 24 25 26 27 28 29 30
31
HEX = 0 1 2 3 4 5 6 7 8 9 A B
C D E F 10 11 12 13 14 15 16 17 18 19 1A 1B 1C 1D 1E 1F
You can use your computer's calculator to convert numbers between hex/decimal
easily. All values in the game, whether they are measurements of distance or
time, are counted in hex.
4.
Copying a room to edit.
It's time to finally make your first edit to the ROM with HxD. We're gonna copy
& paste a chunk of bytes, then explain what every byte or set of bytes in the
chunk does. The room we're gonna copy is 792B3, which is one of the acid
hallways in Crateria. Take a look at the room list again real quick:
![[IMG_023.png: room list again]](./images/IMG_023.png "SMILE RF's room list")
Notice that the next entry below it is 792FD. Got it? Good.
Now in HxD, Goto offset 792B3 and select/highlight the bytes exactly as shown
here in dark blue:
![[IMG_024.png: copied room header]](./images/IMG_024.png "Room 792B3's highlighted header")
Underlined red: address 792B3
Underlined green: address 792FD
Underlined pink: "Block" tells you the start and end address of the bytes you
currently have selected; notice it only goes up to 792FC, since the next room is
792FD. "Length" tells you how many bytes are currently selected/highlighted
blue. In the screenshot it's 4A, which is 74 in decimal.
Right-click on these selected bytes and click "Copy" (or press Ctrl+C). This
copies the bytes to your clipboard like any other text. Start scrolling down
until you find nothing but a bunch of FF FF FF FF bytes, which is what free
space in the ROM looks like. In an unedited Super Metroid ROM, the first line of
free space below where we copied is at offset 7E9A0, so go ahead Goto that
address. At 7E9A0, right-click and select "Paste Write" (or use the Ctrl+B
hotkey). NEVER use "Paste Insert" or Ctrl+V to paste bytes in HxD. This
kills the ROM.
Specifically, it alters the filesize of the ROM by inserting completely new
data and mis-aligning everything else below it. Not good. If you accidentally
press Ctrl+V instead of Ctrl+B though, don't worry, HxD will give you a warning
pop-up.
This is what your pasted data should look like now:
![[IMG_025.png: pasted room header]](./images/IMG_025.png "Pasted room header at 7E9A0")
Click "File > Save" (or press Ctrl+S), and the red bytes will change back to
black once saved.
HxD CRASH WARNING: there is a small chance of causing SMILE
to crash (close itself without warning), which can happen if you have unsaved
edits (shown as red bytes) made in HxD, and then try to make edits with SMILE or
run QuickMet. You'll need to save the ROM with HxD first before using SMILE
again (or close & re-open without saving). HxD says *Modified* at the very
bottom-right of the window if there unsaved edits made, but it's not completely
reliable. Making an edit, then using Undo will make the *Modified* notice
disappear, but still cause SMILE to crash.
This potential crash is caused by a feature in HxD that auto-updates the
displayed hex data if changes are made to the ROM by other programs. Other hex
editors that don't auto-update (such as XVI32) will not have this crash risk.
The main symptom of this error is every single room and tileset in SMILE
appearing totally blacked out. If this happens to you, close and re-open the ROM
with HxD, then refresh the room with SMILE to fix it. Saving the ROM with HxD
will also work to fix this error, but you shouldn't. You don't wanna save some
accidental or forgotten edit that causes weird and unexpected bugs later on down
the road, do you? Never save without knowing exactly what you've edited. You can
crash the whole game by getting just a single byte wrong. It's intense.
ABOUT DOLLAR SIGNS: when a number is counted in hex, it
is supposed to have a dollar sign in front of it, while decimal numbers should
obviously never use the dollar sign. However, you should always assume that
any numbers that people throw around while discussing Super Metroid hacking are
counted in hex, even without the dollar sign.
ABOUT OFFSET PREFIXES: some people choose to prefix
offsets with "0x" or extra zeroes in their documentation, or when they give
information directly to others (e.g., saying 0x7E9A0, 0x07E9A0, or 0007E9A0
instead of just 7E9A0). This is an intended way of doing it, but as with
using $ for numbers counted in hex, it becomes assumed over time, and so people
usually won't bother with writing it out.
5.
Add your copied room to SMILE's room
list.
You might already know where this is going. Your copied room was pasted at
7E9A0, so now we have to make 7E9A0 an option in SMILE's room list.
In your SMILE RF folder, browse to \Files\Data and open up the
mdb.txt file that's in there. The top lines of the file will look like this:
'Crateria'
791F8
792B3
792FD
etc...
Looks familiar, right? The contents of SMILE's room list is
determined by what's in this text file. So, all you'll need to do here is add
7E9A0 to the list. It can be anywhere you want, but I'm gonna put it at the very
top since it can be moved later.
'Crateria'
7E9A0 <--
791F8
792B3
792FD
etc...
With that done, save mdb.txt, then close and re-open SMILE (or
just re-open the ROM). Now check out the room list. Success!
![[IMG_026.png: updated room list]](./images/IMG_026.png "SMILE RF's room list with 7E9A0 added")
That's that. You've made a total copy of room 792B3. Right now, any edits you
make to one room will affect the other, which we'll fix soon. This is because
rooms 792B3 and 7E9A0 share all of the same pointers. More on those later.
Before that, we still need to go over those bytes that we pasted earlier.
6.
Room header format.
It's important to know that in this example, it's not the values themselves
that matter, because those will mostly be different for each room, but their
order. All room headers must follow the same order, starting with the room
index, and ending with the door pointer. The length of a room header can vary,
depending on how many doors and extra room states it has. I chose room 792B3
because it has one extra room state. The purpose of room states is making the
room change after a certain event elsewhere is triggered, such as killing a boss
or collecting a certain item. Room states are what make the landing site rainy
at the start of the game, but later have different music and no rain.
These are the hex bytes for room 792B3 that you copy/pasted: 01 00 12 02 05
01 70 A0 00 F9 92 12 E6 00 DF 92 E6 E5 E8 D6 C2 00 00 00 E0 80 7A 84 A1 80 C1 C1
00 00 00 00 00 00 58 80 99 B8 D3 91 E8 D6 C2 00 09 05 E0 80 7A 84 A1 80 C1 C1 00
00 00 00 00 00 58 80 99 B8 D3 91 46 89 52 89
Now, here are those same exact bytes, arranged vertically and
labeled:
THIS COLOR = required values (default room state, "Standard 1")
THIS COLOR = optional values (extra room state, "Events 1")

01        <-- Room index
00        <-- Room area
12        <-- X on map
02        <-- Y on map
05        <-- Width of room
01        <-- Height of room
70        <-- Up scroller value
A0        <-- Down scroller value
00        <-- Special Graphics Bitflag
F9 92     <-- Door Out pointer

12 E6     <-- Events 1 pointer
00        <-- Event value to trigger Events 1 room state
DF 92     <-- Pointer to Events 1's room pointers

E6 E5     <-- Standard 1 pointer
E8 D6 C2  <-- Level data pointer for Standard 1 room state
00        <-- Tileset
00        <-- Song Set
00        <-- Play Index
E0 80     <-- FX pointer
7A 84     <-- Enemy Set pointer
A1 80     <-- Enemy GFX pointer
C1 C1     <-- Background X/Y scrolling
00 00     <-- Room Scrolls pointer
00 00     <-- Unused pointer
00 00     <-- Main ASM pointer
58 80     <-- PLM Set pointer
99 B8     <-- Background pointer
D3 91     <-- Setup ASM pointer

E8 D6 C2  <-- Level data pointer for Events 1 room state.
00        <-- Tileset
09        <-- Song Set
05        <-- Play Index
E0 80     <-- FX pointer
7A 84     <-- Enemy Set pointer
A1 80     <-- Enemy GFX pointer
C1 C1     <-- Background X/Y scrolling
00 00     <-- Room Scrolls pointer
00 00     <-- Unused pointer
00 00     <-- Main ASM pointer
58 80     <-- PLM Set pointer
99 B8     <-- Background pointer
D3 91     <-- Setup ASM pointer

46 89     <-- Pointer to door data in bank $83 (door $00).
52 89     <-- Pointer to door data in bank $83 (door $01).
Here are those hex bytes yet again, but this time with all of
the optional blue bytes taken out: 01 00 12 02 05 01 70 A0 00 F9 92 E6 E5 E8 D6
C2 00 00 00 E0 80 7A 84 A1 80 C1 C1 00 00 00 00 00 00 58 80 99 B8 D3 91 46 89 52
89 - this would give you a version of room 792B3 with no extra Events 1 state,
only Standard 1. All rooms in Super Metroid must have a Standard 1 state.
If this room header still doesn't make sense to you, look at SMILE RF's Room
MDB tab pictured below. Specifically, the hex values that are in all of the
editable text fields under "Room Header" and "Pointers",
and how they match up with the values in the room header data above:
![[IMG_027.png: room header in SMILE RF]](./images/IMG_027.png "SMILE RF's Room MDB tab")
The Room MDB tab's main purpose is to edit the room header. Nice. The
pointers are also all there.
If you're also confused about room states, don't worry, those haven't been
fully explained yet either (see
events). You can select "Events 1" or "Standard 1" from the neon-green menu
to see that Events 1 simply switches to a different set of pointers, which is
everything in the pale green boxes underneath "Pointers". Ingame, this alternate
pointer set can activate whenever you want it to.
7.
Pointers, pointers, pointers...
Pointers are everywhere in this game. There are sometimes pointers to
pointers to pointers, but that's only for more advanced stuff that we won't be
doing in this guide. So, what is a pointer? It's exactly what it sounds like. A
pointer points to data elsewhere. The value that you enter for a pointer is
actually a LoROM address, which is converted to a PC address that you can Goto
with HxD.
You could also think of a pointer as a redirect. In the screenshot above, the
Level Data pointer is C2D6E8. You can't contain all of the room's tiling and BTS
data in the room header, because that can take easily thousands of bytes, so
instead you stick all of that raw data somewhere else in the ROM, then point to
the address where you pasted it, like we did earlier when we copied the data at
792B3 and pasted it at 7E9A0.
The Level Data pointer C2D6E8 is a LoROM address that converts to a PC
address of 2156E8. Click on the white text field for it in SMILE, and you'll see
the conversion appear in the "LoROM" and "PC" boxes underneath all of the
pointers for yourself. You can type addresses in these boxes to convert them as
well (NOTE: for the PC text field, to convert addresses shorter than 6 digits,
you'll will need to add extra zeroes to make it 6 digits long; example: 07E9A0
or 00FF00). If you were to Goto 2156E8 in your hex editor, you'd find compressed
level data that would be pointless to modify with a hex editor, because SMILE
automatically does all of that as you build rooms.
IMPORTANT: offsets that make a pointer of 7FFF or lower must
have 8000 added. Example: LoROM address $B4:F4C0 converts to PC address 1A74C0,
but 74C0 wouldn't work as an Enemy Set pointer, so you'd add 8000 to make it
F4C0.
Here are some common pointers. Most of these are covered
throughout part 2:
The method of repointing is mostly the same among the all of
different pointers (and the
concept itself is pretty simple). It also doesn't matter at all which order
you repoint room data in.
REALLY REALLY IMPORTANT INFORMATION ABOUT BANKS
Pretty
soon, you will be seeing a lot of mention of banks in this guide. If you've been
reading this guide in order, you should already know how to count in
hexadecimal, and how to convert between PC/LoROM addresses. That's all you need
to know to understand banks.
Super Metroid is divided into banks, and every bank is exactly $8000 bytes in
size (32,768 bytes if you're counting in decimal). Super Metroid's ROM type is
LoROM, so this means that its maximum bank range is $80-FF. By default, Super
Metroid only uses banks $80-DF, but banks $E0-FF can be easily added in with
SMILE and used for level data, tileset data, graphics, and other stuff, since
the original game never needed to use that extra data. Because the first bank is
$80, it occupies LoROM addresses $80:0000-$80:7FFF. Bank $81 then begins at
LoROM address $81:8000 and ends at $81:FFFF. Bank $82 is LoROM addresses
$82:0000-$82:7FFF, and so on.
Example: earlier we went to offset 791F8 in a hex editor, which is the room
with Samus's ship in it. PC address 791F8 converts to LoROM address $8F:91F8,
meaning that the room header is located in bank $8F.
LoROM addresses will always be six digits long and begin with 80-FF, while PC
addresses can be between one and six digits long. There are also RAM addresses,
but those only come into play when you're programming assembly, so they won't
really be mentioned much in this guide. Any time that there is an address/data
given to you (hex edits or whatever), it will be either a LoROM or PC address.
This guide mostly uses PC addresses for simplicity, since that's what HxD and
TLP need for their Goto functions.
Notice that in SMILE RF's mint-green pointers list, that LoROM addresses are
shown. Usually, a pointer is just the last 4 digits of a LoROM address. Clicking
on one of the pointers will show its PC address counterpart in the box below the
pointer list.
Here's a quick list of every bank and its address range, and then
a brief description of each bank's contents. Thanks PJBoy and GF_Kennon for most
of the info below:
Bank $##        LoROM address          PC address        Bank description
Bank $80      $80:0000-$80:7FFF      $0-7FFF             Game setup, intros, save station data, other important stuff.
Bank $81      $81:8000-$81:FFFF      $8000-FFFF          Map data, save data, sprite drawing routines, etc.
Bank $82      $82:0000-$82:7FFF      $10000-17FFF        Load areas, pause data, game states, HDMA, demo setup, Samus dying, room setup, etc.
Bank $83      $83:8000-$83:FFFF      $18000-1FFFF        FX Data, door data, FX 'Animated Tiles' and 'Palette Setup' setup.
Bank $84      $84:0000-$84:7FFF      $20000-27FFF        PLM setup, PLM data, probably other stuff.
Bank $85      $85:8000-$85:FFFF      $28000-2FFFF        Message boxes from PLMs and Samus's ship.
Bank $86      $86:0000-$86:7FFF      $30000-37FFF        Enemy projectiles, enemy drops setup.
Bank $87      $87:8000-$87:FFFF      $38000-3FFFF        FX graphics, golden boss statue graphics.
Bank $88      $88:0000-$88:7FFF      $40000-47FFF        DMA/HDMA stuff, power bomb explosions, Crateria scrolling sky, etc.
Bank $89      $89:8000-$89:FFFF      $48000-4FFFF        Item graphics, palette blends, FX color math stuff.
Bank $8A      $8A:0000-$8A:7FFF      $50000-57FFF        FX tilemaps, free space.
Bank $8B      $8B:8000-$8B:FFFF      $58000-5FFFF        Screen fades, OAM stuff, title setup, ending and credits stuff, etc.
Bank $8C      $8C:0000-$8C:7FFF      $60000-67FFF        Intro & menu tilemaps, ending tilemaps, etc.
Bank $8D      $8D:8000-$8D:FFFF      $68000-6FFFF        FX palettes, cheat for damage in heated rooms, etc.
Bank $8E      $8E:0000-$8E:7FFF      $70000-77FFF        Main menu palettes and graphics, etc.
Bank $8F      $8F:8000-$8F:FFFF      $78000-7FFFF        Room headers, PLM Set data, Background data, Room Scrolls data, etc.

Bank $90      $90:0000-$90:7FFF      $80000-87FFF        Samus's animations/movement/weapons, shinesparking, minimap, hitbox collision, etc.
Bank $91      $91:8000-$91:FFFF      $88000-8FFFF        Samus's movement transitions/frame delays, other Samus data, demo inputs, etc.
Bank $92      $92:0000-$92:7FFF      $90000-97FFF        Animation pointer tables, animation data, tilemaps, etc.
Bank $93      $93:8000-$93:FFFF      $98000-9FFFF        Samus's beam animation tilemaps.
Bank $94      $94:0000-$94:7FFF      $A0000-A7FFF        BTS collision, start of "Special GFX" in SMILE.
Bank $95      $95:8000-$95:FFFF      $A8000-AFFFF        "Special GFX" in SMILE.
Bank $96      $96:0000-$96:7FFF      $B0000-B7FFF        "Special GFX" in SMILE.
Bank $97      $97:8000-$97:FFFF      $B8000-BFFFF        "Special GFX" in SMILE.
Bank $98      $98:0000-$98:7FFF      $C0000-C7FFF        "Special GFX" in SMILE.
Bank $99      $99:8000-$99:FFFF      $C8000-CFFFF        "Special GFX" in SMILE.
Bank $9A      $9A:0000-$9A:7FFF      $D0000-D7FFF        Grapple graphics, layer FX graphics, beam graphics, common sprite graphics, etc.
Bank $9B      $9B:8000-$9B:FFFF      $D8000-DFFFF        Samus's graphics.
Bank $9C      $9C:0000-$9C:7FFF      $E0000-E7FFF        Samus's graphics.
Bank $9D      $9D:8000-$9D:FFFF      $E8000-EFFFF        Samus's graphics.
Bank $9E      $9E:0000-$9E:7FFF      $F0000-F7FFF        Samus's graphics.
Bank $9F      $9F:8000-$9F:FFFF      $F8000-FFFFF        Samus's graphics.

Bank $A0      $A0:0000-$A0:7FFF      $100000-107FFF      Lots of common enemy routines, enemy header data, free space.
Bank $A1      $A1:8000-$A1:FFFF      $108000-10FFFF      Enemy GFX pointer data, free space.
Bank $A2      $A2:0000-$A2:7FFF      $110000-117FFF      Enemy AI.
Bank $A3      $A3:8000-$A3:FFFF      $118000-11FFFF      Enemy AI.
Bank $A4      $A4:8000-$A4:7FFF      $120000-127FFF      Enemy AI.
Bank $A5      $A5:8000-$A5:FFFF      $128000-12FFFF      Enemy AI.
Bank $A6      $A6:8000-$A6:7FFF      $130000-137FFF      Enemy AI.
Bank $A7      $A7:8000-$A7:FFFF      $138000-13FFFF      Enemy AI.
Bank $A8      $A8:8000-$A8:7FFF      $140000-147FFF      Enemy AI.
Bank $A9      $A9:8000-$A9:FFFF      $148000-14FFFF      Enemy AI.
Bank $AA      $AA:8000-$AA:7FFF      $150000-157FFF      Enemy AI.
Bank $AB      $AB:8000-$AB:FFFF      $158000-15FFFF      Enemy AI.
Bank $AC      $AC:8000-$AC:7FFF      $160000-167FFF      Enemy graphics.
Bank $AD      $AD:8000-$AD:FFFF      $168000-16FFFF      Enemy graphics.
Bank $AE      $AE:8000-$AE:7FFF      $170000-177FFF      Enemy graphics.
Bank $AF      $AF:0000-$AF:FFFF      $178000-17FFFF      Enemy graphics.

Bank $B0      $B0:0000-$B0:7FFF      $180000-187FFF      Enemy graphics.
Bank $B1      $B1:8000-$B1:FFFF      $188000-18FFFF      Enemy graphics.
Bank $B2      $B2:0000-$B2:7FFF      $190000-197FFF      Space pirate hitboxes, also tilemaps(?), etc.
Bank $B3      $B3:8000-$B3:FFFF      $198000-19FFFF      Miscellaneous enemy/boss stuff (i.e, Botwoon's destroyed wall), etc.
Bank $B4      $B4:0000-$B4:7FFF      $1A0000-1A7FFF      Enemy Set pointer data, debug stuff, enemy instructions/weaknesses/drops.
Bank $B5      $B5:8000-$B5:FFFF      $1A8000-1AFFFF      Area map tilemaps, free space.
Bank $B6      $B6:0000-$B6:7FFF      $1B0000-1B7FFF      Graphics and tilemaps for the equipment/map/title screens.
Bank $B7      $B7:8000-$B7:FFFF      $1B8000-1BFFFF      Enemy graphics (Tourian enemies, Botwoon, etc.)
Bank $B8      $B8:0000-$B8:7FFF      $1C0000-1C7FFF      Free space (unused bank).
Bank $B9      $B9:8000-$B9:FFFF      $1C8000-1CFFFF      CRE graphics/table, Background pointer tilemaps.
Bank $BA      $BA:0000-$BA:7FFF      $1D0000-1D7FFF      Background pointer tilemaps, tileset graphics.
Bank $BB      $BB:8000-$BB:FFFF      $1D8000-1DFFFF      Tileset graphics.
Bank $BC      $BC:0000-$BC:7FFF      $1E0000-1E7FFF      Tileset graphics.
Bank $BD      $BD:8000-$BD:FFFF      $1E8000-1EFFFF      Tileset graphics.
Bank $BE      $BE:0000-$BE:7FFF      $1F0000-1F7FFF      Tileset graphics.
Bank $BF      $BF:8000-$BF:FFFF      $1F8000-1FFFFF      Tileset graphics.

Bank $C0      $C0:0000-$C0:7FFF      $200000-207FFF      Tileset graphics.
Bank $C1      $C1:8000-$C1:FFFF      $208000-20FFFF      Tileset graphics, tileset tables, etc.
Bank $C2      $C2:0000-$C2:7FFF      $210000-217FFF      Tileset tables, tileset palettes, level data.
Bank $C3      $C3:8000-$C3:FFFF      $218000-21FFFF      Level data.
Bank $C4      $C4:0000-$C4:7FFF      $220000-227FFF      Level data.
Bank $C5      $C5:8000-$C5:FFFF      $228000-22FFFF      Level data.
Bank $C6      $C6:0000-$C6:7FFF      $230000-237FFF      Level data.
Bank $C7      $C7:8000-$C7:FFFF      $238000-23FFFF      Level data.
Bank $C8      $C8:0000-$C8:7FFF      $240000-247FFF      Level data.
Bank $C9      $C9:8000-$C9:FFFF      $248000-24FFFF      Level data.
Bank $CA      $CA:0000-$CA:7FFF      $250000-257FFF      Level data.
Bank $CB      $CB:8000-$CB:FFFF      $258000-25FFFF      Level data.
Bank $CC      $CC:0000-$CC:7FFF      $260000-267FFF      Level data.
Bank $CD      $CD:8000-$CD:FFFF      $268000-26FFFF      Level data.
Bank $CE      $CE:0000-$CE:7FFF      $270000-277FFF      Level data.
Bank $CF      $CF:8000-$CF:FFFF      $278000-27FFFF      Music/audio setup.

Bank $D0      $D0:0000-$D0:7FFF      $280000-287FFF      Music data.
Bank $D1      $D1:8000-$D1:FFFF      $288000-28FFFF      Music data.
Bank $D2      $D2:0000-$D2:7FFF      $290000-297FFF      Music data.
Bank $D3      $D3:8000-$D3:FFFF      $298000-29FFFF      Music data.
Bank $D4      $D4:0000-$D4:7FFF      $2A0000-2A7FFF      Music data.
Bank $D5      $D5:8000-$D5:FFFF      $2A8000-2AFFFF      Music data.
Bank $D6      $D6:0000-$D6:7FFF      $2B0000-2B7FFF      Music data.
Bank $D7      $D7:8000-$D7:FFFF      $2B8000-2BFFFF      Music data.
Bank $D8      $D8:0000-$D8:7FFF      $2C0000-2C7FFF      Music data.
Bank $D9      $D9:8000-$D9:FFFF      $2C8000-2CFFFF      Music data.
Bank $DA      $DA:0000-$DA:7FFF      $2D0000-2D7FFF      Music data.
Bank $DB      $DB:8000-$DB:FFFF      $2D8000-2DFFFF      Music data.
Bank $DC      $DC:0000-$DC:7FFF      $2E0000-2E7FFF      Music data.
Bank $DD      $DD:8000-$DD:FFFF      $2E8000-2EFFFF      Music data.
Bank $DE      $DE:0000-$DE:7FFF      $2F0000-2F7FFF      Music data.
Bank $DF      $DF:8000-$DF:FFFF      $2F8000-2FFFFF      Unused songs, note length table, ASDR settings, tracker, etc.

Banks $E0-FF must be added by SMILE ("ROM" > "Expand ROM") before they can be seen in a hex editor.

Bank $E0      $E0:0000-$E0:7FFF      $300000-307FFF      Free space
Bank $E1      $E1:8000-$E1:FFFF      $308000-30FFFF      Free space
Bank $E2      $E2:0000-$E2:7FFF      $310000-317FFF      Free space
Bank $E3      $E3:8000-$E3:FFFF      $318000-31FFFF      Free space
Bank $E4      $E4:0000-$E4:7FFF      $320000-327FFF      Free space
Bank $E5      $E5:8000-$E5:FFFF      $328000-32FFFF      Free space
Bank $E6      $E6:0000-$E6:7FFF      $330000-337FFF      Free space
Bank $E7      $E7:8000-$E7:FFFF      $338000-33FFFF      Free space
Bank $E8      $E8:0000-$E8:7FFF      $340000-347FFF      Free space
Bank $E9      $E9:8000-$E9:FFFF      $348000-34FFFF      Free space
Bank $EA      $EA:0000-$EA:7FFF      $350000-357FFF      Free space
Bank $EB      $EB:8000-$EB:FFFF      $358000-35FFFF      Free space
Bank $EC      $EC:0000-$EC:7FFF      $360000-367FFF      Free space
Bank $ED      $ED:8000-$ED:FFFF      $368000-36FFFF      Free space
Bank $EE      $EE:0000-$EE:7FFF      $370000-377FFF      Free space
Bank $EF      $EF:8000-$EF:FFFF      $378000-37FFFF      Free space
Bank $F0      $F0:0000-$F0:7FFF      $380000-387FFF      Free space

Bank $F1      $F1:8000-$F1:FFFF      $388000-38FFFF      Free space
Bank $F2      $F2:0000-$F2:7FFF      $390000-397FFF      Free space
Bank $F3      $F3:8000-$F3:FFFF      $398000-39FFFF      Free space
Bank $F4      $F4:0000-$F4:7FFF      $3A0000-3A7FFF      Free space
Bank $F5      $F5:8000-$F5:FFFF      $3A8000-3AFFFF      Free space
Bank $F6      $F6:0000-$F6:7FFF      $3B0000-3B7FFF      Free space
Bank $F7      $F7:8000-$F7:FFFF      $3B8000-3BFFFF      Free space
Bank $F8      $F8:0000-$F8:7FFF      $3C0000-3C7FFF      Free space
Bank $F9      $F9:8000-$F9:FFFF      $3C8000-3CFFFF      Free space
Bank $FA      $FA:0000-$FA:7FFF      $3D0000-3D7FFF      Free space
Bank $FB      $FB:8000-$FB:FFFF      $3D8000-3DFFFF      Free space
Bank $FC      $FC:0000-$FC:7FFF      $3E0000-3E7FFF      Free space
Bank $FD      $FD:8000-$FD:FFFF      $3E8000-3EFFFF      Free space
Bank $FE      $FE:0000-$FE:7FFF      $3F0000-3F7FFF      Free space
Bank $FF      $FF:8000-$FF:FFFF      $3F8000-3FFFFF      Free space
Someday, every single byte of every bank will be documented and
understood, making it possible optimize everything and make the game run more
smoothly, fix bugs, and delete unused data.
8.
Level Data. If you've saved a
room before already, you might have seen the "Level Editor" window title display
the level data as well:
![[IMG_028.png: level data usage]](./images/IMG_028.png "Level editor's window title showing level data")
That "Compressed Size: 763 / 1244" is what you wanna be looking at. 763 =
level data usage. This is how much level data the room is currently using (this
number will change as you edit the room). 1244 = level data maximum. This is how
much level data the room is able to use at most, i.e., 1244 / 1244 is as high as
it'll possibly go before SMILE prevents you from saving as a safe-guard against
accidentally overwriting another room's data, which it does by giving you a
small pop-up. If you choose to not show the pop-up anymore after it appears,
then you can force the room to save/overwrite anyway by pressing Ctrl+S multiple
times quickly (3+).
By repointing level data, you gain full control of the level data maximum,
and you'll also be separating it from room 792B3's level data. Let's do that
next.
Take another look at the level data pointer. Specifically, its PC address,
2156E8.
Next, we're gonna go back to SMILE RF's \Files\Data folder again,
and this time open the level_entries.txt file. Yep, the level data maximum for
every room in the game is dictated by a text file, just as the room headers are
dictated by what's in mdb.txt. Also like mdb, level_entries is just a big list
of PC addresses. Near the very top, you should see 2156E8. The value directly
beneath that is what we're looking for (215BC4), because if we subtract 1 from
that, we end up with 215BC3, which is the stopping point of our room's level
data. 215BC4 is the start of room 792FD's level data, which we're not copying.
Here are the first 5 entries of level_entries.txt so far:
2142BB
2156E8
215BC4
216977
216B45
Similar to how we copied the header of room 792B3 and pasted it
at 7E9A0 to create a new header earlier, we're going to copy the level data
that's at 2156E8 and paste it somewhere else in the ROM in roughly the same way
to create new level data, then point to it. Pointers! Make your selection in HxD
until "Block" says 2156E8-215BC3 and "Length" says 4DC (note: 4DC = 1244 bytes
in decimal, which was the level data maximum). It'll be a full two pages or so
of bytes. Copy these bytes. Now, it's time to find some free space in the ROM to
paste this copied level data over. There's a nice big area of free space at
offset 273300, which is shown as a bunch of "FF" bytes, so go Goto that offset,
paste your copied bytes with right-click > Paste Write or Ctrl+B, and then save
the ROM.
See where this is going? Head back over to SMILE Type 273300 into
the "PC" box, and you'll see that it gives you a LoROM address of CEB300, which
is going to be your new Level Data pointer. We're not gonna change the pointer
just yet, though. Go back over to HxD now, and start scrolling down until the
free space ends. You'll see that the last byte of free space is at 277FFF.
Alrighty. Now look back over at level_entries.txt, and scroll to the very bottom
of it. Here are the last 5 entries so far:
272201
272823
272B31
272E3E
277FFF
Unlike mdb.txt, the contents of level_entries.txt must be
arranged by their address, or you'll get inaccurate read-outs of what the room's
level data usage/maximum is, which could cause the level data for other rooms to
be overwritten.
We can see that 277FFF is the very last entry, and that the entry
above it, 272E3E, is lower than 273300. So what to do? Add our new level data
pointer between those two addresses, then save level_entries.txt!
272201
272823
272B31
272E3E
273300 <--
277FFF
Now, back in SMILE, change the Level Data pointer from C2D6E8 to
CEB300, uncheck the "Overwrite Data" checkbox, then click the "Save Pointers"
button. If you did everything right, it won't look like anything happened at all
after you clicked Save Pointers, but if you save the room again, you'll see that
the level data usage/maximum now says "763 / 19711" instead of "763 / 1244"!
That's a huge maximum, more than you will ever need for a single room. Awesome.
Assuming you ever managed to create a room that was 19711 bytes, its level data
would end precisely at offset 277FFF.
See what's going on now? This is how you control a room's level data
maximum.
All it requires is deciding on a beginning offset and ending offset, pasting a
room's copied data at the beginning offset, and then placing those offsets next
to each other in level_entries.txt. In this case, 273300 is the beginning
offset, and 277FFF is the ending offset.
Since 19711 is way too much level data for this room to be using,
let's adjust that amount by giving it a new ending point offset, which is done
by simply inserting a new address between 273300 and 27FFFF. To further
demonstrate how this works, I'm going to set its level data maximum to exactly
1244 bytes again - remember though, that we can freely control this maximum by
changing the ending point offset to something else if the level data maximum
needs to be higher than 1244 bytes. Here's what the bottom of your
level_entries.txt file should look like now:
272201
272823
272B31
272E3E
273300
2737DC <--
277FFF
I came up with the address 2737DC by highlighting the hex bytes
starting from 273300 and stopping once the "Length" was 4DC (1244).
So, what about the ending offset 277FFF at the very bottom, which no longer
has a beginning offset associated with it? You can just leave it alone for now,
and eventually give it a beginning offset for the next room that you repoint the
level data for. If 7E9A0's level data usage never goes above 1244, then the next
room's level data pointer could be 2737DC.
Rooms 792B3 and 7E9A0 now have separate level data. Now you can edit 7E9A0's
room structure without affecting 792B3's. That's cool and all, but everything
else is still shared. Everything else. There's a lot of repointing left to do,
but from now on, the hex editing is going to be a lot simpler than copying the
room header and level data was. Surprise! Worst part's
over.
All of the other pointers deal in smaller amounts of data that are easy to
memorize, and they don't require you to edit .TXT files.
9.
Background pointer.
Points to a ready-made background that is a single screen in size. If this
pointer is set to 0000, then the room will not use a ready-made background at
all, and will instead require a custom layer 2 background, which is part of the
room's level data.
Ready-made backgrounds: each tileset has a few
ready-made backgrounds that work only with that particular tileset. These
backgrounds are limited to 1 screen in size, and so are best designed in a way
that looks good while repeating in the background as Samus travels through the
room. The advantage of using a ready-made background pointer is that the
background is loaded separately from the level data, which means that more level
data is saved overall if multiple rooms use the same background pointer. Super
Metroid shares background pointers often. The "Edit BG Data" button that's in
the Tiles & BTS tab will bring up an editor that allows you to modify any
ready-made background that's currently being pointed to by the Background
pointer.
How to use a layer 2 background in a room that doesn't
have one:
change the room's Background pointer to 0000, make certain that the Overwrite
Data checkbox is unchecked, and then click the Save Pointers button. After that,
click the "Add Layer 2" button, check the "Layer 2" checkbox in the Tiles & BTS
tab, then save the room. This will automatically uncheck the BG Data box next to
it and disable the Edit BG Data button. It also fills the whole background of
your room with the first CRE tile, which by default is the top of a yellow power
bomb door. Hide layer 1 (hotkey: F1) and erase those yellow door tiles with a
blank air tile, then design whatever background you want for that room only.
WARNING: before adding a layer 2 background, make certain that there's enough
extra level data! You may need to repoint the room's level data before you can
add a layer 2 background. Because layer 2 backgrounds are part of the room's
level data, they can be as complex as you want them to be. Most people choose
layer 2 backgrounds instead of ready-mades for this reason.
How to switch from a layer 2 background to a ready-made
background:
change the Background pointer from 0000 to the desired ready-made pointer
(there's a full list below), then uncheck the "Overwrite Data" checkbox and
click the "Save Pointers" button. After that, click the "Delete Layer 2" button,
check the "BG Data" checkbox and then save the room.
REMEMBER: background pointers from different areas/tilesets won't look right,
because the tile tables aren't arranged the same way for every tileset (e.g., a
Background pointer from a red Brinstar room won't look right if used in a
Crateria room).
OPTIONAL: you can save some space in bank $8F by deleting some ready-made
background instructions.
Here is a list them all.
Let's set this room up with a layer 2 background that can be
designed later. First, make a decent-sized selection of blank air tiles from
somewhere in the room (right click + drag):
![[IMG_029.png: level data selection]](./images/IMG_029.png "Selected air tiles in room 7E9A0")
In the Room MDB tab, change the Background pointer from B899 to 0000, then
uncheck the "Overwrite Data" checkbox and click the "Save Pointers" button.
Go over to the Tiles & BTS tab and check the "Layer 2" checkbox, then click
the "Add Layer 2" button. This fills the background with the very first CRE
tile, which by default is the upper portion of a yellow power bomb door:
![[IMG_030.png: layer 2 added to room]](./images/IMG_030.png "Room 7E9A0's background after clicking the Add Layer 2 button")
Press the F1 key (or click "Preferences > View > Layers > uncheck Layer 1")
to hide layer 1, which is the foreground layer. Now use the selection of blank
air tiles you made earlier to 'erase' all of the power bomb door pieces, until
the backround of the whole room is completely black:
![[IMG_031.png: erasing layer 2]](./images/IMG_031.png "Layer 2 default background being erased")
Once you've finished erasing all of the yellow door pieces from the
background, press F1 again to unhide layer 1, then save the room.
All that remains now is to actually design the background, which will be done
later.
10.
Decide on room size and map placement.
Open up the Map Editor window and decide where you want to place room 7E9A0.
Currently, it's just to the left of the landing site (pink arrow), but I've
decided that I want it to be to the right of it instead (pink square):
![[IMG_032.png: new room on map]](./images/IMG_032.png "Room 7E9A0's current location on the map")
I also want it to connect to three different rooms, for reasons which will
become clear later. This means that the room will need to become square shaped,
instead of being the long hallway that it currently is. To do that, we just need
to change the room's width and height. Go over to the Room MDB tab and change
the Width from $5 to $3, and the Height from $1 to $3, then save the room.
You might have noticed that this cut off the right side of the room,
including some enemies. Click "Tools > Offscreen Enemies To Screen" to bring the
enemies back into view. There is an option to do the same with PLMs as well.
Also, we don't need the current level data for anything anymore, so let's wipe
that too by clicking "Tools > Clear Room Tilemap". Now, both layers 1 and 2 are
completely blacked out.
Look back over at the map editor:
![[IMG_033.png: new room size]](./images/IMG_033.png "Room 7E9A0's new width and height")
We can see that our room is now a white square on the map. Cool. Next, hold
your keyboard's M key and move your mouse cursor to place the white square as
seen below. In the room header, it'll say X = $22 and Y = $01. Click the "Save
Map" button, and then save the room also. If you already know what you want the
room to look like, you could place the blue map tiles for it now, but we'll
worry about that later in the guide.
![[IMG_034.png: room size and location]](./images/IMG_034.png "Room 7E9A0's new size and placement")
11.
Create a basic outline/skeleton of your
room.
Select a single solid block from the tile table and draw out the room's general
shape. It might help to decide on the location of its doors first, then build
around them, which is what I'm going to do. Earlier I said I wanted room 7E9A0
to connect to three different rooms, which means it needs at least three doors.
Here is what my room skeleton is looking like so far (viewed at 8x8 level
tile size):
![[IMG_035.png: basic room shape]](./images/IMG_035.png "Room 7E9A0's basic shape so far")
OPTIONAL: here are the level data bytes for my
room skeleton in the screenshot above. You can copy/paste-write these to offset
273300 with HxD, then save the ROM. After that, reload room 7E9A0 in SMILE:
01 00 12 E9 3D 5F 80 E8 3F FF 00 F8 4F 50 D7 60 E8 57 FF
00 F8 59 5A F8 B5 60 8F 36 01 F8 4D C0 F0 5D 20 01 F0 5D 1A 01 F0 59 08 01 EA 67
5F 80 F0 3F 8A 03 DD 28 F0 3F 82 03 F0 4D 70 01 F8 23 FE F0 3D 34 01 F8 21 FE F0
3F 34 01 F8 29 60 F0 55 A8 01 F8 5F 60 C7 E2 F0 59 A6 01 F0 41 3A 01 DF FE FA E3
60 9F A4 09 F0 41 C2 09 F0 27 38 03 F0 69 0C 09 F0 25 34 01 F0 39 7E 08 F0 25 32
01 F0 37 BE 07 F0 27 30 01 F0 37 5E 07 F0 25 2E 01 D9 A2 9F 28 01 F0 25 2C 01 F8
2D 40 F8 21 20 F0 29 A8 07 F8 35 60 F8 61 40 F0 27 20 01 F8 CB 60 E7 FF 00 E7 FF
00 E4 FF 00 EB FF FF 00 FB FF FE FB FF FE FB FF FE F9 FF FE 00 00 FF FF FF FF FF
FF FF FF FF FF FF FF FF FF FF FF FF FF FF FF FF FF FF FF FF FF FF FF FF FF FF FF
FF FF FF FF FF FF FF FF FF FF FF FF FF FF FF FF FF FF FF FF FF FF FF FF FF FF FF
FF FF FF FF FF FF FF FF FF FF
12.
Decide how many doors the room will have,
then give the room its own Doors pointer.
Each door uses 12 bytes of data in bank $83, and 2 bytes of data in bank $8F.
You'll need to give room 7E9A0 its own doors, which will require a small
amount of hex editing, and some free space in bank $8F. Start by going to offset
7E9E6, which is the perfect address to use for this room's Doors pointer. The
four bytes that are already at this spot, "46 89 52 89" are pointers to both of
room 792B3's doors in bank $83, which we can replace with pointers to new doors
since we're not editing room 792B3.
Let's look at these bytes more closely. Always remember that groups of two,
three and four bytes are read in reverse-order from how you would see them in
SMILE. Those bytes at 7E9E6, seen as 46 89 and 52 89, are actually flipped
around to make up the pointers 8946 and 8952, which themselves are just part of
a LoROM address in bank $83. This gives us $83:8946 (door #00) and $83:8952
(door #01), which, if you convert them to PC addresses, gives you 18946 and
18952, which you can Goto with HxD. Let's go to 18946 and see what's there.
Knowing that each door uses 12 bytes, we can see that there are 12 bytes here
between offsets 18946 and 18952 (which is 0C bytes if you're counting in hex).
Room 792B3 only has two doors, so we can know for sure that if we selected the
12 bytes after offset 18946, along with the 12 bytes after offset 18952, these
24 bytes altogether are all we would need to select if we wanted to copy both
doors. We only need to copy one door, though:
![[IMG_036.png: door data selected]](./images/IMG_036.png "Door #00 of room 792B3 selected")
Copy these bytes (block: 18946-18951) to your clipboard, then scroll down
until you find free space. The first line of free space is 1AD70, which is where
I'm gonna paste. Since room 7E9A0 will need at least three doors, I will need to
paste the door data at least three times. You'll also need to note the offset
that each door is pasted at, which I've underlined in the next picture:
![[IMG_037.png: door data pasted]](./images/IMG_037.png "Three doors pasted starting at offset 1AD70")
Underlined green: first door ($00), pasted at offset 1AD70 (LoROM
address/pointer: $83:AD70)
Underlined pink: second door ($01), pasted at offset 1AD7C (LoROM
address/pointer: $83:AD7C)
Underlined blue: third door ($02), pasted at offset 1AD88 (LoROM
address/pointer: $83:AD88)
Remember how each byte (or set of bytes) of the room header does
its own little job setting up the room? Well, the 12-byte string of data for
each door is the same way, but not as complex, and mostly edited automatically
by SMILE. The 12 bytes of door data that you copied are F8
91 00 04 01 26 00 02 00 80 97 B9, which become a lot simpler if we lay
them out vertically:
F8 91  <-- Room ID
00     <-- Bitflag
04     <-- Direction
01     <-- Door cap X
26     <-- Door cap Y
00     <-- Screen X
02     <-- Screen Y
00 80  <-- Distance to spawn
97 B9  <-- Door ASM pointer
Room ID: the "7" at the
beginning of all room IDs is omitted here because the main door processing
code already assumes that these 2 bytes are an address bank $8F. This is the
ID of the room that the door will be leading into, NOT the room ID that the
door itself is in.
Bitflag: this value is almost always set to 00. The only
exceptions to this are doors leading into a different area, and elevators. For
entering a different area, the bitflag will always be 40 (40 = save current
area's map, then load map for different area). You'll need to change the bitflag
from 00 to 40 for any door that leads into another area to keep the map from
screwing up. Elevators must only use a bitflag of 80 or C0. 80 = Elevator is
leading into a room that's in the same area that Samus is currently in. C0 =
Elevator leads to a different area.
Direction: no door closes behind Samus: 00 = right, 01 =
left, 02 = down, 03 = up. Door closes behind Samus: 04 = right, 05 = left, 06 =
down, 07 = up.
Door cap X: horizontal position of the closing blue door cap
in the next room, counted in tiles.
Door cap Y: vertical position of the closing blue door cap
in the next room, counted in tiles.
Screen X: horizontal position, counted from the very left in
screens.
Screen Y: vertical position, counted from the very top in
screens.
Distance to spawn: left/right doors use 8000 by default. For
doors leading up, use 01C0, and for doors leading down, 0140 is good.
Door ASM pointer: 0000 by default, but can point
to custom code in bank $8F. Used sometimes to change the scroll color for
certain screens as the room loads.
With your three doors pasted to free space in bank $83 at 1AD70,
1AD7C and 1AD88, let's go back to the free space in bank $8F that we'll be using
as our new Doors pointer, which is at 7E9E6. The bytes that are already there,
46 89 52 89, are pointers to two doors as we already know, which we need to
change so that they point to the three new doors that we just pasted instead.
You'll need to know the offset of each door that you pasted, because here is
where they will need to be entered in. These are underlined in the above
screenshot in green/pink/blue. The pointers are AD70, AD7C and AD88, which will
need their byte-order reversed, leaving us with 70 AD, 7C AD, and 88 AD, which
we will enter in as a byte string of 70 AD 7C AD 88 AD 00 00. The 00 00 at the
end is required to stop the pointers from being read by the door processing
code:
![[IMG_038.png: door data pointers]](./images/IMG_038.png "New door data at Doors pointer entered")
Save the ROM with HxD, then go back over to SMILE.
In SMILE, change the Doors pointer from 92F9 to E9E6 for room 7E9A0, make
sure the "Overwrite Data" checkbox is unchecked, then click the "Save Pointers"
button.
Right click on an air tile and change it into a door tile using the selected
tile scroller, then set your cursor on that door tile and press Ctrl+D to bring
up the door editor window. In it, you should see the three doors that we pasted
in bank $83 and pointed to in bank $8F (AD70, AD7C and AD88). Also, in the 9
pale yellow text fields, you'll see the 12 door bytes that we copy/pasted
earlier:
![[IMG_039.png: opening door editor]](./images/IMG_039.png "Making a door BTS and opening the door editor")
This confirms that we've repointed the doors correctly. Close the door editor
window for now. You can also change the door tile back to air.
13.
Give your doors their graphics and BTS.
There are two ways you can do this. The first way, which is what I usually do,
is to just copy a door's graphics/BTS from another room and change its BTS
numbers if needed. The second way is to make them from scratch. Let's do it from
scratch first and learn a few things.
In the Clipboard section of SMILE RF's Tiles & BTS main window tab, check the
"Graphic Only" checkbox, then right-click + drag to select graphics from the
Tile Table window, and left-click to place them in the level editor. You'll need
to X-Flip as well:
![[IMG_040.png: CRE doors selected]](./images/IMG_040.png "Copying door graphics from the tile table")
Once the door graphics are placed, check the "BTS Only" checkbox. Right-click
one of the four very bottom tiles of the door tunnel, then change its BTS type
into a door using the selected tile scroller:
![[IMG_041.png: changing tile type to door]](./images/IMG_041.png "Changing the tile type to door BTS")
Right-click the newly-created door-type tile, then left-click on the other
three door tunnel tiles to change them into door-types also. The four tiles
above those (highlighted green in the picture below) must be air, although it's
actually fine if the shootable blue bubble is placed there instead, which we'll
do later, to door $01. The door we're working on right now is door $00.
![[IMG_042.png: four tile types changed]](./images/IMG_042.png "All four tiles changed into door BTS")
If you've looked at any of the rooms in the game before, then you've surely
seen the red numbers that are drawn over certain tiles. All door tiles with a
BTS number higher than $00 will have them. These BTS numbers can be applied by
placing your mouse cursor over any tile, then typing a value between 0-9 and
A-F, or by dragging + dropping from the BTS text field. Start by giving the
leftmost blue bubble a BTS number of 42, and then changing its BTS type to Shot:
![[IMG_043.png: placing BTS numbers]](./images/IMG_043.png "Assign a BTS number to a BTS tile")
The other three door tiles will need to be given BTS numbers of FF, FE and
FD. Their BTS type will need to be H-copy for left/right doors, and V-copy for
ceiling/floor doors. Here are the BTS numbers and BTS types that door $00 should
have right now:
![[IMG_044.png: floor door BTS]](./images/IMG_044.png "BTS types that make up a floor door")
The door would now open normally if you shot it, but since it hasn't been
properly connected to a room yet, going through it still won't work. Let's set
up the graphics/BTS for doors $01 and $02 next. It won't take nearly as long,
now that you know how to edit the BTS number and BTS type of a tile. For door
$01, let's make it a bit different, by excluding the air tiles between the
shootable blue bubble and the door BTS.
Uncheck the "Graphic Only" and "BTS Only" checkboxes, then in the level
editor, right-click + drag to select all but the bottom four tiles of the door,
then left-click to place them where door $01 is. Now, change this new door's
bottom four tiles into door BTS, but give them a BTS number of $01. That's it
for this one! Save the room.
![[IMG_045.png: floor door]](./images/IMG_045.png "Door $01 of room 7E9A0")
And for the last door, just go to any room that has a right-facing door in it
and copy the whole door, then go back to room 7E9A0 and left-click place the
door. It'll stay on the clipboard even after you load a different room. Change
its four red BTS numbers to 02, and you're done. Save the room again.
This is what my room looks like so far:
![[IMG_046.png: room shape with doors]](./images/IMG_046.png "Room 7E9A0's outline and door graphics/BTS")
OPTIONAL: here are the level data bytes again,
this time with the three doors added in:
01 00 12 E9 3D 5F 80 E8 3F FF 00 F8 4F 50 D7 60 E8 57 FF
00 05 5F 80 40 94 0C C4 E8 59 FF 00 05 5F 80 60 94 2C D4 F8 5C 60 02 9C 2C DC F0
51 96 01 87 3E 01 04 5F 80 40 9C 0C F8 48 60 F0 5D 20 01 F0 5D 1A 01 F0 59 08 01
EA 67 5F 80 F0 3F 8A 03 DD 28 F0 3F 82 03 F0 4D 70 01 F8 23 FE F0 3D 34 01 F8 21
FE F0 3F 34 01 F8 29 60 F0 55 A8 01 F8 5F 60 C7 E2 F0 59 A6 01 F0 41 3A 01 DF FE
FA E3 60 9F A4 09 F0 41 C2 09 F0 27 38 03 F0 69 0C 09 F0 25 34 01 F0 39 7E 08 F0
25 32 01 F0 37 BE 07 F0 27 30 01 F0 37 5E 07 F0 25 2E 01 D9 A2 9F 28 01 F0 25 2C
01 F8 2D 40 F8 21 20 F0 29 A8 07 F8 35 60 F8 41 40 07 1D C4 1C 54 1C 50 1D 50 F0
3F 08 01 D7 C0 00 43 43 04 42 01 00 43 F0 38 69 04 DF A0 00 63 43 94 62 02 90 63
90 F8 37 C0 00 43 43 94 42 01 90 43 CC 40 E5 1F 00 01 02 41 F8 2E 30 00 FF F8 2E
60 00 FE F8 2E 90 00 FD E7 FF 00 E6 C3 00 02 42 FF FE F0 4C B3 13 F8 2F 50 23 01
25 00 EB FF FF 00 FB FF FE FB FF FE FB FF FE F9 FF FE 00 00 FF FF FF FF FF FF FF
FF FF FF FF FF FF FF FF FF FF FF FF FF FF FF FF FF FF FF FF FF FF FF FF FF FF FF
FF FF FF FF FF FF FF FF FF FF FF FF FF FF FF FF FF FF FF FF FF FF FF FF FF FF FF
FF FF FF FF FF FF FF FF FF FF FF FF FF FF
14.
Add a new door to each of the three
adjoining rooms.
To do this, you will need to repoint the doors for all three of the rooms that
room 7E9A0's doors are connecting to. This means that rooms 793AA, 7948C and
795FF will each need to have one new door added to them, which means editing
their Doors pointer.

Note the location of the marked pink doors especially.
The first room we're gonna add a new door to is 793AA, which is marked yellow
in the map above. Go to that room in SMILE, then set your mouse cursor on its
doors' BTS and press Ctrl+D to open up the door editor. You'll see that the room
only has a single door in its list:
![[IMG_048.png: door data and pointer]](./images/IMG_048.png "Room 793AA's door data and Doors pointer")
Underlined red: doors pointer in bank $83
Underlined pink: 12-byte string for door $00 in bank $83, which we'll be
copying soon.
Alright, so there's only one door on the list, but we need two.
Easy enough, we did this before when we added three doors to room 7E9A0 from
scratch. We now know to look at the Doors pointer, which is a list of pointers
to the door bytes. The Doors pointer is 93D1, which is a LoROM address of
$8F:93D1 that we can click on and see that it converts to a PC address of 793D1.
In HxD, Goto offset 793D1. You'll see the bytes B2 89, which reverse to 89 B2
and become $83:89B2 (LoROM) / 189B2 (PC). In the screenshot above, you can see
this as "Door $00 - $89B2" highlighted blue. You can replace B2 89 with FF FF
(free space) since we don't need this pointer anymore.
Goto offset 189B2 and select/copy the 12 door data bytes (block: 189B2-189BD
- F8 91 00 05 8E 16 08 01 00 80 00 00). Once copied, replace them with FF. This
can be done quickly with right-click > "Fill Selection..." > check "Hex Values"
checkbox and type FF in place of the 00 that's there by default > click OK.
We're replacing these 12 bytes with free space, because the 12 bytes of door
data that we just copied from here are going elsewhere:
![[IMG_049.png: data replaced with free space]](./images/IMG_049.png "Block 189B2-189BD replaced with free space")
After you've done that, scroll down until you find free space again. The
first free space line is 1ADA0, which is where I'll paste the door data that we
just copied two times. You should recognize this area of free space from
earlier, when we pasted three doors starting at 1AD70. Again, note the offset
that each door is pasted at. In this case, the 12-byte data string for door $00
of room 793AA was pasted at 1ADA0, and door $01
is at 1ADAC:
![[IMG_050.png: new door data offsets]](./images/IMG_050.png "Room 793AA's new door offsets")
Underlined green: first door ($00), pasted at offset 1ADA0 (LoROM
address/pointer: $83:ADA0)
Underlined pink: second door ($01), pasted at offset 1ADAC (LoROM
address/pointer: $83:ADAC)
Next up, finding a new pointer, which means finding 6 bytes of
free space in bank $8F. Goto offset 7E9F0, which is currently the first line of
free space near the end of bank $8F. At the offset, type in the bytes A0 AD AC
AD 00 00. These bytes are the locations of the 12-byte door data strings in bank
$83, reversed and spaced out. A0 AD = $ADA0, AC AD = $ADAC, and 00 00 = stopper
bytes required to end the pointer string:
![[IMG_051.png: new door data pointers]](./images/IMG_051.png "New door data pointers at 7E9F0")
Save the ROM with HxD, then go back over to SMILE.
In SMILE, change the Doors pointer from 93D1 to E9F0, uncheck the "Overwrite
Data" checkbox, then click the "Save Pointers" button. Now set your mouse cursor
on 793AA's door BTS again and press Ctrl+D to open up the door editor, and you
should now see your two doors, $ADA0 and $ADAC:
![[IMG_052.png: new doors in SMILE]](./images/IMG_052.png "New doors visible in SMILE's door editor")
That does it for 793AA's Doors pointer. Now you just have to do all of that
to two more rooms! Rooms 7948C and 795FF will also need an extra door added to
them, which we'll do now. I'm going to walk through the process for each room
briefly, without pictures this time, otherwise this section will run on too
long.
Adding a door to room 7948C: this room has three doors:
$8A2A, $8A36, and $8A42 (you can see these with the door editor). Its Doors
pointer is 94B3, meaning that at offset 794B3, we'd find 2A 8A 36 8A 42 8A.
Since there are three doors, we'll be copying 36 bytes (24 if you're counting in
hex). Goto the offset of the first door, 18A2A, and select/copy the next $24
bytes (block: 18A2A-18A4D). After you've copied the bytes, replace them with FF
via right-click > "Fill Selection...", then go down to the first line of free
space, which is at offset 1ADC0. Paste the three doors that you copied, then
note their offsets, which are 1ADC0, 1ADCC, 1ADD8, and the fourth (new) door
will be at 1ADE4.
Go to some free space in bank $8F (I'm going to use offset 7EA00) and enter
these bytes: C0 AD CC AD D8 AD E4 AD 00 00, then save the ROM with HxD. In
SMILE, change the Doors pointer from 94B3 to EA00, uncheck the "Overwrite Data"
checkbox, then click the "Save Pointers" button. Check the door editor to
confirm that the room now has four doors: $ADC0, $ADCC, $AD88, and $ADE4.
Adding a door to room 795FF: this room has two doors: $8ADE
and $8AEA. Go to offset 18ADE and copy the next 24 bytes (18 if you're counting
in hex), then scroll down to the first line of free space at 1ADF0 and paste
them there, giving us 1ADF0, 1ADFC and 1AE08 as pointers. Go to free space in
bank $8F (I'm going to use offset 7EA10) and enter these bytes: F0 AD FC AD 08
AE 00 00, then save the ROM with HxD. In SMILE, change the Doors pointer from
9626 to EA10, uncheck the "Overwrite Data" checkbox, then click the "Save
Pointers" button. Check the door editor to confirm that the room now has three
doors: $ADF0, $ADFC, and $AE08.
The three rooms adjoining 7E9A0 now all have an extra door to work with!
15.
Level-edit new doors into rooms
793AA, 7948C and 795FF. This step should be simple, since everything
needed to do this has already been explained.
Reminder picture from earlier:
basic level editing
For room 793AA, I moved the power bomb expansion away from the wall, added a
new door to the right side, gave the door tiles red BTS numbers of $01, and then
fixed up the ceiling and floor around it:
![[IMG_053.png: new door in room]](./images/IMG_053.png "Room 793AA with its new door added")
OPTIONAL: here are the hex bytes for my edited
room 793AA. You can copy and paste them at offset 216977:
01 00 04 E8 7F 81 80 0D 11 85 11 81 14 8D 0F 89 5F 80 0F
89 14 89 C3 0E C7 10 C2 0E 44 81 11 C3 1E C4 1C 45 81 11 02 85 14 8D C6 2C C8 10
08 0E 1D FF 00 BB 80 FF 00 0E 43 19 14 02 8D 0F 19 C5 10 07 0E 19 0F 1D 14 89 14
1D C3 1E C3 1C C3 0E C2 6C C2 10 C5 2C 01 0F 19 C4 62 02 85 10 85 C3 20 00 5F C2
40 C3 42 C5 2E D1 10 C7 44 C3 6C C5 2C 02 FF 00 10 C2 AC 03 18 89 0D 8D 53 FF 00
01 56 A8 E8 21 FF 00 07 0D 89 18 89 40 94 0C C4 E8 37 FF 00 07 0C C0 40 90 60 94
2C D4 F8 37 40 07 2C D0 60 90 60 9C 2C DC F8 38 40 05 D8 60 98 40 9C 0C F8 22 40
00 5D 86 37 01 CE C0 04 D8 40 98 16 85 45 70 80 87 36 01 C7 08 C7 FE C5 18 00 BD
CE 1E 00 5F 48 80 70 03 14 85 0E 85 43 FF 80 C7 22 D5 08 01 BD 88 CE 1E 03 88 FF
80 0E 44 81 18 07 11 81 14 85 0F 81 0E 85 C3 22 04 0E 11 0F 11 5F 43 80 9D 06 84
0F 81 5F 80 0E 15 C3 12 C5 10 CD 0E C3 1E 02 0F 81 14 86 AD 00 C3 02 01 14 85 C6
12 4A 85 11 C3 58 C6 24 C6 66 C9 0E C9 08 E8 7F 81 80 E4 61 00 00 D2 22 00 03 92
D3 00 D3 C2 08 C9 07 C8 08 26 00 00 92 C3 26 C9 08 00 92 C3 2E E4 25 00 00 41 3B
00 03 40 01 00 FF 3B 00 03 FF 01 00 FE 3B 00 03 FE 01 00 FD 3B 00 01 FD 01 E4 45
00 01 12 13 24 00 02 52 00 12 CA 07 E4 64 00 FF FF FF FF FF FF FF FF FF FF FF FF
FF FF FF FF FF FF FF FF FF FF FF FF FF FF FF FF FF FF FF FF FF FF FF FF FF FF FF
FF FF FF FF FF FF FF FF FF FF FF FF FF FF FF FF FF FF FF FF FF FF FF FF FF FF FF
FF FF FF FF FF FF FF FF FF FF FF
For room 7948C, I added in a new ceiling door, gave it red BTS
numbers of $03, and then fixed up some of the cave scenery around it:
![[IMG_054.png: new room door]](./images/IMG_054.png "Room 7948C with its new door added")
OPTIONAL: here are the hex bytes for my edited
room 7948C (paste at offset 218FFE):
01 00 12 E8 29 11 81 02 10 85 63 43 9C 62 03 98 63 98 10
CB 34 5F 85 11 F8 2A 60 00 43 43 0C 42 02 08 43 08 F8 32 60 C4 68 05 14 8D 18 89
14 89 C6 94 C6 14 C9 1E 09 10 85 1D CC 1C 5C 1C 58 1D 58 C3 C0 01 14 8D C2 2A CC
A6 D2 3E CA C0 C2 5C 0A 19 17 1D 31 01 17 19 18 19 14 89 C8 6A CA 1E 01 0E 1D 47
FF 00 00 0E C2 24 02 17 1D 17 C2 28 CA 9A C3 3E 00 09 C7 3E C6 7C CA E4 07 19 85
31 01 34 0D 34 09 43 31 01 00 17 C6 6A C5 62 C3 AA 03 19 85 37 05 49 FF 00 02 37
01 34 44 01 31 00 19 C6 9A C3 20 C2 38 02 05 31 05 C3 42 C3 3E C2 7C 00 19 C5 D8
02 18 89 0F 43 89 18 C2 BC 04 34 0D 37 0D 39 46 01 31 C3 6A 01 34 0D C5 40 01 19
85 C3 70 01 34 05 C7 62 C7 5E C7 82 C5 20 C5 5E C3 42 C4 A6 00 05 C3 CA 09 0F 19
18 89 40 94 0C C4 37 09 C3 B8 00 39 C2 A2 C5 0A C3 6A 03 37 09 37 0D 85 F6 00 C3
CC C5 14 C5 C2 C6 42 C4 86 00 19 CA 20 01 34 09 C5 42 C5 64 00 38 C2 40 07 0C C0
40 90 60 94 2C D4 C5 34 C5 40 C3 C2 C3 6A 85 52 01 03 14 19 10 85 C9 7E C6 C0 C4
42 C5 86 01 10 81 C9 20 C3 92 C7 82 C5 42 07 2C D0 60 90 60 9C 2C DC C5 76 C7 3E
C5 88 C7 62 83 4C 01 C9 7E 89 B0 01 C5 D0 D6 20 C6 6A 0B 2C D8 60 98 40 9C 0C DC
2D 01 2E 01 D1 1E CB 4E C9 BE C7 E4 89 0A 02 C9 B0 CB 36 16 2D 05 2B 05 0C D8 40
98 18 81 0F 81 0C 11 0C 15 0E 15 2D 05 2F 01 2D CA 68 D7 4E 87 4E 02 8D CA 02 C7
F2 01 2B 05 C3 44 00 0D 43 81 0C 03 85 0F 81 18 88 41 00 05 14 85 0C 81 0B 15 C6
68 00 05 CD D0 83 FA 01 CE D4 8C 13 03 C5 58 00 2F C2 B2 C7 58 00 14 C8 58 4C 11
81 CE 68 00 2E C2 F6 02 0E 11 0F 44 11 18 01 0E 15 C7 DE C3 E8 00 0E C4 14 00 0F
C2 16 02 2D 01 2B C6 B0 03 0B 85 0C 85 CA 58 99 5B 00 C8 D0 CB 8A C6 10 02 C1 0F
51 C3 FA CE 16 CB B0 F8 26 60 D3 30 01 14 8D 43 0F D9 88 D2 00 F8 25 04 5D 81 11
8A 03 01 01 0F 1D 85 4C 01 02 0E 19 0F 83 5D 01 F8 47 60 C2 FA C9 5C 89 4E 01 C7
64 5F FF 83 F8 23 C0 01 10 85 53 FF 00 00 10 C4 DE F8 41 60 01 14 8D CD BC C9 C4
C3 C2 F8 3E C0 C2 C2 C9 BE 01 30 01 83 36 04 00 30 88 AB 01 C3 C2 F8 4B 60 00 1A
44 81 1B 00 1A C8 70 F8 42 60 00 85 83 2A 00 57 FF 00 F8 45 60 03 39 87 2F 83 D3
62 03 2E 83 39 83 F8 41 C0 04 14 8D 0E 8D 37 D4 60 05 37 83 0E 89 14 89 F8 3F C0
05 39 87 38 87 B9 82 D1 C0 07 0E 11 36 83 0F 85 14 81 F8 40 C0 02 85 0F 85 C2 4A
04 15 0E 15 2E 05 87 54 07 02 B8 82 38 83 7D 08 C4 E0 F0 41 C2 07 C5 E2 03 1C 85
1B 85 89 B4 07 85 BC 02 F8 45 60 03 14 8D 36 8B 8F 28 06 C5 62 01 36 8B F0 41 E0
08 83 2A 00 01 37 8B 55 FF 00 02 B9 82 39 E8 20 83 FF F0 23 42 08 00 B8 8A 27 09
02 30 01 2F 88 53 07 02 37 83 10 F0 3F 41 09 84 29 00 CB BE 01 1A 81 89 EC 09 00
B8 F8 41 C0 04 81 14 8D 0D 8D 57 FF 00 01 0D 81 F0 21 40 09 DF E0 00 39 94 25 09
88 96 06 F8 40 60 02 14 85 0D 86 87 06 01 30 01 8B 52 07 F8 48 60 88 C3 0B 83 AE
07 8C EE 09 01 11 14 F8 42 C0 97 64 08 02 FF 00 0D 84 D1 00 F8 3F C0 01 10 85 93
C6 08 03 B9 82 38 83 83 7E 0B F0 43 40 0C 03 36 83 0E 15 97 CA 0B F8 41 C0 43 11
81 83 22 09 8B 06 0B F0 2B 56 0A F8 23 60 8B 86 06 8B 8C 0C F0 23 7E 0B F0 21 C2
0C 01 36 8B 8B 2A 06 8B EC 0C 01 37 8B F0 21 20 0B F0 21 02 0C 91 6A 0E F0 2B B6
0A F0 35 82 0D F0 29 18 0B F0 3B 02 0C F0 44 DE 0E 98 03 0E 83 3A 09 F0 41 E0 0B
85 62 0E 83 96 09 0D 2F 83 1D C4 1C 54 1C 50 1D 50 2E 83 38 83 83 BE 0A C3 1C F8
43 60 C2 C4 05 87 0E 85 37 83 43 43 04 42 01 00 43 83 DB 08 00 81 C3 BC F8 47 60
C5 C4 02 B9 82 63 43 94 62 02 90 63 90 C7 BC F8 23 C0 35 00 23 03 E4 5B 00 03 43
FF FE FD 3A 00 04 D3 D2 00 92 D3 CC 0F 22 00 03 92 D3 D2 92 25 00 00 93 C2 1F 00
93 30 00 00 92 C2 35 3A 00 01 92 D2 C7 34 C5 4F CB 38 C9 44 C5 5E C7 52 00 93 C2
66 00 41 2E 00 CD 3D CE 10 03 40 01 00 FF CC 94 CA C6 33 00 03 FF 01 00 FE D8 8D
D2 10 02 FE 01 00 9B 7B 12 30 00 06 FD 01 00 00 53 53 52 E4 30 00 F8 39 34 01 12
13 C8 70 CA 0B E4 20 00 00 03 8C 53 13 E4 21 00 A3 B7 14 E4 29 00 83 A6 12 9F 60
13 8F 9C 12 F8 2B 32 E4 2C 00 8E 05 13 E5 1A 00 00 12 E4 25 00 F0 32 E5 13 F0 2C
17 15 89 F5 12 F1 1E 7F 15 F0 57 6D 16 E4 5D 00 F0 37 C6 16 F0 57 7C 15 8F 33 13
E4 AF 00 8A E6 13 F0 28 7F 18 00 42 9D 79 12 E4 40 00 23 02 35 00 47 3F 01 00 3E
C4 04 C3 06 03 D6 02 D7 02 49 3F 01 5F FF 00 DF 40 C9 4A 47 3E 01 C9 70 F8 2B 60
D7 40 C9 5A 00 3D CA 5C C9 6C F8 23 C0 DB 40 C7 D6 C7 BC C7 6C C3 6E F8 25 60 DD
40 CB DE C7 E8 05 3D 01 B4 02 B5 02 C5 62 F0 29 22 1B D5 40 D1 62 C3 EA 02 D4 02
D5 F8 2E 60 D7 40 C5 DE 03 B6 02 B7 02 87 78 1B CB E0 F8 21 C0 DF 40 93 0E 1B F0
2B D6 1B DF 40 C9 D8 C7 C4 CD 16 F0 27 42 1C D7 40 C3 D8 C5 DA C5 C4 8D 6C 1B 01
B6 02 DF C0 DF 40 C5 D8 8D CE 1B 87 3C 1D C3 F8 DF C0 DF 40 8B 20 1C 8F 66 1B F0
2B DE 1B D7 40 89 34 1C 8B EA 1C C9 CC F0 23 62 1D DB 40 85 92 1C C9 60 8B 7C 1C
F0 25 9E 1C DD 40 CF 08 CB E6 F0 27 1E 1B DB 40 CD 6C 8F 44 1D F0 2B 20 1B F8 35
40 FA 1F 20 43 12 01 00 13 84 47 1D 00 13 C4 0A C3 06 00 12 44 01 11 49 12 01 DB
20 F8 25 60 83 14 1B 49 13 01 CB 5A DF 20 DF FE C7 42 C9 C4 C9 C6 C9 6E D9 20 F0
21 82 1E C5 F4 C7 C4 C9 BA C9 74 DB 20 F0 21 E2 1E C7 60 C9 FA 87 5A 23 89 A6 23
D9 20 F0 21 E2 23 C7 F4 CD 64 CF 12 D7 20 F0 23 22 23 85 58 23 8B 10 24 8D B2 23
DB 20 F0 23 E2 23 CB 60 89 1A 24 C9 D8 DB 20 F0 29 02 25 C7 FA 8D 1E 24 DF 20 F8
23 60 8D 22 25 8B 48 23 8D AC 23 D3 20 E8 3F FF 00 F0 3F 02 1B F0 3F 82 1B F8 43
C0 F0 3B C6 1B F0 3F 42 1C F0 49 E2 26 F0 35 8C 1C F0 3F 02 1D F8 3F C0 F0 3F 42
1D F0 3F C2 1D F0 47 02 28 F0 37 0A 1E F0 3F 82 1E F8 3F C0 F0 3F C2 1E F0 3F 42
1F F0 43 22 29 F0 3B 86 1F F0 3F 02 20 F0 49 02 2B F0 35 4C 20 F0 5F C2 20 00 00
FF FF FF FF FF FF FF FF FF FF FF FF FF FF FF FF FF FF FF FF FF FF FF FF FF FF FF
FF FF FF FF FF FF FF FF FF FF FF FF FF FF FF FF FF FF FF FF FF FF FF FF FF FF FF
FF FF FF FF FF FF FF FF FF FF FF FF FF FF FF FF FF FF FF FF FF FF FF FF FF FF FF
FF FF FF FF FF FF FF FF FF FF FF FF FF FF FF FF FF FF FF FF FF FF FF FF FF FF FF
FF FF FF FF FF FF FF FF FF FF FF FF FF FF FF FF FF FF FF FF FF FF FF FF FF FF FF
FF FF FF FF FF FF FF FF FF FF FF FF FF FF FF FF FF FF FF FF FF FF FF FF FF FF FF
FF FF FF FF FF FF FF FF FF FF FF FF FF FF FF FF FF FF FF FF FF FF FF FF FF FF FF
FF FF FF FF FF FF FF FF FF FF FF FF FF FF FF FF FF FF FF FF FF FF FF FF FF FF FF
FF FF FF FF FF FF FF FF FF FF FF FF FF FF FF FF FF FF FF FF FF FF FF FF FF FF FF
FF FF FF FF FF FF FF FF FF FF FF FF FF FF FF FF FF FF FF FF FF FF FF FF FF FF FF
FF FF FF FF FF FF FF FF FF FF FF FF FF FF FF FF FF FF FF FF FF FF FF FF FF FF FF
FF FF FF FF FF FF FF FF FF FF FF FF FF FF FF FF FF FF FF FF FF FF FF FF FF FF FF
FF FF FF FF FF FF FF FF FF FF FF FF FF FF FF FF FF FF FF FF FF FF FF FF FF FF FF
FF FF FF FF FF FF FF FF FF FF FF FF FF FF FF FF FF FF FF FF FF FF FF FF FF FF FF
FF FF FF FF FF FF FF FF FF FF FF FF FF FF FF FF FF FF FF FF FF FF FF FF FF FF FF
FF FF FF FF FF FF FF FF FF FF FF FF FF FF FF FF FF FF FF FF FF FF FF FF FF FF FF
FF FF FF FF FF FF FF FF FF FF FF FF FF FF FF FF FF FF FF FF FF FF FF FF FF FF FF
FF FF FF FF FF FF FF FF FF FF FF FF FF FF FF FF FF FF FF FF FF FF FF FF FF FF FF
FF FF FF FF FF FF FF FF FF FF FF FF FF FF FF FF FF FF FF FF FF FF FF FF FF FF FF
FF FF FF FF FF FF FF FF FF FF FF FF FF FF FF FF FF FF FF FF FF FF FF FF FF FF FF
FF FF FF FF FF FF FF FF FF FF FF FF FF FF FF FF FF FF FF FF FF FF FF FF FF FF FF
FF FF FF FF FF FF FF FF FF FF FF FF FF FF FF FF FF FF FF FF FF FF FF FF FF FF FF
FF FF FF FF FF FF FF FF FF FF FF FF FF FF FF FF FF FF FF FF FF FF FF FF FF FF FF
FF FF FF FF FF FF FF FF FF FF FF FF FF FF FF FF FF FF FF FF FF FF FF FF FF FF FF
FF FF FF FF FF FF FF FF FF FF FF FF FF FF FF FF FF FF FF FF FF FF FF FF FF FF FF
FF FF FF FF FF FF FF FF FF FF FF FF FF FF FF FF FF FF FF FF FF FF FF FF FF FF FF
FF FF FF FF FF FF FF FF FF FF FF FF FF FF FF FF FF FF FF FF FF FF FF FF FF FF FF
FF FF FF FF FF FF FF FF FF FF FF FF FF FF FF FF FF FF FF FF FF FF FF FF FF FF FF
FF FF FF FF FF FF FF FF FF FF FF FF FF FF FF FF FF FF FF FF FF FF FF FF FF FF FF
FF FF FF FF FF FF FF FF FF FF FF FF FF FF FF FF FF FF FF FF FF FF FF FF FF FF FF
FF FF FF FF FF FF FF FF FF FF FF FF FF FF FF FF FF FF FF FF FF FF FF FF FF FF FF
FF FF FF FF FF FF FF FF FF FF FF FF FF FF FF FF FF FF FF FF FF FF FF FF FF FF FF
FF FF FF FF FF FF FF FF FF FF FF FF FF FF FF FF FF FF FF FF FF FF FF FF FF FF FF
FF FF FF FF FF FF FF FF FF FF FF FF FF FF FF FF FF FF FF FF FF FF FF FF FF FF FF
FF FF FF FF FF FF FF FF FF FF FF FF FF FF FF FF FF FF FF FF FF FF FF FF FF FF FF
FF FF FF FF FF FF FF FF FF FF FF FF FF FF FF FF FF FF FF FF FF FF FF FF FF FF FF
FF FF FF FF FF FF FF FF FF FF FF FF FF FF FF FF FF FF FF FF FF FF FF FF FF FF FF
FF FF FF FF FF FF FF FF FF FF FF FF FF FF FF FF FF FF FF FF FF FF FF FF FF FF FF
FF FF FF FF FF FF FF FF FF FF FF FF FF FF FF FF FF FF FF FF FF FF FF FF FF FF FF
FF FF FF FF FF FF FF FF FF FF FF FF FF FF FF FF FF FF FF FF FF FF FF FF FF FF FF
FF FF FF FF FF FF FF FF FF FF FF FF FF FF FF FF FF FF FF FF FF FF FF FF FF FF FF
FF FF FF FF FF FF FF FF FF FF FF FF FF FF FF FF FF FF FF FF FF FF FF FF FF FF FF
FF FF FF FF FF FF FF FF FF FF FF FF FF FF FF FF FF FF FF FF FF FF FF FF FF FF FF
FF FF FF FF FF FF FF FF FF FF FF FF FF FF FF FF FF FF FF FF FF FF FF FF FF FF FF
FF FF FF FF FF FF FF FF FF FF FF FF FF FF FF FF FF FF FF FF FF FF FF FF FF FF FF
FF FF FF FF FF FF FF FF FF FF FF FF FF FF FF FF FF FF FF FF FF FF FF FF FF FF FF
FF FF FF FF FF FF FF FF FF FF FF FF FF FF FF FF FF FF FF FF FF FF FF FF FF FF FF
FF FF FF FF FF FF FF FF FF FF FF FF FF FF FF FF FF FF FF FF FF FF FF FF FF FF FF
And for room 795FF, I added in a ceiling door, got rid of some
grapple blocks, changed its red BTS numbers to $02, fixed up some of the cave
scenery around it, and then added a floating platform underneath the door:
![[IMG_055.png: extra door]](./images/IMG_055.png "Room 795FF with its new door added")
OPTIONAL: here are the hex bytes for my edited
room 795FF (paste at offset 21BD6D):
01 00 08 49 11 85 02 10 85 63 43 9C 62 04 98 63 98 10 81
E8 33 11 85 02 10 85 43 43 0C 42 02 08 43 08 C7 40 01 14 8D 4D 18 89 02 14 89 11
D5 5A C2 70 0C 14 8D 0D 8D 1D CC 1C 5C 1C 58 1D 58 16 C6 36 01 16 8D 4D B7 E0 C3
18 C2 44 C9 36 C3 A8 C5 06 04 85 19 85 37 05 47 FF 00 02 37 09 34 46 09 31 01 34
0D C5 0A C7 08 09 31 09 17 19 18 19 14 89 14 8D C6 48 C4 42 C2 A8 04 19 17 1D 34
05 D1 42 01 39 05 C5 4C C3 08 00 38 43 09 34 C4 50 00 17 C2 2E 00 17 C2 46 C3 BA
02 18 8D 0F C2 A8 C5 6A 00 39 C8 82 03 FF 00 39 01 C3 7E 01 37 0D C3 0A C5 08 C3
98 01 37 0D C3 0E C2 9E 05 05 31 09 16 89 0F C2 E8 03 40 94 0C C4 C3 B0 C3 6A C5
26 C9 C4 C5 50 CF 18 C5 44 00 38 C2 4C 07 0C C0 40 90 60 94 2C D4 CF 24 C7 82 CB
90 D3 1A 07 2C D0 60 90 60 9C 2C DC D5 26 D3 54 CD 1A 06 2C D8 60 98 40 9C 0C C8
40 06 30 01 2F 05 2E 01 30 D6 76 CB A0 02 2A 01 2E C2 2A 0B 0C D8 40 98 18 85 0F
81 0F 11 0E 15 C3 FA 00 1A 44 81 1B 01 1A 85 C7 EE 01 5D 80 D5 C0 0A 0D 81 0C 81
0A 81 0B 81 0C 85 18 46 81 11 00 10 C8 34 CB F2 00 5F D6 40 02 0E 19 0F 85 3B 01
87 B9 00 02 81 14 85 C5 82 CD F0 00 BD D6 80 C3 FC 01 E2 8A CB 40 03 11 81 C2 8E
D1 F6 00 BE DA 40 02 C2 8A 12 85 17 00 C6 C2 01 A2 86 F8 2D 40 02 C5 1A E5 C5 42
C6 80 03 E5 86 C5 16 D0 C0 00 88 5B FF 00 01 A2 82 CB C0 D3 82 9B 1E 03 C3 40 CB
80 00 12 D2 C2 DB C0 C5 C2 CB 80 C5 C2 01 F7 02 F8 27 40 02 FF 00 C2 C3 82 CA 02
00 C2 C2 C2 01 17 03 F0 27 D4 03 03 FF 00 22 83 CB 80 00 12 84 49 03 CC 40 D2 C0
CB A0 00 C2 CC C0 C3 C2 01 A5 82 43 A5 12 87 CC 03 D3 C0 C9 A0 02 C5 12 E5 CE C0
C3 84 8B 48 04 DD 40 00 C2 8E FD 03 C7 3E 85 88 03 C3 A8 93 DE 03 CA 40 8C BD 03
CB 84 83 CA 03 C3 A8 01 5F F0 D1 F6 C7 C0 C3 BE CF 80 8D 44 05 04 A4 86 5F 10 A4
86 55 05 C9 F6 C7 C0 C3 BE D5 80 C9 C8 89 48 04 CF 40 02 0E 11 14 87 17 00 5E 81
11 D1 40 03 C5 12 A4 16 C8 3E F8 20 40 85 CA 03 C9 F6 00 A5 85 7D 05 8B 7D 00 D9
82 C2 A2 83 14 06 43 A5 82 05 A4 86 A3 82 A4 82 88 7E 05 95 73 00 D6 44 86 7C 06
C6 06 C9 08 DE 44 E8 24 85 11 25 00 23 02 E4 3B 00 03 43 FF FE FD 24 00 26 01 E4
21 00 01 92 93 28 00 01 93 D2 D5 22 01 D2 92 E4 23 00 00 41 3B 00 03 40 01 00 FF
3B 00 03 FF 01 00 FE 3B 00 02 FE 01 00 C5 D8 36 00 00 FD C2 EA 01 13 52 E4 35 00
89 7A 08 F8 36 41 F8 21 62 F8 C0 61 29 00 00 13 93 44 09 00 12 E4 4C 00 D0 C5 D1
5F D4 86 37 00 DD 9E 01 12 13 DB 86 D7 1E E4 50 00 FF FF FF FF FF FF FF FF FF FF
FF FF FF FF FF FF FF FF FF FF FF FF FF FF FF FF FF FF FF FF FF FF FF FF FF FF FF
FF FF FF FF FF FF FF FF FF FF FF FF FF FF FF FF FF FF FF FF FF FF FF FF FF FF FF
FF FF FF FF FF FF FF FF FF FF FF FF FF FF FF FF FF FF FF FF FF FF FF FF FF FF FF
FF FF FF FF FF FF FF FF FF FF FF FF FF FF FF FF FF FF FF FF FF FF FF FF FF FF FF
FF FF FF FF FF FF FF FF FF FF FF FF FF FF FF FF FF FF FF FF FF FF FF FF FF FF FF
FF FF FF FF FF FF FF FF FF FF FF FF FF FF FF FF FF FF FF FF FF FF FF FF FF FF FF
FF FF FF FF FF FF FF FF FF FF FF FF FF FF FF FF FF FF FF FF FF FF FF FF FF FF FF
FF FF FF FF FF FF FF FF FF FF FF FF FF FF FF FF FF FF FF FF
16.
Connect these three sets of doors
together. Finally, we're gonna make it so you can travel between rooms
through these new doors.
In SMILE, we're gonna be editing the 12-byte door data strings, using the
door editor. Go to room 793AA and set your mouse cursor on the door tiles with
the red 01 BTS numbers on them and press Ctrl+C. In the Level Editor window
title, you'll see the text "Saved Door - $793AA BTS $01" appear for a few
seconds after you do that:
![[IMG_056.png: copied door notice]](./images/IMG_056.png "Level Editor's window title after copying door $01")
Go to room 7E9A0 and press Ctrl+C on door $02 as well to copy it and receive
the "Saved Door - $7E9A0 BTS $02" message in the Level Editor window title for a
few seconds. Now press Ctrl+D on door $02 to bring up the door editor, and
notice the copied doors list at the bottom, containing "793AA $01" and "7E9A0
$02" in it, which are the 12-byte data strings of the two doors that we just
copied by pressing Ctrl+C on them:
![[IMG_057.png: copied door data]](./images/IMG_057.png "Door editor with two copied doors")
Since we want to link this door with door $01 of room 793AA, click on "$793AA
$01" so it's highlighted blue, then click the "Link Selected Door" button, which
replaces the values in the pale yellow text fields with the data of the copied
door. Click the "Save Door Link" button and then close the door editor.
Go to room 793AA, press Ctrl+D on door $01 and do the same thing, except this
time, "7E9A0 $02" should be highlighted blue, since we want to link this door
with door $01 of room 7E9A0. Click the "Link Selected Door" button, then the
"Save Door Link" button, and then finally, the "Clear Doors" button, which
removes the copied doors since we no longer need them.
This successfully links room 793AA with the top portion of room 7E9A0. Two
more rooms left.
Next up, go to room 7948C, press Ctlr+C on door $03, then go to room 7E9A0
and press Ctrl+C on door $00. Now press Ctrl+D on door $00, highlight "7948C
$03", click the "Link Selected Doors" button, and then the "Save Door Link"
button. Now go back to room 7948C, press Ctrl+D on door $03, highlight "7E9A0
$00", click the "Link Selected Doors" button, then the "Save Door Link" button,
and then the "Clear Doors" button. One more room left.
Go to room 795FF and copy door $02, then go to room 7E9A0 and copy door $01.
Open the door editor for door $01 and select "795FF $02", then click the "Link
Selected Door" and "Save Door Link" buttons. Next, go back to room 795FF, open
the door editor for door $02, select "7E9A0 $01", then click the "Link Selected
Doors", "Save Door Link" and "Clear Doors" buttons.
And with that, we're finished connecting the doors. Going through the
vertical doors still won't work just yet, but we're getting there! Our next big
objective is to master a room's screens and scroll colors.
17.
Room Scrolls pointer, door ASM pointers.
The Room Scrolls pointer sets the default scroll type value for each screen of
the room, which is represented in SMILE by a colored outline that's red, blue or
green. Each screen uses one byte in bank $8F. If the pointer is set to 0000 (all
blue) or 0001 (all green), then no bytes are used. The purpose of room scrolls
is to influence camera behavior. Here's what each scroll type does:
Red (00): prevents the camera from being able to see certain
screens, either permanently, or until a scroll PLM or a door's ASM pointer
changes it to blue or green.
Blue (01): Samus can explore these freely. Blue scrolls display all but the
very top and bottom two rows of the current screen, which is ideal for hallways.
Green (02): same as blue, except green scrolls allow the bottom two rows of
the current screen to be seen. Not preferred because this causes the camera to
hang lower towards the foreground instead of showing the player more of what's
going on around Samus. However, doors that are in the floor must be inside of a
green scroll to work.
If you don't see the screen colors, click "Preferences > View >
Layers > Scrolls" (hotkey: F4). Right now, all of the scrolls are shown thick
blue, because the Room Scrolls pointer is currently 0000.
You can edit the colors of a room's scrolls by clicking "Preferences > View >
Level Tile Size > 8x8" (hotkey: Home & End) and clicking on a screen, which we
don't need to do in this guide.
In SMILE, open room 7E9A0 and notice how many screens the room has. Since the
room is a total of nine screens in size, that's how many bytes of free space we
need to find in bank $8F, and then use that offset as the Room Scrolls pointer.
Easy.
In HxD, I'm going to use the first full line of free space, which is at
7EA20. At this offset, type 00 00 00 01 01 01 01 01 02, then save the ROM with
HxD. Go back over to SMILE.
In SMILE, change the Room Scrolls pointer from 0000 to EA20, uncheck the
"Overwrite Data" checkbox, then click the "Save Pointers" button. You'll see
that the previously all-blue grid that divided the room into nine sections is
now red, blue and green. If you couldn't tell by the bytes we entered, this also
shows you how screens are counted. The first three bytes were 00 (screens
00-02), which are red. The next five were 01 (screens 03-07), which are blue,
then screen 08 at the end, which is green. Here's what my room currently looks
like at 8x8 tile view, minus the pink edits obviously:
![[IMG_058.png: scroll colors]](./images/IMG_058.png "Room 7E9A0's new scroll colors")
We're making three separate rooms that are all part of the same room header,
which I'm calling cell #1, cell #2 and cell #3. To do this, we will need to use
scroll PLMs and door ASM pointers to change scroll colors based on which door
Samus enters room 7E9A0 from. Cell #1 is gonna be the first one we do, but
before that, here's what the room's scroll colors will need to be changed into
for each cell when Samus enters it:
![[IMG_059.png: needed scroll colors]](./images/IMG_059.png "Needed scroll colors for each room cell")
Cell #1: screens 00, 01 and 02 must be changed to blue, and screens 04, 05
and 06 must be changed to red.
Cell #2: screens 05 and 08 must be changed to red.
Cell #3: screens 04 and 07 must be changed to red.
The default scroll colors will never be loaded completely as-is
(unless you test using QuickMet), since Samus must enter a cell by using a door.
You might have also noticed that screen 06 isn't green, even though it has a
floor door like screen 08 does. That's because I'm gonna show you a little trick
later that lets you get around needing a green scroll by default, for occasions
where your level design might work best with a floor door inside of a blue
scroll instead of a green one.
To make cell #1 work properly, we need to use door $01 in room 793AA.
Specifically, its ASM pointer, which is the last 2 bytes of data in its 12-byte
string (the last pale yellow text field in the door editor). First, find some
free space in bank $8F. I'm gonna use the next free line, which is 7EA30. This
means we'll be using a door ASM pointer of EA30. Go ahead and change the pointer
to that for now:
![[IMG_060.png: needed scroll color changes]](./images/IMG_060.png "Needed scroll colors for each room cell")
Click the "Save Door Link" button and close the door editor.
In HxD, enter these bytes at 7EA30 and then save the ROM: 08 E2 20 A9 01 8F
20 CD 7E 8F 21 CD 7E 8F 22 CD 7E A9 00 8F 23 CD 7E 8F 24 CD 7E 8F 25 CD 7E 28 60
Here are those same bytes, arranged vertically and explained:
THIS COLOR = required byte that shouldn't be edited
THIS COLOR = variable byte: scroll color
THIS COLOR = variable byte: screen number +20

08 E2 20     <-- Begin scroll color-change ASM

A9 01        <-- Load blue scroll (01)
8F 20 CD 7E  <-- Store blue scroll to screen 00
8F 21 CD 7E  <-- Store blue scroll to screen 01
8F 22 CD 7E  <-- Store blue scroll to screen 02

A9 00        <-- Load red scroll (00)
8F 23 CD 7E  <-- Store red scroll to screen 03
8F 24 CD 7E  <-- Store red scroll to screen 04
8F 25 CD 7E  <-- Store red scroll to screen 05

28 60        <--  End scroll color-change ASM
A9 00, A9 01 and A9 02 can be used to load a scroll color, and
then 8F ## CD 7E is used to determine which screens are affected by the color
that was loaded. ## = screen number +20, meaning that screen 01 = 21, screen 12
= 32, screen 2A = 4A, etc. The number of loaded scroll colors and the number of
screens that they're stored to can vary, but the "08 E2 20" and "28 60" at the
beginning and end are always required.
NOTE: to easily know which number a screen is in SMILE RF, press the
`
key (located underneath the Esc key in a lot of keyboards) while your mouse
cursor is inside of the screen. The Level Editor's window title will then tell
you the screen number, along with some info about the 16x16 tile that your mouse
cursor was on.
That's all for cell #1's door ASM. The other two should go faster, since they
each only require two screen colors to be changed.
In SMILE, go to room 7948C, open the door editor from door $03, and change
the door ASM pointer from 0000 to EA51. Click the "Save Door Link" button and
close the door editor.
In HxD, go to offset 7EA51 and enter these bytes: 08 E2 20 A9 00 8F 25 CD 7E
8F 28 CD 7E A9 02 8F 26 CD 7E 28 60
Arranged vertically like before:
08 E2 20     <-- Begin scroll color-change ASM

A9 00        <-- Load red scroll (01)
8F 25 CD 7E  <-- Store blue scroll to screen 05
8F 28 CD 7E  <-- Store blue scroll to screen 08

A9 02        <-- Load green scroll (01)
8F 26 CD 7E  <-- Store green scroll to screen 06

28 60        <-- End scroll color-change ASM
That's all for cell #2's door ASM. And since we're already right
here... paste these bytes at offset 7EA66 and save the ROM: 08 E2 20 A9 00 8F 24
CD 7E 8F 27 CD 7E 28 60
Arranged vertically:
08 E2 20     <-- Begin scroll color-change ASM

A9 00        <-- Load red scroll (01)
8F 24 CD 7E  <-- Store blue scroll to screen 04
8F 27 CD 7E  <-- Store blue scroll to screen 07

28 60        <-- End scroll color-change ASM
Finally, in SMILE, go to room 795FF and open the door editor
from door $02, change the door ASM pointer to EA66, click the "Save Door Link"
button, then close the door editor, which takes care of cell #3's door ASM.
18.
Make sure all doors are working exactly
as they should.
Right now, the horizontal doors connecting room 793AA to room 7E9A0 should both
work perfectly, but the two vertical sets of doors still have some problems.
Entering cell #3 causes a duplicate blue door cap to appear. This is because the
door is one tile lower than usual, which is easily fixed by opening the door
editor on door $02 in room 795FF, and changing the Door Cap Y from 2D to 2E.
![[IMG_061.png: Door Cap Y mistake]](./images/IMG_061.png "Inaccurate Door Cap Y value for room 795FF, door $02")
To switch off the acid that's filling the room, open the FX Editor window,
and right underneath Liquid Options, change $00C8 into $FFFF, uncheck the "Large
Tide" checkbox, then click the "Save FX Data" button.
This next one is a little more subtle, but the Distance To Spawn value for
door $01 in room 7E9A0 could use an adjustment. It is currently set to 01C0,
which works, but Samus appears a bit further from the door than I'd like. 0140
is a good value to use, and it's what I default to for floor doors.
Open the door editor for door $01 in room 7E9A0, change 01C0 to 0140 and
click the "Save Door Link" button:
![[IMG_062.png: Distance To Spawn floor comparison]](./images/IMG_062.png "Floor door with Distance To Spawn values of 01C0 and 01C0")
For ceiling doors, 01C0 should be used. If it's a tile shorter (like door $01
in room 7E9A0), then 0180 can be used, which is what we're doing right now. Open
the door editor for door $02 in room 795FF and change the Distance To Spawn to
0180, then click the "Save Door Link" button:
![[IMG_063.png: Distance To Spawn ceiling comparison]](./images/IMG_063.png "Ceiling door with Distance To Spawn values of 0180, 01C0 and 0200")
Next, open the door editor for door $00 in room 7E9A0 and change its Distance
To Spawn to 0140.
For door $02 in room 7948C, change the Distance To Spawn to 01C0.
Almost done with all of the doors and camerawork! One task remains. Remember
that trick I mentioned earlier about being able to use a floor door inside of a
blue scroll instead of green? To do that, we'll need two scroll PLMs.
19.
Decide how many PLMs your room will have,
if possible.
PLM stands for Post-Load Modification. They allow code from bank $8F to execute
after the room has already been loaded, under various conditions, such as
touching or shooting a certain spot. PLMs consist of items,
red/green/yellow/gray door caps, save stations, missile/energy/map stations, and
some other stuff. For a room's PLM Set pointer, each PLM uses 6 bytes in bank
$8F, plus a required instance of "00 00" at the very end of the string.
You know where this is going. Find some free space in bank $8F. I'm going to
use 7EA80. In SMILE, change the PLM Set pointer to EA80, uncheck Overwrite, then
click Save Pointers. Under "Enemies / PLMs" in the Room MDB tab, set the "PLMs
In Room" slider to 02, then save the room. If you don't have PLMs hidden, you
should see what looks like a red question mark block appear in the upper-left
corner of the room (to unhide: "Preferences > View > Layers > PLMs" or hotkey
F5). This is two blank PLMs, stacked on top of each other. They can be
left-clicked and dragged + dropped anywhere in the room. Also notice the small
yellow pop-up that says "PLM Index $00", as this box tells you that particular
PLM's order in the list. Currently only PLMs $00 and $01 exist in room 7E9A0, at
PLM Set pointer EA80.
Crash warning: the red question mark block PLMs will cause
the room to not load (screen stays black). Change them to some other type of PLM
to fix.
Right click on PLM $00 to bring up the PLM editor, and select the scroll PLM
(B703) from the PLM Selector, then click the "Save PLM" Button. Do the same
thing with PLM $01, and then save the room:
![[IMG_064.png: new PLMs]](./images/IMG_064.png "02 PLMs added, index $00 and index $01")
Move the scroll PLMs down so one of them is right above the blue cap of door
$00, and then place the other PLM three tiles above it. It doesn't matter which
PLM is closer to the door. Next to the scroll PLMs, you'll need a row of three
H-copy blocks with BTS numbers either FF FE FD or 01 02 03, depending which side
of the PLM you place them (it doesn't matter). I've demonstrated both ways in
the screenshot below:
![[IMG_065.png: scroll PLM extension]](./images/IMG_065.png "H-Copy extending the scroll PLM's range")
REMINDER: Ctrl (hold) + left-click (hold) on tile-type or
PLM being copied + move mouse cursor = auto-draws H-copy and V-copy blocks. More
on H/V-copy later.
HOW TO USE SCROLL PLMS
The "Main PLM Variable" value,
for scroll PLMs, is a LoROM address to bank $8F. Each scroll PLM is just a
pointer to data that can change scroll colors, which activates when Samus
touches the PLM or any H/V-copy blocks that originate from the PLM. Each screen
that has its color changed by a scroll PLM requires 2 bytes, plus a required
"80" at the very end of the string to close it. One scroll PLM can change many
screen colors at once. Scroll PLMs cannot run custom code, beyond varying how
many scrolls are changed, and to which colors.
In HxD, find some free space in bank $8F that isn't going to be overwritten
by anything new added (don't use EA80, because we still need to add more PLMs
later). Since we're only going to need three bytes for each scroll PLM, we can
find some other spots to wedge them in easily. I'm placing mine at 7E9FA and
7E9FD. At both of those offsets, enter these three bytes, and then save the ROM:
06 00 80
![[IMG_066.png: scroll PLM data]](./images/IMG_066.png "7E9FA and 7E9FD's new scroll PLM data")
In SMILE, give PLM $00 a Main PLM Variable of E9FA, and PLM $01 a Main PLM
Variable of E9FD. Save the room.
You should now see a thick red outline appear over screen 06, which only
becomes visible while your mouse cursor is sitting on one of the scroll PLMs. If
you don't see this second outline color appearing, check "Preferences > View >
Show Scroll PLM Changes".
Right-click on the lower scroll PLM that's right against the blue door cap
(for me, this is PLM $00), then click on the "Edit PLM Scroll Data" button,
which brings up a small confirmation pop-up. Once you click OK for this pop-up,
the screen size will change to 8x8, but this is NOT the same 8x8 editor that you
access through Preferences or with the Home/End keys. This editor is only
accessed by clicking the Edit PLM Scroll Data button, and exited by changing
back to a larger view size, or reloading the room. Notice that the Level
Editor's window title now says "Level Editor - Editing Scroll PLM" as well:
![[IMG_067.png: scroll PLM editor]](./images/IMG_067.png "PLM $00 changing screen 06 to green")
In this scroll PLM 8x8 editor, do not click on any other screens besides 06,
or you'll write more than three new bytes of scroll data, which we don't want to
do. If you ever accidentally click on a screen that originally had no color,
just click on it a few more times to cycle through until the color disappears
again (the scroll PLM editor's changes aren't actually saved to the ROM until
you save the room). Click screen 06 until the new thick red outline is replaced
by a thick green outline, and then save the room. Return to your normal editing
view size. The bottom scroll PLM should now display a thick green outline
whenever you set your mouse cursor on it.
The other PLM (for me, this is PLM $01) will still display a red outline when
you set your mouse cursor on it, which isn't what we want either, so right-click
the PLM, click the Edit PLM Scroll Data button again, and click on screen 06
until it has a thick blue outline, save the room, then return to your normal
editing view size:
![[IMG_068.png: scroll color editor]](./images/IMG_068.png "PLM $01 changing screen 06 to blue")
If you look at the bytes at offset 7E9FA now, you'll see that they've been
changed from "06 00 80 06 00 80" into "06 02 80 06 01 80" by SMILE. You could
have entered the second string of bytes from the start, but I wanted to show you
how SMILE's scroll PLM editor worked.
Together, these two scroll PLMs will change screen 06 to green once Samus is
on top of the door/falling through it, then back to blue once she is a few tiles
above it, thus allowing use of a blue scroll that only changes to green for the
very short moment of time that it actually needs to be green. The ASM pointer of
the door below (door $03 in room 7948C) is already taken care of, which means
that all of room 7E9A0's doors are now finished!
The three cells dividing Room 7E9A0 should now be acting as three separate
rooms. Test all of the doors out and make sure there aren't any lingering
problems.
Changing multiple screens at once using a single scroll PLM is done the same
way. An example piece of code might look like this: 0B 01 0C 01 0D 01 0E 01 0F
01 80 - in this example, screens 0B, 0C, 0D, 0E and 0F would all instantly be
changed to 01 (blue) once Samus touched the PLM, and then of course there's the
required 80 at the very end. Scroll PLMs that affect multiple screens are also
previewed in SMILE by setting your mouse cursor on the PLM.
Decide on the rest of this room's PLMs. If you're not the type of person to
map things out ahead of time (I am not), it can be hard to think of what to add
right now, without seeing the rest of the room completed. Remember that each PLM
uses up 6 bytes. At the PLM Set pointer, you can leave the next few lines of FF
bytes free (example: you could designate 7EA80-7EABF for room 7E9A0's PLMs
only), in case you decide to add more PLMs to the room later on. Personally, I
like to just add some extra blank PLMs (arrows work fine), so I can grab one and
turn it into any other PLM I need quickly as I'm level editing. Once the room is
completed, any unused blank PLMs can be deleted.
Time to explain those six PLM bytes. In HxD, go to offset 7EA80,
which is where room 7E9A0's PLMs are. Right now, the data there should be "03 B7
09 2C FA E9 03 B7 06 29 FD E9 00 00", which composes the two scroll PLMs we just
edited with SMILE. Here's the data, arranged vertically:
PLM Index $00:
03 B7  <-- PLM ID (entry $B703 in PLM Selector)
09     <-- X position, counted from the very left in tiles
2C     <-- Y position, counted from the very top in tiles
FA E9  <--  Main PLM Variable ($E9FA)

PLM Index $01:
03 B7  <-- PLM ID (entry $B703 in PLM Selector)
06     <-- X position, counted from the very left in tiles
29     <-- Y position, counted from the very top in tiles
FD E9  <--  Main PLM Variable ($E9FD)

00 00  <--  Ends the PLM data string
Copy these bytes, paste them at 7EA80, and save the ROM: 03 B7
09 2C FA E9 03 B7 06 29 FD E9 3B B6 01 0F 00 00 3B B6 02 0F 00 00 3B B6 03 0F 00
00 3B B6 04 0F 00 00 3B B6 05 0F 00 00 00 00 - what these bytes will do is add
five new arrow PLMs to the room. This could also be done with SMILE, but doing
it with a hex editor like this can save time:

After you've done that, go back to SMILE and reload the room. You should now
see five red arrow PLMs along the bottom of screen 00, below door $02. These are
PLMs $02-$06. The "PLMs In Room" scroller will also now reflect the new number
of PLMs by changing from 02 to 07. These five arrow PLMs are extra blanks, which
you could leave alone for now, and use later after you've designed more of the
room.
Now's as good of a time as any to learn about the other PLMs, so let's place
a few more.
First, go to room 793AA and right-click on the power bomb expansion that we
moved earlier. Note that its "Main PLM Variable" value is 0000. You'll also see
that in the PLM Selector, $EEE3 is selected; change that to $B63B, which is the
very top entry, then click the Save PLM button. Drag the arrow PLM somewhere
off-screen. I also changed the pedestal that the item was sitting on into a
normal block:

Go back to room 7E9A0, right-click on PLM $02 (the first arrow) and select
$EEE3 in the PLM Selector. For all item expansion PLMs, the Main PLM Variable
value must be unique to that particular expansion. This power bomb expansion has
a Main PLM Variable of 0000, which is what that power bomb expansion in room
793AA was using. Because we just turned that power bomb expansion into an arrow
PLM, we freed up item index 0000, which means we can use 0000 for this new power
bomb expansion in room 7E9A0 instead. Click the Save PLM button. Place this
power bomb expansion somewhere in cell #1, and then save the room.
Right-click PLM $03 and select $EEDB in the PLM Selector, which is a missile
expansion. Because this missile is new, and it's not replacing an existing item
index like the power bomb expansion did with 0000, we need to use a Main PLM
Variable for this missile that isn't shared by any other items. There are plenty
of unused values to choose from. I'm going to use $0051. Click the Save PLM
button.
Right-click PLM $04, make it into a super missile expansion ($EEDF
in the PLM Selector), give it a Main PLM Variable value of 0052, then click the
Save PLM button. Place the missile and super missile expansions somewhere in
cells #2 and #3, and then save the room.
Main PLM Variable (items): unused values by default
are $0051-007F, and $009B-00FF.
Main PLM Variable (doors): unused values by default
are $0061-007F, and $00AD-00FF.
IMPORTANT: the Main PLM Variable value for
items and doors is also known as its index. The PLM Index Tools in the SMILE
RF's ROM Stuff tab can search for items or doors sharing the same index,
depending which of the two checkboxes is checked (i.e., search $051 to check the
availability of Main PLM Variable $0051 for either items or doors). The search
results will appear in SMILE RF's Task Log window, which is opened by clicking "?
> Task Log". Clicking the Show All Indexes button will generate a text list of
all item or room indexes in the same folder as the ROM you currently have open,
depending which checkbox is checked.
Here's what to look for in the Task Log window:
![[IMG_071.png: SMILE RF task log]](./images/IMG_071.png "Task Log")
Door indexes shouldn't typically be shared among each other for the same
reason.
Item and door indexes aren't the same, which means that item $0051 won't
interfere with door $0051.
Random fact: adding +0200 to an item's index will allow that item to affect
doors (i.e., collecting an item with a Main PLM Variable of $0251 could cause a
gray door with an index of $0051 in another room to become blue, without
flashing). This cannot be done the other way around (opening doors causing items
to disappear) without using custom code.
By learning how to use the item PLMs, you also just learned how to use the
gray/pink/green/yellow door cap PLMs, because they work exactly the same way.
I'm gonna leave the remaining two arrow PLMs alone for now.
And that's pretty much how you create/edit PLMs! There are many more PLM
types, but the instructions included for them in SMILE are very straightforward.
PLMs are much easier to use than enemies.
20.
Never use arrow PLMs. Use H-Copy and
V-Copy BTS instead!
It needs to be stressed again that the red arrow PLMs should only be used as
place-holders, if at all. I choose them as place-holders because they're
invisible in-game, they won't react to anything that Samus does if you're not
using them as intended, and they're at the top of the PLM Selector list.
The original Super Metroid uses red arrow PLMs to extend the range of scroll
PLMs often, which wastes space in bank $8F (6 bytes for each arrow). H-Copy and
V-Copy blocks only use a few bytes of level data, which is a much better option.
Arrow PLMs are limited to unbroken strings, and you can't have more than 40 PLMs
in a room. H/V-copy aren't limited in these ways. Because arrow PLMs are
completely obsolete, you could delete all of them from bank $8F and have a lot
of extra space to work with.
H-Copy and V-Copy BTS will be used alongside scroll PLMs often, and they can
be used the same way with any PLM, or even other BTS. Touching any of the H-Copy
or V-Copy tiles in the picture below would cause Samus to take damage from the
spike block, because all H-copy and V-copy BTS do is pass the attributes of BTS
and PLMs along through each other, like a current. The spike block is a source.
A continuous chain of H/V-Copy blocks is not required, however the count must be
maintained over gaps:
![[IMG_072.png: how to use H/V-copy]](./images/IMG_072.png "Demonstration of H-Copy and V-Copy usage")
The gray-numbered tiles in the picture above are there to demonstrate how the
BTS number count must always be maintained if you have gaps (the gray tiles
themselves can be any type of block).
To move attributes up/left, count forward in hex, starting from 00. To move
attributes down/right, count backwards in hex, starting from FF. The simplest
way of actually explaining how to use H/V-Copy would be to just hold the Ctrl
key, left-click on the BTS/PLM you want copied, drag your mouse away from the
BTS/PLM in any direction, release left-click.
OPTIONAL: H/V-copy blocks can be used to create remote door
switches. Blue door caps themselves being shootable works because of V-copy
blocks. The shot block with the red 41 on it in the screenshot below needs to be
shot or bombed by Samus in order to trigger the door opening sequence, so we can
easily just make straight paths going from the 41 by Ctrl(hold) +
Left-click(hold) + dragging from it in straight lines, then getting rid of all
but the turning and end points:
![[IMG_073.png: remote gate switch]](./images/IMG_073.png "H-Copy and V-Copy being used to create a remote door gate")
It's important that Samus is able to shoot/bomb ONLY the blue door switch, or
the blue door cap itself, to cause the door to open. I did this by routing the
H/V-copies straight up from the shot block with BTS 41 to the very top of the
room, then straight right until directly above the blue switch, then straight
down onto the blue switch itself. Because Samus is in a hallway, none of her
weapons will affect the very top unseen row of tiles on the current screen,
giving us a perfectly functional remote door switch! This also works with
red/green/yellow doors.
21.
SMILE's layers, tile highlighting, and
Graphic/BTS Only.
SMILE has many layers that you may need to switch on or off as you're editing.
Now is the time to become familiar with how these work, if you aren't already.
These layers can be toggled in the Preferences menu ("Preferences > View >
Layers"), or by using their respective hotkeys (F1-F8).
List of SMILE's visible layers + hotkeys (from part 1):
Layer 1: main foreground
graphics layer, used for floors, walls, ceilings, doors, etc. Hotkey: F1
Layer 2: optional second graphics layer. Drawn
underneath layer 1, usually used for the room's background. Hotkey: F2
BTS: invisible tile-type layer. Determines the
physical attributes for each tile in the level editor window (making a block
breakable by shooting it, for example). BTS stands for Behind The Scenes, due to
its responsibility in making blocks behave the way they should. Hotkey: F3
Scrolls: the red, green or blue squares that
outline every screen in the room. To change their color, switch the Level Tile
Size to "8x8 (scroll editor)" and click on them. Hotkey: F4
PLMs: room objects that aren't part of the BTS
layer, such as items, save stations, all of the door caps that aren't blue, etc.
Hotkey: F5
Enemies: hide or unhide all enemies in a room.
Hotkey: F6
Show All: unhides any and all of the above
layers if they're hidden. Hotkey: F7
Hide All: hides all but Layer 1 and Layer 2 with
a single command. Hotkey: F8
TILE HIGHLIGHTING & GRAPHIC/BTS-ONLY CHECKBOXES
Ridiculously useful for checking yourself before you wreck somebody else's good
time.
"Highlight Same Tile Type" checkbox:
highlights all instances of the currently selected BTS type with a thick red
outline. Located near the top of SMILE RF's Tiles & BTS tab.
This checkbox is great for error-checking your room's BTS map. In the
screenshot below, the lone red square is solid, even though it looks exactly
like the surrounding air. Directly below it, there are two blocks that are air,
even though they look exactly like the surrounding solid blocks. Notice how the
red outlines are different, depending on which tile-type is displayed
(underlined red):
![[IMG_074.png: tile highlighting]](./images/IMG_074.png "Highlight Same Tile Type")
It's easy to mess up and have solid or air tiles that aren't supposed to be
there, so it's good to check the tile types like this every once in awhile.
"X Flip", "Y Flip", and "X/Y Flip" checkboxes:
highlights all flipped tiles with a yellow outline. Located near the top of
SMILE RF's Tiles & BTS tab.
These checkboxes work the same way as Highlight Same Tile Type, except they
can detect invisible air tiles that are flipped needlessly, which wastes
additional bytes of level data, due to how the rooms are compressed. Instead of
a red outline, as with the tile type, the X/Y tile flips are marked yellow. To
demonstrate how this works, turn on the Show Current Room Size setting in
Preferences, then start flipping air files using the four arrow hotkeys, and
watch as the level data number rises, while the room itself still looks exactly
the same! The picture below demonstrates this:
![[IMG_075.png: BTS flip]](./images/IMG_075.png "X, Y and XY flip")
Check for wasteful flips among the foreground filler and background tiles as
well. This could potentially save hundreds of bytes or more in rooms that aren't
very small. You should scrutinize every single tile in a room at least once
before calling that room completed, because it is very easy to miss something.
It sucks to watch somebody else stumble through obvious mistakes that you could
have prevented.
"Graphic Only" and "BTS Only" checkboxes:
located under the Clipboard section of SMILE RF's Tiles & BTS tab. These
checkboxes allow you to place only the tile graphic, or only the tile type,
instead of both at once by default. Play around with the checkboxes until you
figure out exactly how they work, and you should see why this is a really nice
feature. Tiles placed on layer 1 with Graphic Only checked are set as air tiles
with BTS number 00. For BTS Only, the tile type and BTS numbers are copied, but
the graphic is not. There's also the "=" hotkey for BTS type, which places the
last tile-type that you right-clicked, but not its BTS number.
![[IMG_076.png: Graphic Only or BTS Only]](./images/IMG_076.png "Graphic Only and BTS Only checkboxes in action")
22.
All BTS types and their uses.
Note that for some tile types, using different BTS numbers can make them behave
differently. Known variations for different BTS numbers are explained.
There are some types that can have 1x2, 2x1 and 2x2-sized
versions, which is accomplished using H-copy and V-copy. These types are shot,
bomb, crumble, air(shot), and air(bomb). Here's a nice little image that shows
exactly how they work:
![[IMG_077.png: breakable blocks]](./images/IMG_077.png "How to use 1x2, 2x1 and 2x2 destructible blocks")
![[IMG_078.png: air tile]](./images/IMG_078.png "AIR type")
AIR: Samus passes/falls freely
through air tiles. Air is the most commonly used BTS. Unless you're using custom
code, the BTS number for air tiles should always be 00.
![[IMG_079.png: slope tile]](./images/IMG_079.png "SLOPE type")
SLOPE: the many different neon green
slopes that you see throughout the game are all the same tile type (slope). It's
their different BTS numbers that give them different shapes and behaviors. To
avoid confusion, SMILE displays these as various neon green shapes overlaying
the tiles that are appropriately flipped, instead of bothering to display their
BTS numbers in red, as it does with other tile types.
![[IMG_080.png: air X-ray tile]](./images/IMG_080.png "AIR (X-RAY) type")
AIR (X-RAY): these behave exactly
like air tiles, except air(x-ray) tiles will not disappear when Samus X-rays
them. Useful for scenery that isn't meant to hide secrets from the player. This
type was called "Air Fool X-Ray" in older SMILE versions. Unless you're using
custom code, the BTS number for air(x-ray) tiles should always be 00.
Air(x-ray) with BTS
number 02:
acts as a spike block that does less damage to Samus than a normal spike,
while also letting her pass/fall through it. Some of its attributes can be
adjusted with a hex editor:
Damage: A188A - 10 00 ($0010 damage, counted in hex)
Flickering invincibility timer: A1871 - 3C 00 ($003C frames)
Flinch duration: A1877 - 0A 00 ($000A frames)
![[IMG_081.png: treadmill tile]](./images/IMG_081.png "TREADMILL type")
TREADMILL: used by Wrecked Ship's
left/right conveyors, and Maridia's downward quicksand/sandfalls. There are many
unused treadmill variations. Some of them are area-specific, but most of them
act the same, or do nothing.
Treadmill BTS numbers
(Wrecked Ship):
08: conveyor, moving right
09: conveyor, moving left
Treadmill BTS numbers (Maridia):
82: quicksand
85: sandfalls
![[IMG_082.png: air shot tile]](./images/IMG_082.png "AIR (SHOT) type")
AIR (SHOT): an air tile that can be
destroyed if Samus shoots or bombs it. Unused in the original Super Metroid. Can
be sized 1x2, 2x1 and 2x2. Respawns as a regular shot block.
Air(shot) BTS numbers:
00: air(shot), respawning
01: 2x1 air(shot) block, respawning
02: 1x2 air(shot) block, respawning
03: 2x2 air(shot) block, respawning
04: air(shot) block, non-respawning
05: 2x1 air(shot) block,
non-respawning
06: 1x2 air(shot) block,
non-respawning
07: 2x2 air(shot) block,
non-respawning
![[IMG_083.png: H-copy tile]](./images/IMG_083.png "H-COPY type")
H-COPY: extends the reach of PLMs or
other BTS horizontally. These are explained above in more detail.
![[IMG_084.png: unused tile]](./images/IMG_084.png "UNUSED type")
UNUSED: does nothing normally, but
can be modified to run custom code.
Grapplable air: go to offset A2847 and change C9 into D1 to make
the "Unused (BTS numbers $00-03)" into an air tile that can also be grappled
onto.
![[IMG_085.png: air bomb tile]](./images/IMG_085.png "AIR (BOMB) type")
AIR (BOMB): an air tile that can be
destroyed if Samus bombs, speed boosts, or screw attacks through it. Unused in
the original Super Metroid. Can be sized 1x2, 2x1 and 2x2. Respawns as a regular
bomb block.
Air(bomb) BTS numbers:
00: air(bomb) block, respawning
01: 2x1 air(bomb) block, respawning
02: 1x2 air(bomb) block, respawning
03: 2x2 air(bomb) block, respawning
04: air(bomb) block, non-respawning
05: 2x1 air(bomb) block,
non-respawning
06: 1x2 air(bomb) block,
non-respawning
07: 2x2 air(bomb) block,
non-respawning
![[IMG_086.png: solid tile]](./images/IMG_086.png "SOLID type")
SOLID: solid tiles make up almost
all of the floors, walls, ceilings, and other structures that Samus cannot pass
through. Unless you're using custom code, the BTS number for solid tiles should
always be 00.
![[IMG_087.png: door tile]](./images/IMG_087.png "DOOR type")
DOOR: triggers a room transition
sequence if Samus touches it, which should never happen unless the door has been
properly set. Doors / door tiles have already been explained above in great
detail.
![[IMG_088.png: spike tile]](./images/IMG_088.png "SPIKE type")
SPIKE: spikes are solid blocks that
will damage Samus the moment she touches them. There are a few BTS number
variations that can be given their own unique damage, flinch and invincibility
timer values by changing them with a hex editor.
Spike (BTS number 00):
Damage: A0EB3 - 3C 00 ($003C damage)
Flickering invincibility timer: A0E9A - 3C 00 ($003C frames)
Flinch duration: A0EA0 - 0A 00 ($000A frames)
Spike (BTS number 01):
Damage: A0EEE - 10 00 ($0010 damage)
Flickering invincibility timer: A0ED5 - 3C 00 ($003C frames)
Flinch duration: A0EDB - 0A 00 ($000A frames)
Spike (BTS number 03):
Damage: A0F29 - 10 00 ($0010 damage)
Flickering invincibility timer: A0F10 - 3C 00 ($003C frames)
Flinch duration: A0F16 - 0A 00 ($000A frames)
Spike (BTS number 0E):
Acts as a solid block that shows up as tile $005F if Samus
X-rays it. The original Super Metroid uses these for the invisible bridge in
blue Brinstar.
![[IMG_089.png: crumble block]](./images/IMG_089.png "CRUMBLE type")
CRUMBLE: solid blocks that will only
break if Samus steps on them. Can be sized 1x2, 2x1, and 2x2.
Crumble block BTS
numbers:
00: crumble block, respawning
01: 2x1 crumble block, respawning
02: 1x2 crumble block, respawning
03: 2x2 crumble block, respawning
04: crumble block, non-respawning
05: 2x1 crumble block, non-respawning
06: 1x2 crumble block, non-respawning
07: 2x2 crumble block,
non-respawning
0E: speed booster block, respawning
0F: speed booster block,
non-respawning
![[IMG_090.png: shot block]](./images/IMG_090.png "SHOT type")
SHOT: destroyed by beams, missiles,
and bombs. Can be sized 1x2, 2x1, and 2x2.
Shot block BTS numbers:
00: shot block, respawning
01: 2x1 shot block, respawning
02: 1x2 shot block, respawning
03: 2x2 shot block, respawning
04: shot block, non-respawning
05: 2x1 shot block, non-respawning
06: 1x2 shot block, non-respawning
07: 2x2 shot block, non-respawning
08: power bomb block, respawning
09: power bomb block, non-respawning
0A: super missile block, respawning
0B: super missile block,
non-respawning
![[IMG_091.png: V-copy tile]](./images/IMG_091.png "V-COPY type")
V-COPY: extends the reach of PLMs or
other BTS vertically. These are explained above in more detail.
![[IMG_092.png: grapple block]](./images/IMG_092.png "GRAPPLE type")
GRAPPLE: solid blocks that Samus's
grappling beam can latch onto.
Grapple block BTS
numbers:
00: grapple block
01: crumble-grapple block, respawning
02: crumble-grapple block,
non-respawning
![[IMG_093.png: bomb block]](./images/IMG_093.png "BOMB type")
BOMB: destroyed by bombs, screw
attack, and speed booster. Can be sized 1x2, 2x1, and 2x2.
Bomb block BTS numbers:
00: bomb block, respawning
01: 2x1 bomb block, respawning
02: 1x2 bomb block, respawning
03: 2x2 bomb block, respawning
04: bomb block, non-respawning
05: 2x1 bomb block, non-respawning
06: 1x2 bomb block, non-respawning
07: 2x2 bomb block, non-respawning
The tile types below this point are
actually just BTS number variations of the 16 main BTS types listed above. This
is why they, like the green slopes, are not included in the same tile-type list,
but are instead located in a separate spot to drag & drop from.
![[IMG_094.png: super missile block]](./images/IMG_094.png "SUPER MISSILE type")
SUPER MISSILE: shot block with BTS
number 0A (respawning) or 0B (non-respawning).
![[IMG_095.png: power bomb block]](./images/IMG_095.png "POWER BOMB type")
POWER BOMB: shot block with BTS
number 08 (respawning) or 09 (non-respawning).
![[IMG_096.png: speed booster block]](./images/IMG_096.png "SPEED BOOSTER type")
SPEED BOOSTER: crumble block with
BTS number 0E (respawning) or 0F (non-respawning).
![[IMG_097.png: crumble grapple block]](./images/IMG_097.png "CRUMBLE GRAPPLE type")
CRUMBLE GRAPPLE: grapple block with
BTS numbers 01 (respawning) or 02 (non-respawning).
![[IMG_098.png: right conveyor]](./images/IMG_098.png "CONVEYOR (RIGHT) type")
CONVEYOR (RIGHT): treadmill block
with BTS number 08.
![[IMG_099.png: left conveyor]](./images/IMG_099.png "CONVEYOR (LEFT) type")
CONVEYOR (LEFT): treadmill block
with BTS number 09.
![[IMG_100.png: downward conveyor]](./images/IMG_100.png "CONVEYOR (DOWN) type")
CONVEYOR (DOWN): treadmill block
with BTS number 82 (quicksand) or 85 (sandfalls).
![[IMG_101.png: enemy break block]](./images/IMG_101.png "ENEMY-BREAK type")
ENEMY-BREAK: spike block with BTS
number 0F. This block acts exactly like a solid, except that if an enemy touches
it, the block will be destroyed. The original Super Metroid requires that
Shaktool destroy a wall of these blocks before Samus can collect the spring
ball.
![[IMG_102.png: enemy solid block]](./images/IMG_102.png "ENEMY-SOLID type")
ENEMY-SOLID: crumble block with BTS
number 0B. This block acts like air for Samus, but solid for enemies.
Enemy-solid is unused in the original Super Metroid. Unfortunately, this block
also stops Samus's projectiles, and it reacts with X-ray. A crumble block with
BTS number 10 works exactly the same way, minus the X-ray reaction.
23.
It's finally time to start designing the
room!
There are certain types of graphics that are present in most of the tilesets,
because they serve the same purpose. Memorize what those look like, and you'll
easily be able to see how they're used for structuring a room. There might not
be a fast way to learn this, besides studying how the original game's rooms are
constructed, or looking at rooms that other hackers have made. Here's a
simplified illustration of how some of Crateria's tileset is put together:
![[IMG_103.png: tile formation]](./images/IMG_103.png "Basic Crateria tiles and formation")
There's obviously a lot more to it than what's in that picture above, because
I only showed a small part of the Crateria tileset's tile table, but the picture
very clearly demonstrates the core idea. Beyond that, it's mostly just more
slopes, more BTS, and graphical variations of the common types, such as floors
or walls, to keep the terrain from looking too repetitive. This applies to every
tileset.
It might help to absolutely master Crateria's tileset first and
foremost, and just ignore all of the other area tilesets until you've done that.
Once you've gotten Crateria's tileset completely figured out, the other tilesets
will be very easy to learn.
Here's a more complex Crateria structure, marked in the same way (note that
some of the tiles are flipped this time):
![[IMG_104.png: detailed tile formation]](./images/IMG_104.png "More Crateria tiles and formation")
That's pretty much it for how rooms are put together visually. Backgrounds
are exactly the same, except they're on a separate layer, and they don't have a
BTS map, which means that backgrounds are graphic-only. Some of what goes into
level design is too varied and nuanced to try explaining here, and some of it
also comes down to our own personal preference as designers.
Creating a lush world that feels natural, and not creating a broken, buggy,
featureless obstacle course that feels completely unrewarding to play through is
hard. Stretching this lush creativity out over the length of a whole game is a
lot harder than that. Be prepared outdate your own level designs and ideas over
time as you get better. Experience with pixel art is helpful, and so is being
able to come up with creative ways of tiling things together, but these skills
are not required, and in fact, you will probably eventually learn them by
hacking Super Metroid anyway. Everybody's level editing habits will vary because
of personal preference, and because of the fact that you don't have to follow
the steps in a particular order to create a room. I'm not going to walk through
actually placing tiles, because that would make this guide even more
unnecessarily long, and it wouldn't actually be teaching you anything new.
24.
Slopes are essential.
Using slopes is pretty self-explanatory if you take awhile to examine how the
original game has them placed throughout all of the rooms (the neon-green shapes
show you which part of the tile is actually solid), but there are certain things
you'll need to know about some of them that isn't obvious right away. First,
here's a labeled picture of the table, with useless or buggy slopes colored red:
![[IMG_105.png: slope types]](./images/IMG_105.png "Slope table")
1. Half-solid (horizontal):
shinesparks are sometimes able to pass through these from below. These should be
used for small platforms. If you want to use a half-solid as a ground slope, use
slope #8 instead.
2. Half-solid (vertical): don't
use a line of these along any wall that Samus is able to shinespark horizontally
into, or she will be partially buried in them after the shinespark ends.
3. Quarter-solid: shinesparks are
able to pass through these from below.
4. Quarter-air: if you wanted
small stairs that Samus cannot smoothly run up and down, this one could be used.
5. Full-solid: bugged. Behaves
mostly like a solid block. Shouldn't use.
6. Small bump: raises and lowers
Samus's position by half of a tile as she runs over it.
7. Large bump: bugged. Causes
Samus to drop forward at the peak as she runs over it.
8. Half-solid (horizontal) #2:
shinesparks and normal jumps are able to pass through these from below. These
behave the same way squares do (slope #20) by pushing Samus towards the top or
bottom.
9-14. Square duplicates: useless.
These function, but using them is a waste of level data. #20 is the only square
slope you should use.
15. Stairs: bugged. Running up
stairs is a bit jagged on the camera, and running down stairs causes Samus to
drop forward.
16. Concave triangle: slightly
bugged. Samus cannot run down a hill of these without dropping forward. Uphill
seems to work fine.
17. Horizontal lines: bugged. Acts
mostly like air.
18. Vertical lines: bugged. Acts
mostly like air.
19. Triangle: raises or lowers
Samus's position by one tile (16 pixels) as she runs over it.
20. Square: used alongside
triangles and hills on floors and ceilings to prevent Samus's running and
shinesparking from unintentionally being stopped. Don't flip these horizontally
(X-flip); doing that will waste level data. Only use vertical flips (Y-flip) for
squares. Stacking multiple squares on top of each other can create a column that
instantly transports Samus up or down several tiles, but doing that isn't
advised because it can cause a graphical error if there is vertical scrolling
allowed. As a general rule, Samus should never be able to touch the sides or
bottom of a square.
21-22. Hill: same purpose as
triangle (19), stretched out over the length of one and a half tiles.
23-24. Smooth hill #1: same
purpose as triangle (19), stretched out over the length of two tiles.
25-27. Smooth hill #2: same
purpose as triangle (19), stretched out over the length of three tiles.
28-29. Steep hill #1: raises or
lowers Samus's position by two tiles as she runs over them. 28 must be placed
directly on top of 29 (if Y-flipped, then directly underneath). Samus cannot run
down these without dropping forward.
30-32. Steep hill #2: raises or
lowers Samus's position by three tiles as she runs over them. 30, 31 and 32 must
be stacked on top of each other. Samus cannot run down these without dropping
forward.
Here are some examples of slope use with various tilesets:
![[IMG_106.png: triangle and square slopes]](./images/IMG_106.png "Basic hill for different tilesets")
Some tilesets are limited in the types of slopes they can use by default,
because there were never graphics painted by the original creators to match up
with the shape of certain slopes. For example, Crateria doesn't have any
graphics that would really work well with slopes 21-32, which are great for
smooth tunnels and walls; on the other hand, Maridia has graphics that work for
all of those slopes and more. If you wanted Crateria tiles that work with all of
the slope shapes, you would need to paint new graphics yourself, or find
somebody else who can. Pixel art isn't covered in this guide.
IMPORTANT NOTE: you always want to use two squares next to
any triangle or hill if it's in a place where the player will easily be able to
use the speed booster near it. If it's a cramped area, or you're sure the player
won't be able to shinespark over it, then you can save on level data by only
using one square in those places. Doing this will prevent shinesparks from
occasionally getting stopped unexpectedly while passing over smooth surfaces,
which can be annoying. This is more of an issue with hills than it is with
triangles. Here's a picture for triangles:
![[IMG_107.png: hill slopes]](./images/IMG_107.png "Basic hill, triangle and square slopes only")
And with all of the hills, the same idea applies, except you might need an
extra 'layer' of squares in certain places to keep them from possibly stopping
shinesparks. The original game is missing these in a lot of places. Here's an
unedited section of room 7A923, with pink dots that mark where green squares
should have also been placed:
![[IMG_108.png: missing square slopes]](./images/IMG_108.png "Missing slopes from the original game")
SOMEWHAT LESS IMPORTANT NOTE: Bomb Torizo and Golden Torizo
are also able to walk along sloped surfaces if extra squares are used, except
for the Torizos, these extra squares will need to extend the length of the
floor, instead of only needing two squares like shinesparks do. Here's a picture
by Tyjet66 that demonstrates it:
![[IMG_109.png: Torizo slopes]](./images/IMG_109.png "Slopes for Bomb and Golden Torizo")
The yellow version of the slope table that appears when you check the "Yellow
Slopes" checkbox is just an exact copy of the default green slope table. There
is no reason to use it, unless you plan to make it behave differently than
green, which is beyond my knowledge.
25.
More need-to-know level design stuff.
TILING ERRORS
No matter how long you've been editing
Super Metroid, you should always be looking out for tiling errors. It's very
easy to make them, and there are many different kinds. The original Super
Metroid has some small tiling errors, which include needlessly placed slopes,
and lots of wasted level data.
Room 791F8 (the landing site) has a misplaced triangle slope near the first
door that you enter on the left. Also note the missing square above the blue
door cap, marked with a pink dot:
![[IMG_110.png: triangle slope errors]](./images/IMG_110.png "Slope errors in room 791F8")
And in the the room past that door, you can see two squares inside of the
wall by where you drop down, where Samus would never be able to reach them:
![[IMG_111.png: wasteful slopes]](./images/IMG_111.png "Extra square slopes that can be removed")
It can be tricky deciding what exactly constitutes a tiling error, and some
of it can come down to personal opinion/preference. I avoid having gaps that
aren't 1 tile tall (morph tunnels) or 3+, because areas that automatically force
Samus into a crouched position by spinjumping into them and therefore requiring
morph ball to escape from are just kind of annoying to me, and of course the
fact that not having the morph ball collected will turn all of these instances
of being crouched into permastucks.
More subtle than that, are graphical tiling errors. In red brick Brinstar
(room 7A253), both sides of the room darken out at the very left/right edges,
except for a single tile near the top of the room. And in Norfair (room 7ACB3),
there are some small bubbles that don't display a consistent light source
because the tiles are flipped, which is easily fixed by picking a different
graphic for them from the tile table. These two examples are pointed out with
red arrows in the picture below, with solutions underlined pink:
![[IMG_112.png: graphical tiling errors]](./images/IMG_112.png "Graphical tiling error examples")
If in doubt, you can always post your room on Metroid Construction's forum or
IRC channel, and ask people to point out any tiling errors that they can find.
UP SCROLL AND DOWN SCROLL
These two values are worth
mentioning (found near the top of SMILE RF's Room MDB tab), because they can
adjust how far the camera will scroll vertically, relative to Samus as she moves
through the room. This means that if there was something on the ceiling you
wanted the player to see more easily, you could use a higher Up Scroller value
like 90 to keep the camera closer to the ceiling. Down Scroller is the opposite,
which could be useful for a one-way descent. In the example picture below,
notice how the higher the Up Scroller value is, the more visible the ceiling
becomes:
![[IMG_113.png: Up Scroll]](./images/IMG_113.png "Up Scroller examples")
The Up/Dn Scroller values can also be changed using a door, or a custom PLM.
I don't know how to create a custom PLM, but if you wanted to change the Up/Dn
values using a door, there's a small string of bytes that you can paste in bank
$8F and point to with the door's ASM pointer. The bytes are: 08 E2 20 A9
XX 8D AD 07 A9 YY 8D AF 07 28 60. If you
wanted to change only the Up Scroller, you'd use 08 E2 20 A9
XX 8D AD 07 28 60, and for the Down Scroller only, it's 08 E2 20 A9
YY 8D AF 07 28 60. If the door also needs to change scroll colors, then
that code can be placed right before the 28 60.
CAMERA SNAPS
Camera snaps usually happen when part of a
red scroll suddenly becomes visible due to Samus entering another vertical row
of screens, which the camera will respond to by pushing the red scroll
off-screen and centering back on Samus. This is an intended function, but bad
level design can cause these camera snaps to become disorienting, and if the
snaps are too severe, a nasty screen-wrapping bug can happen and cause the
camera to lose track of Samus. The original Super Metroid has camera snaps in
quite a few places, and probably every Super Metroid hack has them.
There are two main ways you can deal with camera snaps: let them exist, and
just make sure that they can't cause the screen-wrap bug (this is what almost
everybody does), or structure your rooms so that camera snaps are very small
and/or impossible. The second option is not a very attractive option, because it
means having to follow a guideline for parts of some of your rooms.
Here's a picture with three example room structures. Camera snaps and
screen-wrap bug possible, camera snaps not possible, and only smaller camera
snaps possible:
![[IMG_114.png: camera snap range]](./images/IMG_114.png "Room structure examples for camera snaps")
The yellow arrows in the "camera snaps & screen-wrap bug possible" example
are vague paths that Samus could follow to cause the screen-wrap bug. In the
other two examples, the screen-wrap bug is not possible. The added blocks
(highlighted transparent purple) in the "camera snaps not possible" example must
be there for the camera snaps to be completely gone. The "only smaller camera
snaps possible" example will also work fine, as long as there are blocks to keep
Samus from getting closer than three tiles to the edge of the blue scroll while
also next the left edge of it (outlined in pink).
Because camera snaps can allow parts of screens to be seen that the
player should otherwise never be able to see, you should use some some kind of
basic filler foreground tile for red scrolls instead of leaving them blacked
out. If the foreground has a lot of detail in it, then you should figure
out how much of the foreground can possibly be seen ingame by the player, and
then adjust the amount of visible detailed foreground accordingly.
SCROLL SNAPS
Because green scrolls display the bottom
two tile rows of a screen and blue scrolls do not, walking directly into a blue
scroll from a green scroll can cause the camera to readjust by instantly
snapping upward. This won't break the game, but it could cause a harmless
graphical error. Elevate the floor by at least 6 tiles, for a length of 10 tiles
with 5 in each scroll (highlighted transparent purple) any time you're going to
have these two scroll colors side by side. Here's a picture:
![[IMG_115.png: scroll snap range]](./images/IMG_115.png "Green scroll into blue scroll")
LEVEL DESIGN TIPS
- Use the arrow hotkeys for flipping tiles in the
level editor. It is much faster than any other way of doing it.
- In the map editor, press 'E' while your mouse
cursor is sitting on any room to load that room. This saves a lot of
wasted time 'navigating' through doors in SMILE with Ctrl+E to edit nearby
rooms.
- Copy structures or layer 2 backgrounds from other
rooms, then edit those. This can be helpful if you have problems with
starting from a blank room.
- Reward the player's curiousity as much as you
can, even if it's not with items or progress.
- Consider each room's actual purpose, not just
what it looks like or what will be in it. This can be decided before
anything else, if you're the type to plan everything out in advance.
- Write out the item progression of your whole
hack.
Walk the reader (even if it's only you) through everything in your hack, using
a vaguely intended route for the player to follow. Does it flow well? Doing this
might help you tighten the route through your hack and reduce pointless
backtracking/confusion.
- Don't force players to use advanced tricks to
progress or collect everything.
Requiring precise walljumps, mockball, infinite bomb jumps, and other difficult
maneuvering that somebody who is totally new to the game couldn't learn fairly
quickly is probably a bad decision. Hackers are notoriously bad at gauging the
difficulty of their own hacks for a very long time after they've started
hacking, almost without exception.
- See how many bytes a room actually uses by
re-saving it with SMILE RF.
Most of Super Metroid's rooms have some amount of wasted level data bytes,
which you can free up easily. The original compression left no free space at all
between each room's level data, even though the rooms themselves often have
hundreds or more level data bytes to spare! If you want to see it in action, do
this: in HxD, select "Block: 21ACDB-21B1B9 / Length: 4DF" and copy these bytes
to your clipboard. Open a new text file and paste the bytes into it. Now open
room 79552 in SMILE RF, save the room, copy/paste the same exact block/length of
bytes from HxD into the text file again, and then compare the two chunks of
bytes. Notice anything different? There is a bunch of free space at the end now
of the second set, yet the room was not changed at all when you saved it! At
offset 21AFC5, there is now free space all the way to offset 21B1B9, which means
that 501 bytes have been freed up to use for other stuff (level data, graphics,
palettes, etc.)
- Be careful not to accidentally crash SMILE by
absent-mindedly leaving unsaved hex edits!
This can happen if you've been editing a room in SMILE, forget to save your
work, then start editing the ROM in HxD, and forget to save your work in that
program also. It really sucks to accidentally crash SMILE and lose most of the
room you just built. This is only really an issue if you're using HxD because of
its auto-refresh feature. Hex editors that don't auto-refresh opened files that
have been changed by another program won't have this crash risk.
26.
MISTAKES TO AVOID BECAUSE THEY COULD
BREAK YOUR GAME.
- Encountering vertical gaps that are
less than three tiles tall before the morph ball has been collected.
This is a very common mistake that is very easy to make. If you allow this to
happen, then somebody, someday will get permanently stuck there and have to
reset the game (assuming they still feel like playing your hack after this).
Samus should NEVER be able to become accidentally force-crouched into tight
spaces without the morph ball. You need the morph ball to escape, it's that
simple. Without it, there is no way to uncrouch and continue. If your hack
doesn't give the player morph ball very early in the game, then you must be
especially aware of this. Here is a picture:
![[IMG_116.png: permanently stuck]](./images/IMG_116.png "Don't let this be your hack!")
- Unmorphing or standing up from a
crouch in tight spaces underneath a Y-flipped square slope.
This buries part of Samus in solid rock, which also looks buggy. The example on
the left in this picture below can result in the player being permanently stuck
if they don't have the spring ball:
![[IMG_117.png: square slope clip]](./images/IMG_117.png "Unmorphing against Y-flipped square slopes")
This limits morph ball tunnels in a very significant way. Only straight
tunnels will work properly, because any sloped morph ball tunnel is either going
to possibly trap Samus if the player unmorphs, or otherwise act buggy in some
annoying way.
OPTIONAL: this issue of bland morph tunnels can be completely solved by
using Scyzer's
morph lock patch. The morph lock patch allows two new custom BTS types to be
used, which are "Air(x-ray)" tiles with BTS numbers 0C and 0D. Touching these
tiles will lock and unlock the ability to exit morph ball, allowing you to
create detailed morph tunnels without fear of the player becoming stuck because
they unmorphed and managed to clip through a slope.
As a general rule, try to keep sloped floors and ceilings at least 3 full
tiles apart.
- Avoid the use of respawning
blocks until bombs have been collected.
If a block respawns over Samus while she is morphed, she will most likely be
permanently stuck there if she doesn't have bombs. The block prevents Samus from
demorphing and moving, and so without bombs, there's no way to break that block.
Whoops!
![[IMG_118.png: respawning block error]](./images/IMG_118.png "Respawning shot block just doing its job")
- Double-check all square slopes in
your ceilings and floors.
Badly placed square slopes can very easily cause a permastuck. Square slopes
work by pushing Samus above or below it, depending how it is flipped vertically;
an incorrectly flipped square slope will pull Samus into the solid blocks above
or below, causing immediate immense frustration. Horizontal flipping doesn't
affect how square slopes behave. In this picture below, I vertically flipped a
square slope on the ceiling and floor, then showed how they both affect Samus
ingame:
![[IMG_119.png: square slope error]](./images/IMG_119.png "Incorrectly flipped square slopes on the ceiling and floor")
- Some enemies can mistakenly place
Samus inside of solid blocks.
Enemies that Samus can directly affect Samus's positioning also have the risk
of leaving the player permanently stuck inside of solid blocks. Yapping maw
(enemy $E7BF) can pull Samus inescapably into solid blocks if they're positioned
too far into the foreground. Platforms (enemy $D83F), shutters (enemies
$D53F/$D5BF), and the spiked platforms (enemies $DFFF/$E03F) will pass through
solid blocks and bring Samus along with them if their movement coordinates
aren't set correctly. The grapplable ripper (enemy $D3FF) near the Wrecked Ship
entrance is able to place Samus inside of the nearby wall under specific
conditions.
Elevators move Samus through solid blocks in a controlled way, as does the
walking Chozo statue that carries you to the gravity suit. Samus's ship also
moves Samus's on-screen position around under various conditions. Here's a
picture of the yapping maw, shutters and platforms doing things that they should
not be doing:
![[IMG_120.png: enemy errors]](./images/IMG_120.png "Enemies going above and beyond their call as enemies")
- Don't let Samus fall into
quicksand without the gravity suit. By default, standing in quicksand
without the gravity suit equipped immediately makes it impossible to jump out of
it.
This can actually be fixed by changing two bytes: at PC address 2348C,
replace 02 with 00, and then at 234BD, replace 01 with 00. You will now be able
to escape quicksand without the gravity suit. In the original Super Metroid,
it's insanely difficult to reach quicksand areas without the gravity suit
equipped. Changing these two bytes gives you the option of using Maridia's
quicksand areas early in the game.
- Don't create water-filled pits
that players can't escape from.
It is easy to accidentally make water unnecessarily difficult for Samus to
exit, even if it isn't totally inescapable. Don't know if you've made a body of
water too difficult to exit? Chances are, if you can't always jump out of it on
the first or second try, then it's probably too annoyingly difficult to exit,
and so the liquid level needs to be adjusted. To illustrate how easily this can
happen, I added a single extra solid tile to this familiar place in red brick
Brinstar. Without high-jump boots, gravity suit, or space jump, it becomes
impossible to get out:
![[IMG_121.png: stuck in water]](./images/IMG_121.png "Watery permastuck")
- Be careful with respawning blocks
that require speed booster, super missiles, or power bombs to destroy.
If these blocks respawn (or Samus goes through a door and brings non-respawning
blocks back), this could cause problems if there isn't enough room to run at
full speed, or some way to refill missiles, super missiles, and power bombs. If
you decide to use speed booster blocks, make sure that the player can easily
break them from either side; don't assume that they will know how to
shortcharge, or perform difficult shinesparks. These permastucks are especially
bad, because it usually takes the player awhile to realize that they've
encountered a game-breaking design error.
- Door cap PLMs and gate PLMs
should also be handled with care.
Keep the above paragraph's info in mind for the red, green, yellow and gray
door cap PLMs as well, even though they aren't generally set to respawn.
Blue, red, green, and yellow gates are mostly the same. Remember that the
player has the option of closing the gates again after opening and passing
through them, so plan your level design around this possibility by adding a
respawning enemy or something nearby on both sides of the gate.
- The varia and gravity suits could
potentially place Samus inside of solid blocks.
After collecting the varia and gravity suits, Samus is moved to the center of
the current screen, and her pose is changed so that she's standing upright and
facing the camera/viewer. If the varia and gravity suit items are not placed
near the center of the screen, and instead, there are solid blocks clustered
everywhere around the center of the screen, then collecting a suit could
possibly cause a permastuck once the suit moves Samus to that center position.
This is easily fixed in one of four ways: 1) test repeatedly and tweak the room
until the permastuck is gone, 2) keep the suit items in their original
single-screen-sized rooms and only make aesthetic adjustments if needed, 3)
remove the cutscenes that happen when you collect a suit, which would allow you
to place the suits as freely as any other item, or 4) change where the suits
move Samus in the room.
- Avoid the possibility of
encountering Botwoon or Norfair Ridley without charge beam.
In the original Super Metroid, Botwoon/Norfair Ridley become permastucks if
Samus runs out of missiles and super missiles during the fight without having
the charge beam in her inventory. Other bosses don't really become permastucks,
but they can be much more annoying to kill if charged shots aren't an option.
Bosses can be modified to take damage from normal uncharged shots, but I don't
have that info yet.
- Grappling blocks can semi-bury
Samus in solid blocks if they're not placed correctly.
Grappling beam is a pretty flawed feature, and there are many things wrong with
it that will start becoming apparent if you place grapple blocks or grapplable
enemies in tight places, or anywhere that isn't VERY spacious. Becoming
permastuck with grapple isn't easy to do, but getting slightly buried in solid
blocks is. You should also never place a grapple block directly in front of
Samus; if she is able to grapple onto a block or an enemy while standing totally
still, then you'll experience a weird positional bug that goes away when you
release grapple:
![[IMG_122.png: grapple bugs]](./images/IMG_122.png "Grapple beam quirks")
If a grapplable enemy is also able to move around while it is being grappled,
then you must be extremely careful, because Samus WILL pass through solid blocks
if the enemy's movement brings her close enough to any walls, floors or
ceilings. Seriously, always leave a lot of extra space around grapple blocks and
grapplable enemies, and test all of them very very thoroughly.
- Don't let Samus touch a red
scroll without changing it to blue or green first.
The camera won't follow Samus into the red screen, so if this happens
unintentionally, the player can very easily get lost off-screen somewhere with
no way to see how to get themselves back out.
- Ceiling slopes directly above a
door cap PLM will cause problems.
Samus will either be able to clip through the door cap, or more likely end up
permastuck immediately, because bombs won't be able to open the door:
![[IMG_123.png: door PLM error]](./images/IMG_123.png "Ceiling slope and door PLM causing a permastuck")
- The red question mark block PLM /
knight enemy will crash the game.
These appear if you add a new PLM or enemy to the room using the "Enemies /
PLM" sliders in SMILE RF's main window. They are blank placeholders that must be
changed into something else. If you try to test the room while either of these
placeholders are visible, the room will fail to load and give you nothing but a
black screen until you change the question mark PLM / knight enemy into
something functional. SMILE RF can set a default PLM/enemy to load so that this
room crash will no longer happen; this is done by clicking the "Use As Default"
checkbox underneath the preview picture of the selected PLM/enemy entry in the
list.
- The enemy editor's "Extended
Tilemap Format" checkbox will cause most enemies to crash the game.
There are only a few enemies that require this checkbox to be checked, such as
space pirates. Always assume it that should NOT be checked for the current enemy
that you're editing.
- Enemies $D0FF, $D13F, and $D17F
could cause a permastuck if any gray doors rely on killing them to unlock.
It's possible for them to fly too far off-screen and stop in a place that makes
them impossible for any of Samus's weapons to kill, while also putting Samus
outside of their attack range.
- Enemy $E97F can potentially cause
a permastuck if any gray doors rely on killing them to unlock.
If enemy $E97F's vulnerabilities are changed to allow it to be frozen by ice
beam, a bug in their AI that makes them fly far off in a random direction if
they're frozen and then allowed to unfreeze.
- Ceiling sidehoppers could cause a
permastuck if any gray doors rely on killing them to unlock.
They could fall upwards and out of Samus's reach if the room's ceilings are too
high. When using a ceiling or a floor sidehopper, make sure you know exactly how
far left/right they are able to travel throughout the room; give them loose
bounds so the player can't lead them into weird spots or get them wedged into
tight places that they weren't meant to be in.
- Actually, it's pretty easy for
enemies and PLMs to crash the game in general.
If your room stops loading (black screen when you try to enter it through a
door), or freezes when you walk near a certain spot, it's most likely an enemy
or PLM that needs to be fixed. For PLMs, a crash will usually be caused by an
incorrect "Main PLM Variable" value. For enemies, it could be several things:
there's the "Extended Tilemap Format" checkbox of course, but also the other
Enemy Data checkboxes near it, and the "Main AI Pointer" text fields. A bad Shot
AI pointer will make an enemy crash the game if you shoot it, for example.
- Shinesparks can pass through
H-Copy and V-Copy tiles if they are placed too close to the door cap.
Specifically, door transitions can accidentally place Samus on the other side
of them if she shinesparks through the door, so keep rows of V-copy tiles at
least one tile away from door caps.
There are other ways to get permastuck that I'm probably not
remembering right now, but I think I've mostly explained the ways that could
easily happen on accident. Many permastucks are so difficult and obscure that
it's not worth mentioning them here.
27.
My finished design for room 7E9A0.
I tried to mimic the design style of the original game so that these extra
rooms would feel like they've always existed in Super Metroid.
Only graphics visible:
![[IMG_124.png: graphics-only view]](./images/IMG_124.png "Room 7E9A0 with only graphics displayed")
Slopes, scrolls, BTS, and PLMs visible:
![[IMG_125.png: All layers visible]](./images/IMG_125.png "Room 7E9A0 with all layers displayed")
Only solid blocks (marked red), slopes, and BTS visible:
![IMG_026.png: blackout view]](./images/IMG_126.png "Room 7E9A0 with only solid tiles and slopes displayed")
The total black-out view in the picture above is not a view option in SMILE
RF by default, but it can be accessed using the debug menu's "Unlock Layers"
button and then hiding both layers 1 and 2. It can also be done without the
debug menu by changing every single color in the tileset to black and clicking
the Save Palette button (make sure you export the tileset's palette first). I
find the black-out view to be extremely helpful when I'm looking for tiling and
sloping errors.
Here are the hex bytes for this room that you can copy/paste-write
at PC address 273300 with HxD:
01 00 12 E9 19 11 85 03 14 8D 14 89 D5 18 45 0F 89 D5 1E
DD 52 C9 36 05 14 8D 0E 1D 10 81 CF 1A C2 5C 02 19 0E 1D 45 FF 00 00 0E 45 19 0F
CC 68 C5 7C C5 98 CB 4E C4 B0 00 1D C3 3A C3 36 C3 B8 01 10 85 C3 42 00 14 44 89
18 C5 54 C3 50 C7 5C CB 06 C7 32 C9 7C C3 38 C3 A0 D3 1C C7 9A C5 A6 05 10 81 40
94 0C C4 E8 21 FF 00 CF 7C 03 0D 89 0D 8D D7 1C CB A2 05 10 81 60 94 2C D4 E8 59
FF 00 C2 60 02 9C 2C DC F8 57 60 06 0E 11 14 81 40 9C 0C F8 32 60 03 0D 81 0D 85
F8 23 BE 01 11 85 4F 70 80 01 5F 80 F8 25 98 03 14 85 0E 15 F8 23 60 03 0F 81 0E
85 47 FF 80 00 0E C2 96 00 BD C2 60 05 BA 12 BB 12 BC 12 D7 F4 00 0F C2 F6 43 11
85 83 DA 01 D5 7E C7 7A C3 C0 00 11 C2 8A C3 64 02 0E 81 0F 43 81 14 0A 85 BE 80
0E 11 DA 12 DB 82 DC 12 C3 A0 C5 6A 04 2A 01 2C 01 2F C2 04 C9 5C C3 60 C5 C2 C3
70 01 0E 15 C5 92 C3 7C C3 46 C3 7A 00 5E C2 A8 8A 7E 01 00 85 C7 38 01 BE 80 C7
42 C3 78 01 DA 82 C2 6A 07 82 0C 85 0A 81 0B 81 0C C2 80 8E 0E 01 C2 FE C3 CC 01
14 85 C5 28 C9 3A 02 0E 15 BD C2 A8 CF 30 C5 60 F0 44 D8 00 CA A8 F0 D7 46 00 47
0F 89 F0 31 3C 01 91 14 01 01 14 8D 4F 18 89 01 0D 8D 47 9B E0 00 16 CE 1A D1 70
D3 8C C3 A0 01 0E 0D 83 7E 01 C2 5C 02 19 17 1D 4D 31 01 03 34 05 37 05 47 FF 00
0B 37 09 38 09 34 09 31 01 32 01 34 0D C3 0A 02 17 19 18 84 D5 01 C5 FE 02 1F 81
14 43 0D 0E 44 01 0F 05 0E 05 0E 09 14 09 43 11 05 C3 14 85 3C 02 01 14 8D C7 5C
00 32 C6 04 C5 0A 00 39 C8 60 C5 64 04 34 09 34 0D 37 C2 34 C3 0A 05 31 01 17 19
14 19 8D 16 05 C2 A6 01 89 1F 86 1F 05 C5 14 83 9A 03 03 10 81 19 85 C5 5C C5 02
C9 62 03 34 05 38 01 C9 C4 02 FF 00 39 C8 72 00 39 C4 8A CB C6 87 24 07 C3 DA 87
F2 06 83 7A 01 02 37 01 19 C2 60 03 34 0D 34 09 C7 BC 85 4C 07 88 46 07 CA 64 01
37 09 C3 BE C7 CC C5 E8 C2 C6 84 8D 01 85 28 07 C7 9E C5 7A 04 19 85 38 01 34 C4
60 02 39 05 39 89 2F 07 84 AD 07 8B 42 07 8D 9A 07 C4 6A C2 38 C7 50 03 19 81 11
85 83 E2 07 C3 FA C7 9A C5 DE C3 D0 00 32 C6 60 C3 92 05 17 11 18 11 17 15 CB 4E
C5 64 8B 38 07 89 0E 08 C3 F4 C3 C2 00 19 84 81 07 C5 5E CB 9A C5 E0 01 34 0D C5
C0 C3 34 C5 8A CF AE C3 C8 87 6C 08 CD 14 85 74 08 C3 A0 C5 CC CD 9A C3 C6 C3 72
83 E0 07 C3 78 C7 60 CF 4C DB 0E 83 A6 08 C3 A0 85 4C 07 CD 86 C3 1C C3 B8 00 10
84 D5 04 83 D4 08 C3 C0 97 5C 04 D5 74 C3 DC C5 C0 92 C2 08 C6 F8 C5 60 02 39 01
17 84 55 04 F8 27 60 07 30 01 2F 01 2A 01 2B 01 83 5E 03 83 42 08 D9 F6 C3 C0 C7
BE 85 1A 02 F8 23 C2 08 00 81 01 81 02 81 03 81 04 94 6B 09 CD 60 C2 80 86 DD 08
C3 6A 8F 24 09 D5 D0 08 20 11 21 11 22 81 23 81 24 F8 24 60 00 31 86 87 0A C3 6A
DB 8C 93 F2 01 83 98 08 9B D0 09 C5 60 C3 BE 85 E2 08 F8 2D 60 87 1E 0A D7 F4 85
3E 08 01 17 01 85 56 04 9D C2 0A D1 3C 83 3A 07 DD 60 83 68 09 06 14 85 14 01 11
05 1F 84 83 08 F8 2B BE 85 0A 08 DB C0 87 26 0A C5 02 C9 BE F0 23 4E 0B C3 3C 83
38 07 DB C0 85 FC 09 86 C6 06 00 19 C7 BE C3 76 F8 21 C8 C3 3C 83 F8 07 00 19 F8
20 60 83 7A 01 85 34 09 03 37 0D 37 01 83 9C 08 C9 C8 43 38 01 CB CC C9 DA 85 14
08 83 FE 08 D7 C0 C3 E2 C7 20 87 18 0A 89 A8 07 87 A4 07 8D 98 07 89 0A 08 85 74
08 83 88 0A 01 19 85 8F 24 09 C5 98 C3 5E C3 C0 C3 E0 C4 58 84 FB 07 00 39 8C 37
07 C2 0E C2 D6 85 B6 0A 01 2A 05 87 58 0D 8D 76 0D 01 19 85 8C 5E 08 C4 5A 89 88
07 C7 E0 85 A6 08 01 34 05 C3 D4 C7 30 87 92 0D 85 16 0B 03 0C 15 17 15 89 BE 08
C7 FE 87 E2 08 89 0C 08 C9 5C C5 C0 85 FA 03 85 B2 07 C2 76 02 51 31 51 C2 04 C4
64 C3 88 C3 CE 83 76 0B 83 1E 01 85 02 0A 85 6C 08 C3 BE 85 88 0A 01 14 85 C3 78
C7 F6 C8 48 C6 02 87 2A 0A 04 0E 11 18 11 16 84 E3 07 83 4E 07 01 16 81 83 0C 09
89 94 07 83 3E 08 C5 4A 8B 0C 08 87 20 0D D3 C2 C5 C0 C7 82 85 20 05 83 42 08 87
7A 0A C3 98 C5 64 C5 CA 87 06 0C 89 6C 08 C5 BE 85 B8 04 01 17 15 8B 52 0E 87 54
08 87 04 0C 89 22 0D 01 37 5D 44 FF 50 88 DD 04 C7 64 02 31 01 17 84 71 07 02 14
05 0E C2 CE 01 2A 05 8D AE 04 C4 8C 00 81 83 C4 04 8B 9E 07 83 0A 09 8D 0E 05 09
19 85 1D C4 1C 54 1C 50 1D 50 CB 78 C3 3C C3 02 89 D2 07 00 0C 88 E9 04 CD 06 89
5C 04 CF 80 C7 C0 00 43 43 04 42 02 00 43 00 CD D8 F8 27 0C D5 A0 CB C0 00 63 43
94 62 02 90 63 90 F8 37 60 00 43 43 94 42 01 90 43 CC 40 E4 BC 00 00 D2 29 00 00
93 C3 0C 02 92 93 93 34 00 C2 1D 00 92 C4 1A 00 92 C7 0D C9 3A C4 19 C3 3E C2 1C
C6 27 C5 1E C5 25 01 02 41 30 00 CB 3E CF 0E 02 00 02 FF E4 2D 00 01 02 FE E4 2B
00 03 12 00 02 FD E4 47 00 03 12 00 00 52 3B 00 02 14 07 54 CB 7A 00 13 CF 8B CE
3D C2 21 01 13 52 C7 35 C7 2E 00 52 C2 38 00 52 C2 49 D0 3E E4 23 00 C2 3D E4 F3
00 8D 44 13 8D FA 12 9D AC 12 F8 26 32 DF 31 88 E7 12 DA 5C C7 95 C9 81 F8 30 6E
01 00 92 C7 E9 01 12 13 9A FF 13 F8 20 84 E4 80 00 9A 9F 14 D7 1B F8 43 D5 01 94
95 F8 30 8F 84 EF 12 F0 7D 4C 12 F0 69 41 15 F8 63 8C F0 55 9F 14 9B 87 16 86 FE
13 01 FF FE 87 B3 13 8B BC 17 C3 8F D1 3C 87 2A 14 CA 57 D7 61 CE D0 CE 89 C5 EE
D3 9D 02 03 02 01 D0 BB 89 2A 14 C7 D0 C9 12 00 42 C9 C0 38 00 F0 2B 68 14 F8 23
50 2B 00 23 01 25 00 47 3F 01 00 3E C4 04 C3 06 03 D6 02 D7 02 51 3F 01 F8 3F 20
C5 5E C5 62 C7 70 F8 47 20 C5 5A 00 3D CA 5C CF 6C F8 3B 20 C5 F6 C7 BC C7 6C C3
6E F8 45 20 C9 FE C7 FA 05 3D 01 B4 02 B5 02 CD 22 F8 3F 20 C9 62 C3 EA 02 D4 02
D5 F8 46 20 C5 FE 03 B6 02 B7 02 87 78 1B CB E0 F8 47 20 8D 14 1B CB 5A F8 3F 20
C9 F8 C7 C4 CD 16 F8 3F 20 C3 F8 C5 FA C5 C4 8D 6C 1B C5 F8 F8 3B 20 C5 F8 91 DE
1B CD F8 F8 39 20 8B 20 1C 8F 66 1B 8D 1C 1E F8 35 20 89 34 1C 8B EA 1C 8D D2 1B
F8 3B 20 85 92 1C C9 60 91 9E 1C F8 3F 20 CD 08 8F 1C 1E F8 43 20 8D 22 1F 8B 48
1D F8 4B 20 F3 FF 0C 1B F3 FF 0C 1F F3 F5 0C 1D 00 00
IMPORTANT: while making the room, I needed to
change a few small things that aren't part of the level data, so you must also
apply these edits if you're using my room design to follow this guide:
Open level_entries.txt and change 2737DC into 273B00, near the very bottom.
This expands the maximum amount of level data allowed for room 7E9A0 from 1244
to 2048.
Right-click on PLM $03 and choose entry $EF83 in the PLM Selector (missile
expansion hidden in scenery) instead of $EEDB (normal missile expansion).
Right-click on PLM $04 and choose entry $E8F7 in the PLM Selector (super
missile expansion hidden in scenery) instead of $EEDF (normal missile
expansion).
Optional: change the Up Scroll value from 70 to 99. Doing this makes the
grapple blocks easier for the player to see, and only affects cells #2 and #3,
which are ascent rooms, so seeing more of what's above Samus is nice.
28.
Enemy setup. Because there are
so many different enemies in the game, I won't be explaining all of them here.
Doing that would take up most of this already enormous guide. The
enemy and bosses page has that information and more.
Also, check the basic instructions for most enemies given to you in the
"Enemy Info" section of SMILE's enemy editor. If the Enemy Info area says "[NO
TEXT FILE FOUND]", then this almost always means that the enemy will work just
fine with its "Special" value set to $2000, and its "Graphics", "Tilemaps",
"Speed" and "Speed 2" values all set to $0000.
Enemies are a big deal, and placing them correctly can be harder than it
seems. Some require only choosing the enemy and placing it somewhere in the room
to function. Others are more complex, needing multiple enemies ("pieces"), and
edited values that adjust certain behaviors (mostly "Speed" and "Speed 2")
before they'll work. If your enemy choices and enemy placements are not great,
then it won't matter how well-designed the rest of your hack is. Enemies should
feel like they belong exactly where they are.
Right now, the Enemy Set and Enemy GFX pointers (847A and 8A01) are what room
792B3 uses, so if we move an enemy or change it into something different in room
7E9A0, the same exact thing will also happen in room 792B3. Two repoints will
fix this. Unhide room 7E9A0's enemies.
"ENEMY SET" POINTER
Points to a set of 16-byte strings
in bank $A1. The number of enemies in the room is how many of these 16-byte
strings will be found at this pointer, until ending with a required instance of
"FF FF". The data in these 16-byte strings contains all of the settings for that
particular enemy that have been made through the enemy editor's Enemy Selector
and Enemy Data areas.
"ENEMY GFX" POINTER
Points to a string of data that's
6-18 bytes long in bank $B4, which make up the contents of the Room Enemies list
(enemy editor,
#28). Each enemy in the Room Enemies list is 4 bytes (2 bytes for the enemy
ID entry, and 2 bytes for the palette entry next to it), with a required
instance of "FF FF" at the end. You will need to repoint the Enemy GFX if you
want to add more entries to the list than what the room has by default. Maximum
of four list entries.
We need to find some free space in banks $A1 and $B4. For Enemy Set, I'll be
using 10EBE0, and for Enemy GFX, it'll be 1A74C0. In an unedited Super Metroid
ROM, there is nothing but "FF" bytes at both of those addresses, which is more
than enough free space to work with. This gives us Enemy Set = EBE0 and Enemy
GFX = F4C0 as our new pointers.
In SMILE RF, change 847A into EBE0 and 8A01 into F4C0, uncheck the "Overwrite
Data" checkbox, then click the "Save Pointers" button, which will cause all of
the enemies in the room to disappear. With that done, room 7E9A0 can now have
its own enemies. Using SMILE RF's "Enemies / PLMs" scroller to add in blank new
enemies will work (the same way we added in those first two PLMs earlier), but
for the sake of learning more, let's add these enemies with HxD.
Copy/paste-write these bytes at these two pointer addresses and
save the ROM:
10EBE0: FF E7 C0 01 80 00 00 00
00 A0 00 00 09 00 00 00 FF E7 50 01 C0 00 00 00 00 A0 00 00 05 00 00 00 D3 F1 B8
00 C3 00 00 00 00 61 00 00 00 00 00 00 D3 F1 09 01 D3 00 00 00 00 61 00 00 00 00
00 00 D3 F1 48 02 D3 00 00 00 00 61 00 00 00 00 00 00 FF DC 53 01 C8 02 03 00 01
68 00 00 01 00 00 00 FF DC 63 01 C8 02 03 00 00 68 00 00 02 00 00 00 7F D4 74 02
BD 01 00 00 00 28 00 00 18 00 01 00 FF FF
1A74C0: FF E7 01 00 D3 F1 02 00
FF DC 03 00 7F D4 07 00 FF FF
Now you can refresh room 7E9A0 in SMILE and see all of its
enemies! That's all of the actual work you have to do on enemies in this guide.
The rest of this enemy section is purely informational.
Strings of enemy data look about the same as door data and PLM data strings,
so this should all be nice and simple once we examine that data more thoroughly.
Enemy Set (10EBE0):
Enemy Set has a lot of data, so we'll look at it in two ways. Each
enemy in the room uses 16 bytes of this data, so if we break it up into 16-byte
rows and number them, it starts to look a little more like something. This is
data for 8 enemies, but a room can have up to 32:
Enemy Index $00: FF E7 C0 01 80 00 00 00 00 A0 00 00 09 00 00 00
Enemy Index $01: FF E7 50 01 C0 00 00 00 00 A0 00 00 05 00 00 00
Enemy Index $02: D3 F1 B8 00 C3 00 00 00 00 61 00 00 00 00 00 00
Enemy Index $03: D3 F1 09 01 D3 00 00 00 00 61 00 00 00 00 00 00
Enemy Index $04: D3 F1 48 02 D3 00 00 00 00 61 00 00 00 00 00 00
Enemy Index $05: FF DC 53 01 C8 02 03 00 01 68 00 00 01 00 00 00
Enemy Index $06: FF DC 63 01 C8 02 03 00 00 68 00 00 02 00 00 00
Enemy Index $07: 7F D4 74 02 BD 01 00 00 00 28 00 00 18 00 01 00
End data string: FF FF ##?
The "FF FF" at the very end is always required after the final
enemy index, which for room 7E9A0, is $07. If any gray door caps in the room
require a certain number of enemies to be killed by Samus before they can be
opened, then that number goes where the "##?" is, otherwise no number is used
there at all.
An easy way to always know where the current Enemy Set data ends is to count
straight down from the offset until you see the ending bytes (in the example
above, you'd count straight down from 10EBE0 until you saw the FF FF). Enemy
types are usually grouped together in the Enemy Set data (again, in the example
above, notice how all three instances of enemy $F1D3, or "D3 F1" are right next
to each other).
In SMILE, placing your cursor on an enemy will display a yellow "Enemy Index
$__" pop-up that tells you that particular enemy's index number, which as you
can see in the 16-byte hex byte columns above, is that enemy's order in the
Enemy Set pointer's data string. Here are all of room 7E9A0's enemy indexes, as
they appear in SMILE:
![[IMG_127.png: enemy indexes]](./images/IMG_127.png "Room 7E9A0's Enemy Indexes")
Certain enemies (wrecked ship ghosts, bosses) need to be the first enemy in
the room to work, which is enemy index $00. Indexes for multi-piece/possessor
enemies must be next to each other. Most of the values in these 16-byte enemy
strings are edited in SMILE's enemy editor, through the "Enemy Data" section
that's underneath the enemy's preview picture:
![[IMG_128.png: enemy data values]](./images/IMG_128.png "Enemy Index $07's Enemy Data values")
Since the above screenshot has a picture of enemy $07's values,
let's take a look at its 16-byte data string and label them. Notice how the
Special, Speed, and other values are the same between the above screenshot and
enemy $07's values below:
Enemy Index $07:

7F D4  <-- Enemy Selector entry D47F (Ripper)
74 02  <-- X position in room
BD 01  <-- Y position in room
00 00  <-- "Tilemaps" value
00 28  <-- "Special" value
00 00  <-- "Graphics" value
18 00  <-- "Speed" value
01 00  <-- "Speed 2" value
These Enemy Data values are the only ones that are unique to the
individual enemy. Changing any of the values under the "Enemy Header AI", "Main
AI Pointers", or "Enemy Graphics" sections on the right half of the enemy editor
would affect every Ripper in the entire game.
Enemy GFX (1A74C0):
The data strings for Enemy GFX are much simpler than Enemy Set,
because they make up the contents of the "Room Enemies" list and nothing more,
which is located on the bottom-right of the enemy editor window. The example
below is the longest that the data string for a room's Enemy GFX pointer can
get, because four different enemy types is the most that any room can have. Two
exceptions to this are elevators ($B70B) and escape steam ($E1FF), which are
allowed to exist in a room without being added to the Room Enemies list. Certain
enemies (metroids, bosses) must be at the top of the Room Enemies list to work.
FF E7  <-- Enemy E7FF (Kago)
01 00  <-- Palette 0001

D3 F1  <-- Enemy F1D3 (Zebbo)
02 00  <-- Palette 0002

FF DC  <-- Enemy DCFF (Zoomer)
03 00  <-- Palette 0003

7F D4  <-- Enemy D47F (Ripper)
07 00  <-- Palette 0007

FF FF  <-- Required end of string
Here's where the same data can be seen and edited in SMILE's
enemy editor. Should be pretty easy to recognize:
![[IMG_129.png: room enemy list]](./images/IMG_129.png "Room 7E9A0's Room Enemies list")
Room Enemies 'Palette' value: enemies should only
ever have a "Palette" number of 0001, 0002, 0003, or 0007 in the Room Enemies
list. Double-click on a palette number if you want to edit it. Entries can be
dragged & dropped if the order needs to be changed. Enemies may share
palette numbers, which will apply an enemy's palette to any other enemies in the
list above it that are using the same number, and only for rooms that use this
Enemy GFX pointer.
The original Super Metroid uses this cool trick on a few enemies, such as the
orange fish in room 7D104, and the red/blue cactii in rooms 7ACB3 and 7D9FE.
OPTIONAL: let's use the same trick for our room. The two
Zoomers (enemies $05 and $06) in cell #2 are set to respawn from a little
tunnel, which makes them different from any other Zoomers used in Super Metroid.
Making these Zoomers use different colors will further set them apart, and
almost make them seem like a different type of enemy. Right-click on one of the
Zoomers and open up the enemy editor. In the Room Enemies list, double-click the
0003 next to $DCFF and change it to 0007, then click the Save button. Done. This
gives us Zoomers that now use Ripper's colors for room 7E9A0 only. Here's a
picture of that, plus some other examples:
![[IMG_130.png: enemy palette swaps]](./images/IMG_130.png "Zoomer using Ripper's palette")
The palette number itself being shared between the enemies doesn't matter as
much. The "Zoomer with Ripper palette" example would also work if both enemies
were using palette number 0003, and the "Zoomer with Zebbo palette" example
would work if both enemies used palette 0002.
If you swapped the Zoomer and Ripper's places on the Room Enemies list by
dragging & dropping one of them, you would get the opposite effect, which is
room 7E9A0's Rippers using Zoomer's colors:
![[IMG_131.png: another enemy palette swap]](./images/IMG_131.png "Ripper using Zoomer's palette")
Palette 0007 allows enemies to be drawn behind water that's being darkened by
value 14 in FX Transparency menu #2.
MULTIPLE-PIECE ENEMIES, POSSESSOR ENEMIES
Not all
multi-piece enemies are possessors, but all possessors are multi-piece enemies.
Possessors usually require at least two pieces (enemy indexes) to function
completely, and some of them will forcibly use a neighboring enemy index
(usually the next entry, or multiple entries following it) as its other piece,
which could cause the game to crash if the index it uses isn't the right enemy
type. Incorrect Enemy Data values for possessors are also able to easily crash
the game.
List of possessor types, possessor enemies, and multi-piece
enemies:
POSSESSOR TYPE A: automatically possesses any enemies with a
neighboring index. Possessing the wrong enemy type will most likely crash the
game.
POSSESSOR TYPE B: should only possess identical or intended enemy types with
neighboring indexes. Possessing the wrong enemy type could crash the game, but
more likely just won't work.
POSSESSOR TYPE C: only possesses its pieces when they're given the correct
speed values.
POSSESSOR TYPE D: able to possess other enemy types and still
function. Possibility of creative use in hacks.
Possessor enemies:
Shaktool ($F07F): 7 pieces, all required. Possessor type A.
Gamet ($F213): 5 pieces, all required. Possessor type B.
Dachora ($E5FF): 5 pieces. Piece #1 = main enemy. Pieces #2-5 = shinespark
echoes. Pieces 2-5 don't seem to be required if Dachora is used as the final
enemy index. Possessor type B.
Bang ($DB3F): 4 pieces. Piece #1 (optional) = enemy type of choice to
possess. Piece #2 = fully functioning orange bang core. Piece #3 (optional) =
outer blue bubble graphics appearing when it respawns. Piece #4 = outer blue
bubble graphics when bang is loaded for the first time. Possessor type D.
Lavaman ($E83F): 3 pieces, all required. Piece #1 = floating head. Piece #2 =
rising body. Piece #3 = body throwing lavaballs. Possessor type C.
Evir ($E63F, $E67F): 3 pieces. Piece #1 = main falling body. Piece #2
(optional) = animated legs. Piece #3 (optional) = round spiny projectile it
throws at Samus from its tail, which is also a separate enemy type that doesn't
go on the Room Enemies list. Possessor type B.
Samus's ship ($D07F, $D0BF): 3 pieces, all required. Piece #1 = main
functioning part that allows Samus to enter the ship, makes the ship hover up
and down while idle, loads the top half of the ship's graphics, and makes the
bottom thrusters glow. Piece #2 = bottom half of the ship's graphics. Piece #3 =
different enemy type, not sure what it does, but just assume that it's required.
Possessor type B.
Dragon ($D4BF): 2 pieces, both required. Piece #1 = main enemy. Piece #2 =
animated wings on its back. Possessor type A.
Hibashi ($E07F): 2 pieces, both required. Piece #1 = graphics and sound.
Piece #2 = hitbox movement. Possessor type D.
Puu ($E8BF): 2 pieces, both required. Piece #1 = grapplable bottom part.
Piece #2 = main rising body. Possessor type A.
Kzan ($DFFF, $E0BF): 2 pieces. Piece #1 = fully functioning enemy. Piece #2 =
separate enemy type, also an unused/unneeded part? Possessor type B.
Kihunter ($EABF, $EB3F, $EBBF, and $EAFF, $EB7F, $EBFF): 2 pieces. Piece #1 =
main enemy. Piece #2 = wings, which are a separate enemy type that doesn't go on
the Room Enemies list. Kihunter's wings can attach to an enemy other than
kihunter, but might there might have graphical issues. Possessor types B and D.
Multi-piece enemies (non-possessor):
Geruta ($D2FF): 2 pieces. Piece #1 = main enemy. Piece #2 = separately
animated flames.
Squeept ($D2BF): 2 pieces. Piece #1 = main enemy. Piece #2 = separately
animated flames.
Holtz ($D33F): 2 pieces. Piece #1 = main enemy. Piece #2 = separately
animated flames.
Eye ($E6BF): 2 pieces. Piece #1 = neck part that attaches it to
the wall, also responsible for yellow light and sound. Piece #2 = eye part that
follows Samus around.
Multi-piece enemies don't require all of their pieces to be
used. Holtz, Geruta and Squeept only use their second piece to animate their
flame graphics separately from their main body animations, which means that
excluding their second piece will only turn off the flame. This could actually
be used alongside a Room Enemies shared Palette value to make variants that
don't look so much like they're from a fire area (i.e., a blue Squeept that
jumps out of water instead of lava would look fine without its flame piece).
Multi-piece enemies aren't actually possessors, because their pieces are only
layered enemies with different Enemy Data values (usually Speed and Tilemaps).
ENEMY HEADERS
Each enemy header uses 64 bytes in bank
$A0. As with the room headers in bank $8F, these enemy headers are just a big
string of pointers that each handle different parts of an enemy's overall AI.
Let's look at Zoomer's header as an example, located at 105CFF. Remember that
this is the Zoomer's main code, so if any of the values below are edited, every
Zoomer in the game will be affected (along with any other enemy types that share
the same pointers).
Here are the raw bytes for Zoomer's header, copied from the ROM: 00 06 B0 E5
0F 00 05 00 08 00 08 00 A3 00 23 00 00 00 69 E6 01 00 01 00 C2 E6 0A 80 4C 80 41
80 00 00 00 00 00 00 00 00 00 00 00 00 00 00 00 00 23 80 2D 80 00 00 00 80 AE 05
24 F2 48 EC DB E1
And here are the bytes for Zoomer's header, arranged vertically and labeled:
00 06     <-- GFX Size
B0 E5     <-- Enemy Palette pointer
0F 00     <-- Energy
05 00     <-- Damage
08 00     <-- Width
08 00     <-- Height
A3        <-- AI Bank
00        <-- Hurt Flash duration
23 00     <-- Hurt Sound
00 00     <-- Boss Value
69 E6     <-- Initiation AI
01 00     <-- Possessors
01 00     <-- UNUSED [Extra AI #1: $0016,X]
C2 E6     <-- Main AI
0A 80     <-- Grapple AI
4C 80     <-- Hurt AI
41 80     <-- Frozen AI
00 00     <-- X-Ray AI
00 00     <-- Death Animation
00 00     <-- UNUSED [Extra AI #2: $0024,X]
00 00     <-- UNUSED [Extra AI #3: $0026,X]
00 00     <-- Power Bomb AI
00 00     <-- UNUSED [Extra AI #4: $002A,X]
00 00     <-- UNUSED [Extra AI #5: $002C,X]
00 00     <-- UNUSED [Extra AI #6: $002E,X]
23 80     <-- Touch AI
2D 80     <-- Shot AI
00 00     <-- UNUSED [Extra AI #7: $0034,X]
00 80 AE  <-- Enemy Graphics pointer
05        <-- Layer Priority
24 F2     <-- Drops pointer
48 EC     <-- Enemy Weaknesses pointer
DB E1     <-- Enemy Name pointer

These values can all be edited in SMILE RF, and are labeled as such.
The
enemy editor has more info about what each pointer does. There's also
PJBoy's
enemy header values list.
ENEMY PROJECTILES
Enemy projectiles are mostly separate
from the enemies that use them. The projectiles aren't actually enemies
themselves, but they can sometimes behave sort of like an enemy, and they
usually get their graphics and colors from their respective enemy's tilemap.
Thanks to Kejardon, Cardweaver, and Crashtour99 for gathering this info.
Just like door data, enemy indexes, PLMs and a lot of other things, enemy
projectile headers are just a simple array with a fixed length. For projectiles,
the string is always 14 bytes long, and all of the enemy projectile headers are
located in bank $86. You probably won't need to edit enemy projectiles unless
your hack is really extensive, and you can't really repoint or add more
projectiles without some assembly knowledge.
List of enemy projectiles:
D02E: Kago's bugs (enemy $E7FF)
A17B: Space pirate's eye lasers
A189: Claws that fighting space pirates throw at Samus
CF26: Kihunter acid, going right (enemies $EABF, $EB3F, $EBBF)
CF18: Kihunter acid, going left (enemies $EABF, $EB3F, $EBBF)
9E90: Walking dragon's fireballs (enemy $E9BF)
B5CB: Lava dragon's fireballs (enemy $D4BF)
8BC2: Skree's debris #1 (enemy $DB7F)
8BD0: Skree's debris #2 (enemy $DB7F)
8BDE: Skree's debris #3 (enemy $DB7F)
8BEC: Skree's debris #4 (enemy $DB7F)
8BFA: Metalee's debris #1 (enemy $D67F)
8C08: Metalee's debris #2 (enemy $D67F)
8C16: Metalee's debris #3 (enemy $D67F)
8C24: Metalee's debris #4 (enemy $D67F)
DAFE: Cactus' needles, projectile runs once for each of the five needles (enemy $CFFF)
DFBC: Eyed version of Name & Fune's fireball (enemy $E73F)
DFCA: Eyeless version of Name & Fune's fireball (enemy $E6FF)
E0E0: Lava clumps thrown by lavaman (enemy $E83F)
D298: Puu's debris when it explodes (enemy $E8BF)
D2D0: Wrecked ship robot's ring lasers, travelling up right (enemy $E8FF)
D2B4: Wrecked ship robot's ring lasers, travelling left (enemy $E8FF)
D2A6: Wrecked ship robot's ring lasers, travelling up left (enemy $E8FF)
D2C2: Wrecked ship robot's ring lasers, travelling down right (enemy $E8FF)
D2DE: Wrecked ship robot's ring lasers, travelling down left (enemy $E8FF)
F498: Wrecked ship's falling green sparks (enemy $EA3F)
BD5A: Flying rocky debris in Norfair (enemy $D1FF)
9DB0: Rocks that mini Kraid spits (enemy $E0FF)
9DBE: Mini Kraid's belly spikes, facing left (enemy $E0FF)
9DCC: Mini Kraid's belly spikes, facing right (enemy $E0FF)
A985: Bomb Torizo's explosive hand swipe (enemy $EEFF)
AEA8: Bomb Torizo's crescent projectile (enemy $EEFF)
AD5E: Orbs that Bomb Torizo spits (enemy $EEFF)
DE6C: Spore spawners? (enemy $DF3F)
DE88: Spore spawners? (enemy $DF3F)
DE7A: Spore Spawn's spores (enemy $DF3F)
9C6F: Rocks when Kraid rises (enemy $E2BF)
9C61: Rocks when Kraid rises again (enemy $E2BF)
9C45: Rocks that Kraid spits (enemy $E2BF)
9C53: Rocks that fall when Kraid's ceiling crumbles (enemy $E2BF)
(Kraid's flying claws and belly spike platforms aren't enemy projectiles.)
8F8F: Glowing orbs that Crocomire spits (enemy $DDBF)
8F9D: Blocks crumbling underneath Crocomire (enemy $DDBF)
90C1: Crocomire's spike wall when it crumbles (enemy $DDBF)
9C37: Phantoon's starting fireballs (enemy $E4BF)
9C29: All of Phantoon's other fireballs (enemy $E4BF)
EBA0: Botwoon's wall? (enemy $F293)
EC48: Botwoon's green spit (enemy $F293)
8E5E: Draygon's wall turret projectiles (enemy $DE3F)
8E50: Draygon gunk (enemy $DE3F)
B428: Golden Torizo's eye beam (enemy $EF7F)
AFE5: Golden Torizo preparing to attack; equipment check? (enemy $EF7F)
AFF3: Golden Torizo preparing to attack; equipment check? (enemy $EF7F)
AD7A: Orbs that Golden Torizo spits  (enemy $EF7F)
AEB6: Golden Torizo's crescent projectile; doesn't run if Samus's ammo is too low (enemy $EF7F)
B31A: Super missile that Golden Torizo throws at Samus (enemy $EF7F)
B1C0: Hatchlings that Golden Torizo uses when it's almost dead (enemy $EF7F)
9642: Ridley's fireball (enemy $E17F)
965E: Something for Ridley (enemy $E17F)
9688: Something for Ridley (enemy $E17F)
9696: Something for Ridley (enemy $E17F)
C17E: Something for Mother Brain; spawning turrets? (enemy $EC3F)
C18C: Mother Brain's turret bullets (enemy $EC3F)
CEFC: Mother Brain's glass shattering (enemy $EC3F)
CF0A: Mother Brain's glass shards falling (enemy $EC3F)
CB91: Mother Brain's mother brain's saliva (enemy $EC3F)
CB2F: Mother Brain's purple breath, larger puff (enemy $EC3F)
CB3D: Mother Brain's purple breath, smaller puff (enemy $EC3F)
CB4B: Mother Brain's blue ring lasers (enemy $EC3F)
A17B: Mother Brain's space pirate eye laser (enemy $EC3F)
CB59: Mother Brain's bomb as it spawns from her mouth (enemy $EC3F)
9650: Mother Brain's bomb as it bounces on ground (enemy $EC3F)
966C: Mother Brain's bomb as it explodes (enemy $EC3F)
967A: Mother Brain's bomb as it explodes again (enemy $EC3F)
CB67: Mother Brain's orange chain explosion beam starting (enemy $EC3F)
CB75: Mother Brain's orange chain explosion beam running (enemy $EC3F)
CB83: Animated graphics in front of Mother Brain's eye while rainbow beam attack charges (enemy $EC3F)
CBAD: Mother Brain's rainbow beam firing, runs while beam is active (enemy $EC3F)
B743: Eye door projectiles (PLMs $DB48 and $DB56)
D904: Created by the glass Maridia tube exploding (PLM $D70C, enemy $F0BF)
D912: Created by the glass Maridia tube exploding (PLM $D70C, enemy $F0BF)
D920: Created by the glass Maridia tube exploding (PLM $D70C, enemy $F0BF)
F345: Enemy death graphics (different types of explosions, particles, etc.)
F337: Unknown/varies. Spawning larger quantities of energy/ammo drops?
E509: Unknown/varies. Used by boulder enemies, Kraid, Crocomire, Ridley, Mother Brain.
EC95: Unknown/varies. Runs when rooms with acid are loaded.
For our example, let's look at the projectile data for "DAFE:
Cactus' needles", which we view by converting $86:DAFE (LoROM) into 35AFE (PC),
and going to offset 35AFE with HxD. The 14 bytes we see at that spot ("Block:
35AFE-35B0B") are "92 D9 DB D9 2E D9 02 02 05 00 00 00 FC 84", which are
arranged vertically below:
92 D9  <-- Initialization code
DB D9  <-- First AI pointer
2E D9  <-- Graphic AI pointer
02     <-- Hit box X radius
02     <-- Hit box Y radius
05 00  <-- Contact flags + damage
00 00  <-- Contact graphic AI pointer
FC 84  <-- Projectile graphic AI pointer
Initialization code: sets
up the projectile.
First AI pointer: pointer of first AI to run (run once every
frame before any other part of the projectile).
Graphic AI pointer: pointer of first graphic AI to run (same
as PLM format and enemy graphic AI).
Hit box X radius: horizontal 'radius' (1/2 width) of hit
box.
Hit box Y radius: vertical 'radius' (1/2 height) of hit box.
Contact flags + damage: 8000 = Check for collisions with
Samus's projectiles. 4000 = DON'T die on collision with Samus. 2000 = Disable
collision with Samus. 1000 = Invisible. 0XXX = Damage to Samus.
Contact graphic AI pointer: pointer to new graphics to load
once the enemy projectile touches Samus. Usually set to 00 00.
Projectile graphic AI pointer: pointer to new
graphics to load if Samus shoots the enemy projectile. D064 = small death
explosion + energy/ammo drops.
If you change the contact flags + damage value to 8050 instead of
0050, and the projectile graphic AI pointer to D064 instead of 84FC for the
cactus' needles (or copy/paste-write the bytes "92 D9 DB D9 2E D9 02 02 05 80 00
00 64 D0" at offset 35AFE), Samus will then be able to shoot the cactus needles
and destroy them for energy/ammo pick-ups. This can be done to most of the enemy
projectiles in the game.
"ENEMY PALETTE" POINTER
Always uses 32 bytes, which
must be in the same bank as the enemy's "AI Bank". Editable in SMILE's enemy
editor, easy to repoint. These are the enemy type's default colors, so changing
them will affect every instance of that enemy type in the game, as well as any
other enemies that use its colors by sharing the same Palette number in the Room
Enemies list.
"ENEMY WEAKNESSES" POINTER
Always uses 22 bytes, which
must be in bank $B4. Editable in SMILE's enemy editor, easy to repoint. Damage
multiplier can use a value between 0-F. $0 = no damage. $1 = default (1x) damage
to enemy. $4 = double (2x) damage to enemy, etc. Before editing any of these
weakness values with SMILE, make certain that none of the other enemies share
the same weakness pointer, and if they do, either make sure you're okay with
multiple enemies sharing the pointer data you're about to edit, or give the
enemy a new Enemy Weakness pointer. Does not require "FF FF" at the end of the
string.
"ENEMY DROPS" POINTER
Always uses 6 bytes, which must
be in bank $B4. Editable in SMILE's enemy editor, easy to repoint. From left to
right: small energy, large energy, missile, nothing, super missile, power bomb.
The sum of all six bytes should be exactly FF. Does not require "FF FF" at the
end of the string.
UNUSED DATA -- ENEMY GFX SET NAMES
8 bytes in bank $B4.
Enemy GFX names are unused, and can be overwritten with different stuff. To see
enemy GFX names, just go to the data in a room's Enemy GFX pointer, and look at
the 8 bytes immediately before the offset (e.g., room 792B3's enemy GFX is
1A00A1 by default, which means that its enemy GFX name bytes are located at
1A0099-1A00A0).
UNUSED DATA -- BETA ENEMY NAMES
14 bytes in bank $B4.
Enemy beta names are unused, and can be overwritten. Enemy beta names are all
located at offset 1A5D86, and each enemy's name pointer simply points to its
respective name here (e.g., Atomic's name pointer is DD97, meaning its name is
located at $B4:DD97).
GENERAL ENEMY INFORMATION
Graphic limitations:
enemy graphics for a room are a limitation you'll run into sooner or later,
which can happen if you use multiple large or complex enemies with many
animations. For example, space pirates use many graphics for all of their
animations, so fitting three other different enemy types in a room with space
pirates can be a little difficult, because now you're limited to smaller enemies
with fewer animation frames. If an enemy type is having graphical problems, and
you're sure you've set up the Enemy GFX pointer / Room Enemies list correctly,
try removing an entry from the Room Enemies list and see if that fixes it. If an
enemy type is not on the Room Enemies list, its graphics will not load properly.
Audio limitations: a few enemies require certain
background songs to be playing for their sounds to work correctly (metroids,
Maridia snails, bosses, and a few others). This is because the sound itself is
tied to the instruments being used in the song. Thankfully, it only takes
editing a few bytes at most to make them use a different sound, which is a great
work-around for this limitation. See
hex editing > sound effects.
Off-screen limitations: the "Move Off-Screen"
checkbox shouldn't be used on too many enemies for a single room. The complexity
of the enemy's AI affects how many of them can be set to move off-screen before
it becomes too much for the game to process smoothly. Be careful after about
four or five off-screen enemies; by then, it might become easy to experience lag
if too many other enemies are able to appear on-screen at once.
On-screen limitations: too many enemies visible
on the screen at the same time will cause the game to start lagging, even if
none of the room's enemies have their "Move Off-Screen" checkbox checked. The
swarm of tiny enemies that guard Bomb Torizo's room early in the game is a good
example of the approximate maximum size that a cluster of enemies should be. For
larger or more complex enemies, the number will need to be smaller.
Wandering enemies: misplaced slopes can cause
crawling enemies to drop from walls and ceilings. For any room that uses
crawling enemies, make certain that the enemies are able to crawl completely
around the room without falling or getting stuck in an awkward loop somewhere.
For ANY enemy that's able to move around freely or deviate slightly from moving
in a completely fixed pattern, you should test how far from its original
position it's able to go, and try to consider all of the ways that the player
could possibly interact with the enemy.
For enemies like Waver ($D63F) and Multiviola ($D1BF), which fly around all
over the place, you can test them out by checking their "Move Off-Screen"
checkbox, then using the fast-forward function in your emulator for about 15
seconds or more. By that time, the enemies will have either gotten wedged in
somewhere, or they will be stuck in a loop. You want them to get stuck in a
loop, because it means that they'll never stop moving until Samus kills them.
The size and length of time that it takes for them to complete the loop will
vary, so test and re-test until they end up looping in a way that you like.
Enemy-specific limitations & quirks:
- Shutter enemies can briefly screen-wrap at the
top of the screen and appear at the bottom for a few frames, so it's best to
limit them to hallways.
- Changing physics will affect the Etecoons' ability to
demonstrate walljumps.
- The dead & dried Tourian enemies must have their 'enemies
to clear room' value set to 00, which is at the very end of the Enemy Set data
string, after the FF FF.
- Shaktool's scroll color changes might need to be removed
if you're editing the enemy's positioning or room shape.
- Mocktroids will crash the game if set to respawn.
- Space pirates have a large vertical frozen hitbox.
- Wall-climbing space pirates will climb up and down
through the air if something solid isn't there to stop them.
- Walking dragons don't recognize slopes, and fall slowly
if allowed to walk off of ledges.
- Some respawning enemies will count towards the 'enemies
to clear room' amount needed to unlock gray doors.
- Enemy placement doesn't always mean that that's where the
enemy will appear in the room. Sometimes the enemy's initialization AI will
determine the enemy's position instead, and therefore must be changed with a hex
editor. This mainly applies to bosses.
- If Samus gets force-crouched between frozen enemies and
the ceiling, it's possible to get locked in-place until the enemy unfreezes.
This is kind of unavoidable for wandering enemies, but for fixed-movement
enemies like ripper, keeping three tiles between them and any ceilings will fix
the problem. Also, if a flying enemy such as Gamet is perfectly level with the
platform that Samus is standing on and then frozen, standing on the frozen Gamet
can sink Samus 1px down into the platform.
- Mocktroid & metroid's draining touch AI only works in
bank $A3. "Shot reflected" also only works in bank $A3.
- Enemies that require the "Invisible" checkbox checked:
not necessarily required, but usually used by respawning flies like Zeb/Zebbo
(enemies $F193 and $F1D3), and by some multi-piece enemies.
- Enemies that require the "Non-Responsive" checkbox to be
checked: usually used by extra enemies that are meant to be used by possessors.
- Enemies that require the "Extended Tilemap Format"
checkbox to be checked: all space pirates, Oum ($D37F), Shutters ($D4FF-$D5FF),
Bang ($DB3F), and bosses.
- Enemies that require the "Disable Movement / Animations"
checkbox to be checked: Bang ($DB3F), and probably also some boss parts.
- Enemies that must be at the top of the Room Enemies list:
most bosses, metroids, Wrecked Ship ghosts.
- Enemies that should NOT be added to the Room Enemies
list: elevators, escape steam, Zebetites, Kihunter's wings, Evir's projectile,
Kzan duplicate, probably some others.
- Enemies that require being the first enemy in the room
(Enemy Index $00): Wrecked Ship ghosts, probably bosses and some others.
- Enemies with sound effects that rely on certain songs to
be playing: Wrecked Ship ghosts, metroids, Yards ($DBBF), Name/Fune
($E6FF/$E73F), Etecoons ($E5BF), the broken Maridia glass tube, Mother Brain's
case, most bosses
If you want a room to have no enemies at all, change its Enemy Set
and Enemy GFX pointers both to 8000.
COPYING ENEMY HEADERS ("ENEMY CLONING")
Copied enemy
headers are explained much more thoroughly in an
older guide for SMILE 2.5 that includes pictures. In the context of this
guide, it's easy to explain exactly how enemy header copying works:
To clone an enemy type, all you need to do is copy/paste-write its
64-byte header to some free space in bank $A0, and then make copies of its .GIF
and .TXT files for SMILE RF. The filenames of these copied .GIF and
.TXT files should be the last 4 digits of the LoROM address in bank $A0 that the
enemy clone's header is located, as with all other enemies (e.g., if you pasted
a copied enemy header at 1077E0, you'd name the copied files F7E0.GIF and
F7E0.TXT). You can also overwrite an existing enemy header, which doesn't
require copying the .GIF and .TXT files for that enemy, although you will still
see the overwritten enemy's GIF/TXT files in SMILE unless you update them).
There are a few limitations to what you can do, because copying an enemy's
header is not the same thing as copying an enemy's entire AI code (copying an
enemy's entire AI is possible, but much harder to do). These limitations are:
all sounds except hurt sounds, animation speeds, actual AI edits, and special
colors that aren't part of an enemy's default palette.
29.
Layer 3 effects ("FX"), door-specific
effects, and palette blends.
The "FX / Layer 3" data that's located in bank $83 and editable with SMILE's FX
editor only uses 16 bytes. Most of Super Metroid's rooms have their own FX
pointer, but a lot of rooms also share them. Repointing a room's FX is as easy
as you'd expect: find 16 bytes of free space somewhere in bank $83, convert that
offset to a LoROM address, and use the last 4 digits as your new FX pointer. I'm
gonna use AF00.
Paste these bytes at offset 1AF00 and save the ROM: 00 00 20 01 60 00 F2 FF
01 04 02 18 82 00 00 00
These bytes are the effects for cell #1, which you can now test if
you want. As usual, here are those same bytes, arranged vertically and
labeled/explained:
00 00  <-- Door select
20 01  <-- Liquid surface start
60 00  <-- Liquid surface new
F2 FF  <-- Liquid surface speed
01     <-- Liquid surface delay
04     <-- FX type
02     <-- FX bit A
18     <-- FX bit B
82     <-- FX bit C
00     <-- Palette FX bitflags
00     <-- Tile animation bitflags
00     <-- Palette blend
Door select: these two
bytes are simply the location of a door's data in bank $83. This only gets
used by rooms with door-specific FX. For rooms without door-specific FX, use
0000.
Liquid surface start: starting height of a room's
water/lava/acid. This is the value that you'd edit for just setting a liquid
height that you don't intend to change (hotkey: hold Shift while the level
editor window is in focus and look at the orange bars that appear on the
left/right side; clicking will set a new height). For rooms with no liquid, use
FFFF.
Liquid surface new: eventual height of a room's
water/lava/acid. This value is only used for rooms with liquid that rises or
lowers (not counting the small/large tide checkboxes). For rooms with no liquid
or changing liquid levels, use FFFF.
Liquid surface speed: how fast the water/lava/acid moves as
it rises or lowers. For rooms with no liquid, use 0000.
Liquid surface delay: how long until the water/lava/acid
starts to rise or lower. For rooms with liquid, you must use a value between 01
(instantly) and FF (a few seconds). For rooms with no liquid, use 00.
For liquids moving up, use a surface speed value between FE00-FFFF. Examples:
FFFE (absolute slowest), FFD0 (slow), FFD0 (decent speed), and FE00 (very fast).
For liquids moving down, use a surface speed value between 0001-0100.
Examples: 0001 (absolute slowest), 0020 (slow), 0040 (decent speed), 0100 (very
fast).
FX type: all of the available options for this value can be
seen in the FX editor's "FX Type" drop-down menu. This byte determines if a room
will have liquid, fog, spores, rain, etc.
FX bit A: this value has lighting options, such as Samus's
flashing yellow visor. Common values are 02 = normal. 28 = dark yellow-visor
room. 2A = even darker yellow-visor room.
FX bit B: this value has several options for how the FX
type's layering will be prioritized and/or colored.
FX bit C: the eight "Liquid Options" checkboxes are what
make up the value that gets used here.
Palette FX bitflags: switches the various FX glows for each
area on or off. The eight "Palette Options" checkboxes are what make up the
value that gets used here. Glow colors themselves are all documented and
explained in
palette locations.
Tile animation bitflags: switches the tile animations for
each area on or off, such as room 793FE's background ocean tiles. The eight
"Animated Tiles" checkboxes are what make up the value that gets used here.
Palette blend: this value is the palette blend
index that can be used to color the FX type for this data string. More info
further below. For rooms with no custom palette blend, use 00.
That mostly explains how to apply effects to a room. The
"palette FX bitflags" and "tile animation bitflags" do different things for each
area (this is why the palette effects are simply called "Unknown" in SMILE RF),
and most of them are unused.
Here is a list of the FX values by Kejardon.
DOOR-SPECIFIC FX
Cell #1's layer 3 effects work fine,
but what about cells #2 and #3? Both of those rooms currently fill up with acid,
just like cell #1 does, which we obviously don't want. Cell #1 should be the
only part that fills up with acid. This is easily fixed by using another
16-byte FX string, which will only be used when Samus enters room 7E9A0 through
a certain door! This means that all three cells can have their own unique
effects, which we'll be doing next. Door-specific effects are why the lava and
acid in rooms 7AFA3 and 7B4E5 will only rise when Samus enters through the left
door.
The first thing you want to do is determine what each cell's effects will be,
if possible. If multiple cells are going to use the same effects, it might be
easier to decide on a default FX for the room. Cell #1 slowly fills up with
acid, so we won't use that as the default. Cells #2 and #3 don't really need to
have any special effects, because the cavey Crateria rooms connected to them
don't have any effects of their own that would need to be matched for
consistency, so it would be easy to use a default FX that covers both of them.
For the sake of understanding how to do it more thoroughly, let's give them each
their own effects. Cell #2 will use fog, and cell #3 will use falling spores.
Spores will be the default FX for room 7E9A0.
Go back to 1AF00 with HxD. Copy/paste-write these bytes at that offset, then
save the ROM: AC AD 20 01 60 00 F2 FF 01 04 02 18 83 00 00 00 E4 AD FF FF FF FF
00 00 00 0C 02 18 00 00 00 00 00 00 FF FF FF FF 00 00 00 08 02 18 00 00 00 00
That's data for three different FX setups, which are of course
each 16 bytes long. Here are those same bytes, arranged vertically:
AC AD 20 01 60 00 F2 FF 01 04 02 18 83 00 00 00  <-- cell #1 FX

E4 AD FF FF FF FF 00 00 00 0C 02 18 00 00 00 00  <-- cell #2 FX

00 00 FF FF FF FF 00 00 00 08 02 18 00 00 00 00  <-- cell #3 FX (room 7E9A0's default FX values)
The door select value's only purpose is to enable door-specific
FX. For rooms without door-specific FX, the door select value should always be
0000. The main difference between each FX string is its use of the door select
value (underlined). Something else to remember about door-specific FX, is the
fact that it's the door that Samus enters that will set the FX, NOT the
door that Samus emerges into the room from. This means that door $01 in room
793AA will set the rising acid for cell #1, NOT door $02 in room 7E9A0. For cell
#2, it's door $03 in room 7948C, and for cell #3, it would be door $02 in room
795FF.
Reminder: press Ctrl+D on any door to see that room's available doors, along
with each door's location in bank $83. This is the easiest way to find a "door
select" value to use for triggering door-specific FX. Room 793AA's door $01 =
$ADAC. Room 7948C's door $03 = $ADE4. Room 795FF's door $02 = $AE08. Because
spores are the default FX and therefore go at the bottom, door $AE08 doesn't
need to be used.
For door-specific FX, the default FX should always be at the bottom,
and always have a door select value of 0000, with all of the door-specific FX
alternates directly above it in any order, and the room's "FX / Layer 3" pointer
pointing to the very top 16-byte FX string. For this room, the top
string is at 1AF00. You can do this with as many doors that lead into the room
as you want. It also works with doors that don't actually take you to a
different room.
You can now also edit the different FX strings using SMILE. Select one of
them from the "Door FX Select" drop-down menu at the very top of SMILE's FX
editor, and its values will appear in the FX editor.
Because it's so easy to do, let's add one more quick door-specific FX as a
finishing touch. In HxD, copy/paste-write these bytes at address 1AEB0 and save
the ROM: 88 AD D0 00 80 00 EA FF FF 04 02 1E 42 00 02 48 00 00 D0 00 FF FF 00 00
00 04 02 1E 42 00 02 48
After you've done that, go back into SMILE and change room 793AA's
FX pointer from 8100 to AEB0, make certain that the "Overwrite Data" checkbox is
unchecked, and then click the "Save Pointers" button. Now room 793AA's acid will
rise if Samus enters it through the right door, which can only happen after
leaving cell #1. This will create what feels like a small escape sequence after
the power bomb expansion in cell #1 has been collected, because the rising acid
effect will seem to follow Samus back into room 793AA as she's exiting.
PALETTE BLENDS
In SMILE's palette editor window,
entering 04AA02 as the "Address" value, and 7F as the "#" value will show you
all of the available palette blend colors at once, which you could edit right
now if you wanted to. A palette blend consists of four colors (transparency +
three colors), which are used to color the layer 3 FX graphics, such as water,
lava, fog, etc. Most palette blends are completely unused, which are seen as
repeated black-gray-gray color patterns. These unused palette blend colors are
easy to change and use. This picture should make understanding palette blends
much easier. Here is the full blend palette:
![[IMG_132.png: palette blends]](./images/IMG_132.png "Palette blend color table")
Remember that because palette blends use four colors, the next three colors
after your palette blend value will also be seen (e.g., if you're using palette
blend 48, then you'd be looking at colors $48, $4A, $4C and $4E ingame. This is
why it's best to keep your palette blend colors together in groups or three or
four, although it's not required.
If the palette blend value is set to 00, then four colors from the tileset's
palette will be used instead.
OPTIONAL: how to edit an existing palette blend. In the
original Super Metroid, all of the water throughout Crateria uses palette blend
48 to make it appear blue. If you wanted to edit blend 48, all you'd have to do
to is adjust the red/green/blue sliders for colors $4A, 4C, and optionally $4E,
then click the "Save ROM" button. Just like that, all of the 'default' blue
water throughout all of Super Metroid is a different color. To change the color
of Norfair's lava, edit colors $04, $06 and optionally $08, and if you wanted to
affect Maridia's water, you could edit colors $E4-$F4. The third optional color
can be used to give the entire room a slight color tint, but is usually left
black.
Because each color uses two bytes, it's necessary to count by two for each
color that's on the grid. Using an odd value like 03 will mess the colors up,
and trying to view an odd address with SMILE's palette editor will cause a
jumble of neon colors to display, instead of what you see in the picture above.
Only view/use a value from that picture as a palette blend number.
Here are all of the different palette blend numbers used throughout the
original Super Metroid: 00, 02, 22, 42, 48, 62, E2, E8, and EE. There's also
this
document by PJBoy, which lists all of Super Metroid's rooms, along with the
palette blend number that's used in the 16-byte FX string for each room. SMILE
RF will also generate a list of pointers for every room in your hack if you
click the "Export Room Details" button, located in the ROM Stuff tab.
OPTIONAL: how to use unused palette blend colors. This is as
easy as just picking a color on the palette blend table, editing it, and then
using that value at the end of a room's 16-byte FX string.
You don't actually have to use four colors for each new blend; you
can get away with using just three colors for most of them, because
liquid/fog/spore graphics are drawn to only use two colors + transparency
anyway. Palette blend indexes also don't have to be separated by three or four
colors, meaning that you could use 48, 4A, 4C, 4E, etc., as palette blend values
for a room if you wanted to, although most of them won't look good, because the
colors aren't shaded in the right order to work properly with the layer 3
graphics.
OPTIONAL BUG FIX -- WATER/ACID TRANSPARENCY LINE
Copy/paste-write these bytes at these offsets in HxD and save the ROM (thanks
Black Falcon). Doing this allows all palette blends to work completely for rooms
that have water and acid in them, without the ugly line of transparency that
normally appears (lava doesn't require this fix):
51080 (water): 4E 38 4E 38 4E 38 4E 38 4E 38 4E 38 4E 38 4E 38
4E 38 4E 38 4E 38 4E 38 4E 38 4E 38 4E 38 4E 38 4E 38 4E 38 4E 38 4E 38 4E 38 4E
38 4E 38 4E 38 4E 38 4E 38 4E 38 4E 38 4E 38 4E 38 4E 38 4E 38
50840 (acid): 4E 38 4E 38 4E 38 4E 38 4E 38 4E 38 4E 38 4E 38
4E 38 4E 38 4E 38 4E 38 4E 38 4E 38 4E 38 4E 38 4E 38 4E 38 4E 38 4E 38 4E 38 4E
38 4E 38 4E 38 4E 38 4E 38 4E 38 4E 38 4E 38 4E 38 4E 38 4E 38
OPTIONAL IMPROVEMENT -- ACID GRAPHICS THAT WORK WITH PALETTE BLENDS
This patch
by squishy_ichigo modifies acid's graphics so that they use the four palette
blend colors like all of the other layer 3 FX graphics do, instead of being
stuck sharing their colors with power bomb doors.
SCREEN SHAKES
Screen shakes are an effect used
throughout the game, but they aren't part of the room's FX data (firing super
missiles can cause screen shakes, for example). I documented most of their
locations
here, but they aren't labeled yet.
MISCELLANEOUS FX INFORMATION
- BUG:
Samus's animations can become slowed down by exiting a watery room (or being
in deep-enough water to apply water physics to Samus) and entering another
room that isn't submerged. This will happen if the room you enter is using
an FX type that isn't water. Using "No FX" or "BG Glow" can also fix the
issue.
- If you run into the problem of liquids
appearing/disappearing every few seconds over the whole room, unchecking the
"Small Tide" and "Large Tide" checkboxes will fix it.
30.
Map editing.
You used the map editor earlier in this guide on step #10 to move room 7E9A0
to a different X/Y location than room 792B3. This time, we're gonna use the map
editor place the new map tiles that will show up on both the mini-map and pause
map when Samus explores room 7E9A0's three cells.
Using the map editor is pretty straightforward. It works almost exactly the
same as the level editor. Right-click on a tile to copy it, then left-click to
place the copied tile. Remember that
part 1: map editor
labels and explains all of the map editor's functions. Using the arrow keys to
flip map tiles after you've placed them is much faster than using the "H-Flip"
and "V-Flip" checkboxes.
The "Full Map" checkbox hides/unhides any map tiles that are marked with a
tiny red dot. The tiny red dot means that the map tile is hidden from map
stations. To add the red dot to an existing map tile: right click on the map
tile you want hidden, check the "Hidden" checkbox, then left-click on the same
map tile that you just right-clicked.
Choose palette 3 from the tiny drop-down menu (map
editor, #6), which will make the map graphic table (part 1, map editor #14)
blue to match the map. Right-click on tiles from the graphic table to copy, and
of course left-click to place them on the map.
Here's what my map looks like now. Notice that I removed the item dot from
room 793AA, since the power bomb expansion in that room was moved to the end of
cell #1 in room 7E9A0 instead:
![[IMG_133.png: map editing]](./images/IMG_133.png "Rooms 793AA and 7E9A0 on the map")
重要 -
SCYZER'S MAP FIX
通常、Super
Metroidのマップを編集することは完全にはうまくいきません。なぜなら、ゲームは最終的に異なるマップを念頭に置いてプログラムされていないからです。
Scyzerは、スーパーメトロイドの地図を保存およびロードするためのコードを書き直し、すべての地域地図を自由に編集できるようにしました。
地図をやり直す予定がある場合、この修正を適用する必要があります。そうしないと、編集内容が正しく更新されません。
この修正はいつでも適用できます。
Scyzerのマップ修正は
"KejMap"と呼ばれる古いSMILEバージョンからの組み込みパッチを廃止し、すでにKejMapが適用されているROMに適用することができます。
[Download
Scyzer's map fix]
IPSまたはASMのどちらのパッチでも適用できますが、問題ありません。 See
IPS/ASM patching.
MAP ICONS
地図のアイコンは、サムスが探索した後にピンク色のパレットに切り替わる地図のタイルとは異なります。マップアイコンは、特定の条件が満たされた後に表示される独立したグラフィックです(通常、サムスはマップ上のどこに行っているのかを示します)。地図アイコンのデータはすべて82ドルの銀行にあります。
マップアイコンのデータ文字列には、2バイト、4バイト、6バイトの3種類があります。これがそれぞれの動作です。
2バイト長:バンク$
82のアドレスへのポインタ。例: "1480B - 53 C8"は、オフセット14853のクラテリアの保存ステーションアイコンのX / Y位置を示します(53
C8を反転するとC8 53になり、$ 82:C853となり、オフセット14853になります)。
2バイトのポインタは、地図アイコンを追加する場合にのみ編集する必要があります。
長さ4バイト(XX XX YY
YY):すべての地図アイコンの水平方向/垂直方向の位置(エリア名グラフィックアイコンを除く)。
XX XX =左端からピクセル単位で数えた水平位置。
YY YY =一番上から始まる垂直方向の位置(ピクセル単位)。
長さ6バイト(XX XX YY YY ZZ
ZZ):区域名グラフィック・アイコンの水平/垂直方向の位置+区域名グラフィック・アイコンの値。
XX XX =左端からピクセル単位で数えた水平位置。
YY YY =一番上から始まる垂直方向の位置(ピクセル単位)。
ZZ ZZ =区域名グラフィック・アイコン値
各エリアのマップアイコンの位置はすべてここにあります、そしてそれらをどのように編集するか:
CRATERIA:
1474D - 59 C7 [pointer: Crateria area name icons]
147CB - 3B C8 [pointer: Crateria boss icon, unused]
147DB - 00 00 [pointer: Crateria missile refill icon, unused]
147EB - 00 00 [pointer: Crateria energy refill icon, unused]
147FB - 4D C8 [pointer: Crateria map station icon]
1480B - 53 C8 [pointer: Crateria save station icons]
1483B - FE FF FE FF [Crateria boss icon, unused]
1484D - B8 00 40 00 [Crateria map station icon]
14853 - D8 00 28 00 [Crateria save station icon #1, room 791F8]
14857 - 90 00 38 00 [Crateria save station icon #2, room 793D5]
14759 - 30 00 70 00 5A 00 ["BRINSTAR" area name icon #1]
1475F - B8 00 B8 00 5A 00 ["BRINSTAR" area name icon #2]
14765 - 10 01 68 00 5A 00 ["BRINSTAR" area name icon #3]
14771 - C8 01 80 00 5D 00 ["MARIDIA" area name icon]
1476B - 78 01 20 00 5C 00 ["WRECKED SHIP" area name icon]

BRINSTAR:
1474F - 79 C7 [pointer: Brinstar area name icons]
147CD - 9D C8 [pointer: Brinstar boss icon]
147DD - A3 C8 [pointer: Brinstar missile refill icon]
147ED - A9 C8 [pointer: Brinstar energy refill icon]
147FD - B7 C8 [pointer: Brinstar map station icon]
1480D - BD C8 [pointer: Brinstar save station icons]
1489D - BC 01 9C 00 [Brinstar boss icon]
148A3 - 28 00 40 00 [Brinstar missile refill icon]
148A9 - 48 00 68 00 [Brinstar energy refill icon #1]
148AD - 00 01 98 00 [Brinstar energy refill icon #2]
148B1 - A8 01 98 00 [Brinstar energy refill icon #3]
148B7 - 28 00 28 00 [Brinstar map station icon]
148BD - 78 00 28 00 [Brinstar save station icon #1, room 7A184]
148C1 - 40 00 30 00 [Brinstar save station icon #2, room 7A201]
148C5 - 28 00 60 00 [Brinstar save station icon #3, room 7A22A]
148C9 - 88 01 98 00 [Brinstar save station icon #4, room 7A70B]
148CD - 30 01 48 00 [Brinstar save station icon #5, room 7A734]
14779 - 48 00 08 00 59 00 ["CRATERIA" area name icon #1]
1477F - D0 00 40 00 59 00 ["CRATERIA" area name icon #2]
14785 - 28 01 20 00 59 00 ["CRATERIA" area name icon #3]
1478B - 40 01 90 00 5D 00 ["MARIDIA" area name icon]
14791 - 48 01 C0 00 5B 00 ["NORFAIR" area name icon]

NORFAIR:
14751 - 99 C7 [pointer: Norfair area name icons]
147CF - 0B C9 [pointer: Norfair boss icon]
147DF - 00 00 [pointer: Norfair missile refill icon, unused]
147EF - 13 C9 [pointer: Norfair energy refill icon]
147FF - 1D C9 [pointer: Norfair map station icon]
1480F - 23 C9 [pointer: Norfair save station icons]
1490B - B8 00 90 00 [Norfair boss icon]
14913 - A0 00 50 00 [Norfair energy refill icon #1]
14917 - A8 00 80 00 [Norfair energy refill icon #2]
1491D - 48 00 28 00 [Norfair map station icon]
14923 - 60 00 60 00 [Norfair save station icon #1, room 7AAB5]
14927 - A8 00 20 00 [Norfair save station icon #2, room 7B0DD]
1492B - 58 00 30 00 [Norfair save station icon #3, room 7B167]
1492F - 80 00 48 00 [Norfair save station icon #4, room 7B192]
14933 - A0 00 58 00 [Norfair save station icon #5, room 7B1BB]
14937 - 20 01 68 00 [Norfair save station icon #6, room 7B741]
14799 - 50 00 08 00 5A 00 ["BRINSTAR" area name icon]

WRECKED SHIP:
14753 - A1 C7 [pointer: Wrecked Ship area name icons]
147D1 - 81 C9 [pointer: Wrecked Ship boss icon]
147E1 - 00 00 [pointer: Wrecked Ship missile refill icon, unused]
147F1 - 00 00 [pointer: Wrecked Ship energy refill icon, unused]
14801 - 8B C9 [pointer: Wrecked Ship map station icon]
14811 - 91 C9 [pointer: Wrecked Ship save station icon]
14981 - 98 00 A0 00 [Wrecked Ship boss icon]
1498B - 68 00 A0 00 [Wrecked Ship map station icon]
14991 - 88 00 78 00 [Wrecked Ship save station icon #1, room 7CE8A]
147A1 - 40 00 80 00 59 00 ["CRATERIA" area name icon #1]
147A7 - C0 00 80 00 59 00 ["CRATERIA" area name icon #2]

MARIDIA:
14755 - AF C7 [pointer: Maridia area name icons]
147D3 - DB C9 [pointer: Maridia boss icon]
147E3 - E1 C9 [pointer: Maridia missile refill icon]
147F3 - E7 C9 [pointer: Maridia energy refill icon]
14803 - ED C9 [pointer: Maridia map station icon]
14813 - F3 C9 [pointer: Maridia save station icons]
149DB - 3C 01 54 00 [Maridia boss icon]
149E1 - 30 01 48 00 [Maridia missile refill icon]
149E7 - 50 01 38 00 [Maridia energy refill icon]
149ED - 88 00 90 00 [Maridia map station icon]
149F3 - 60 00 A0 00 [Maridia save station icon #1, room 7CED2]
149F7 - 18 01 28 00 [Maridia save station icon #2, room 7D3DF]
149FB - 98 00 60 00 [Maridia save station icon #3, room 7D765]
149FF - 48 01 38 00 [Maridia save station icon #4, room 7D81A]
147AF - 08 01 08 00 59 00 ["CRATERIA" area name icon]
147B5 - 30 00 A0 00 5A 00 ["BRINSTAR" area name icon #1]
147BB - 78 00 A0 00 5A 00 ["BRINSTAR" area name icon #2]

TOURIAN:
14757 - C3 C7 [pointer: Tourian area name icon]
147D5 - 00 00 [pointer: Tourian boss icon, unused]
147E5 - 00 00 [pointer: Tourian missile refill icon, unused]
147F5 - 49 CA [pointer: Tourian energy refill icon]
14805 - 4F CA [pointer: Tourian map station icon, unused]
14815 - 51 CA [pointer: Tourian save station icons]
14A49 - 58 00 88 00 [Tourian energy refill icon]
14A4F - FF FF [Tourian map station icon location, unused]
14A51 - 80 00 90 00 [Tourian save station icon #1, room 7DE23]
14A55 - A8 00 68 00 [Tourian save station icon #2, room 7DF1B]
147C3 - 98 00 48 00 59 00 ["CRATERIA" area name icon]

CERES:
14759 - 30 00 [pointer: Ceres area name icons, unused]
147D7 - 9B CA [pointer: Ceres boss icon]
147E7 - 00 00 [pointer: Ceres missile refill icon, unused]
147F7 - 00 00 [pointer: Ceres energy refill icon, unused]
14807 - 00 00 [pointer: Ceres map station icon, unused]
14817 - 00 00 [pointer: Ceres save station icons, unused]
14A9B - A0 00 88 00 [Ceres boss icon]

DEBUG:
1475B - 70 00 [pointer: Debug area name icons, unused]
147D9 - 00 00 [pointer: Debug boss icon, unused]
147E9 - 00 00 [pointer: Debug missile refill icons, unused]
147F9 - 00 00 [pointer: Debug energy refill icons, unused]
14809 - 00 00 [pointer: Debug map station icons, unused]
14819 - 00 00 [pointer: Debug save station icons, unused]
HOW TO MOVE MAP ICONS
マップアイコンのXおよびY位置の値を上下に移動して移動します。 例:「148A9 - 48 00 68 00
[brinstar energy refill icon#1]」 48 00はX位置、68 00はY位置です。
値は16進バイトとして反転されるため、Brinstarの最初のエネルギー補給アイコンは、画面の一番左端から0048ピクセル、一番上から0068ピクセルの位置に配置されます。
各マップタイルのサイズは8 x
8ピクセルです。そのため、マップアイコンの位置がずれないようにするには、マップアイコンを8ピクセル単位で移動することをお勧めします。
HOW TO DELETE MAP ICONS
4バイトまたは6バイトをFFに置き換えてから、他のアイコンのデータをシフトして、どのFFバイトでも中断されない切れ目のないストリングを維持します(たとえば、結果がXX
XX YY YY FF FF FF XX XX YYの場合)。 アイコンを削除した後のYY FF
FFの場合は、下線を引いたバイトを4つ左にシフトする必要があるので、XX XX YY XX XX YY Y FF FF FF FF FF
HOW TO ADD EXTRA MAP ICONS
各マップアイコンはX /
Y位置に4バイトを使用します。したがって、Crateriaには2つの保存ステーションマップアイコン、つまり8バイト、および最後に2つの必要なFF
FFバイトがあるためです。
Crateriaに3つの新しい保存ステーションアイコンを追加したい場合は、8バイトをコピーし、それらのバイトはそのオフセットではもう必要ないのでFFで埋めてから、バンク$
82のどこかに22バイトの空きスペースを見つけます
そこに8バイトを書き込み、次に貼り付けた22バイトのオフセットを指すようにアドレス1480Bの2バイトを変更します。
MAP ICON TYPES
上の地図アイコン位置データの6つの異なるポインタのために、6つの異なる地図アイコンタイプがあることを伝えることができたかもしれません:ステーションアイコン、エネルギー補充ステーションアイコン、ミサイル補充ステーションアイコン、地図ステーションアイコン、ボスアイコン
、およびエリア名のグラフィックアイコン。
あなたがサムスの船のアイコン、サムスのヘルメット、そして死んだボスのための赤い "[X]"(他のものとそれらのX /
Y位置を共有する)とサムスの現在の位置のためのアニメーションの白い十字線を数えるなら10種類。
これらの異なる種類のすべてがあるにもかかわらず、それらのグラフィックを除いてアイコン自体の間にそれほど違いはありません、そしてそれらはそれぞれその特定のマップアイコンタイプが何回現れるかを決定する独自のポインタを持っています
各エリア さまざまなアイコンタイプのそれぞれのデータは、PLMおよびEnemy
Setデータ文字列と同じように、常にFF FFで終わる必要があります。
Area name icons:
これらのアイコンは、ゲームを一時停止したときに各エリアのマップに表示される、小さなピンク色の文字で書かれたすべてのエリア名です。
デフォルトで利用可能な値は次のとおりです。59 00 = CRATERIA、5A 00 = BRINSTAR、5B 00
= NORFAIR、5C 00 =郵送船、5D 00 = MARIDIA、5E 00 = TOURIAN。
あるエリアに別の名前を付けると、グラフィック編集が必要になります。
Boss icons: サムスがマップステーションを使用した後に表示されます。
ボスが倒された後にボスアイコンを置き換える大きな赤い「[X]」クロスアウトアイコンはすべて、それらが置き換えるボスアイコンと同じX / Y位置を使用します。
Missile refill station icons:
サムスがそれを地図上で探索した後に表示されます。
新しいグラフィックが与えられれば、他のものに簡単に使用できます。
Energy refill station icons:
サムスがそれを地図上で探索した後に表示されます。
新しいグラフィックが与えられれば、他のものに簡単に使用できます。
Map station icons:
サムスがそれを地図上で探索した後に表示されます。
新しいグラフィックが与えられれば、他のものに簡単に使用できます。
Save station icons: サムスがセーブポイントを使用した後、および保存したゲームを読み込んだ後に表示されます。
Samusが最後に使用したセーブポイントをマップ上で正しくマークできるように、各セーブステーションには独自のマップアイコンが必要です。
Samus's ship icon: サムスがそれを探索していなくても、常に地図上に表示されます。
サムスの船はCrateriaの最初の保管場所であるため、サムスの船のX
/ Y位置は「crateria save station icon#1」と同じです。
Samus's helmet icon:
セーブしたゲームをロードするとが表示されます。 X /
Y位置はSamusの位置によって異なります。
Samus's current position icon:
現在サムスがマップ上にいる場所に常に表示されます。
One last thing about area maps: サムスが探索しても、地図全体をスクロールしても見ることができないというスクロールの問題がある場合は、マップエディタを使用して地図全体の周囲に目に見えない境界線を描画してみます。
境界線は、端から数タイル離れている必要があります。
31.
Room states / events.
Room states: alternate pointer sets that are only used after
an event is triggered.
Events: triggered by Samus in various ways through gameplay.
With some custom coding, event triggers can become highly specific, such
collecting a certain item, opening a certain door, killing a certain enemy,
walking to a certain spot, etc. Events are just small chunks of code in bank $8F
that activate room states.
You might have noticed that if you select "E612 = Events 1" from the neon
green drop-down menu, it will make room 7E9A0's level data look absolutely
destroyed. This is because the Events1 room state is loading an alternate set of
pointers for room 7E9A0, which are pointing to stuff that room 792B3 still uses.
To fix this issue, all you have to do is make certain that all of E612=Events1's
pointer values are the same as E5E6=Standard1's pointer values. You can do all
of that in SMILE, or you can just copy/paste-write these bytes at offset 7E9CC
with your hex editor and save the ROM: 00 B3 CE 00 00 00 00 AF E0 EB C0 F4 C0 C0
20 EA 00 00 00 00 80 EA 00 00 D3 91 - after you do that, refresh the room in
SMILE, and both states will now have all of the same pointer values. Because
their pointers are identical, any edits you make while viewing either state will
affect the other.
You will also need to update the pointer to room 7E9A0's Events1 pointers. Go
to offset 7E9AE and change DF 92 into CC E9. Offset 7E9CC is where Events1's
pointers for room 7E9A0 begin, starting with the level data pointer.
Adding extra states to a room requires moving the room header to
another spot in bank $8F, because each new state adds 31 bytes to the room
header. By default, all of Super Metroid's room headers are packed
together in bank $8F, with no free space between them. Removing states from a
room is much easier, because all you're doing is shortening the length of the
header. If you're adding new states to a room, don't forget to update mdb.txt
after you move the header. The default state (E5E6=Standard1) must go last in
the room header so that checks for alternate states are done first (similar to
why with door-specific FX1, the default FX string must go at the end).
There's no reason to demonstrate room states by creating a
different one for this room, because it's nothing but editing pointers anyway,
which we've already done in painful detail. Understanding the
room header format almost fully explains how to also use room states.
List of "Events 1" event values:
0000 = Zebes is awake
0001 = Giant metroid has finished eating sidehopper
0002 = Mother Brain's glass case is broken
0003 = Zebetite 1 destroyed
0004 = Zebetite 2 destroyed
0005 = Zebetite 3 destroyed
0006 = Phantoon statue is grey
0007 = Ridley statue is grey
0008 = Draygon statue is grey
0009 = Kraid statue is grey
000A = Path to Tourian is open
000B = Maridia tube is broken
000C = Lower Norfair Chozo has lowered the acid
000D = Shaktool has cleared its path
000E = Zebes timebomb set (escape imediately!)
000F = Dachora and Etecoons saved
0010 = 1st metroid hall cleared
0011 = 1st metroid shaft cleared
0012 = 2nd metroid hall cleared
0013 = 2nd metroid shaft cleared
0014 = none/unused
0015 = Outran the Speed Booster lava-quake.
0016-00FF = none/unused
Custom events: someday I'll mess around with
events enough to be able to include some information here about customizing
them. There can be MANY events (~640) that can become as specific as you want
them to. JAM's event patches allow you to use all 640 events and more (Metroid
Construction > Patches).
32.
When to call a room finished?
Before you consider a room totally finished, you should double-check
everything about it as thoroughly as possible.
- Look over the data at each of the pointers in SMILE's
Room MDB tab. Check for overwrites or missing "FF FF" / "00 00" stopper
bytes for data strings that use them. Be especially aware of any shared
pointers with other rooms! Use SMILE'S Index and MDB Tools (located in the
"ROM Stuff" tab) to search directly for accidentally shared indexes, and
generate helpful .TXT lists.
- Go through every combination of doors possible that are
inside of, and connected to the room. Make certain that all door ASM pointer
data is working exactly as it should.
- Look at all of the room's scroll PLMs and their
H-Copy/V-Copy BTS numbers. All scroll PLM data strings must end with a single
"80" byte. If Samus needs to touch a scroll PLM while within a certain range of
something, make absolutely certain that there is no way for the player avoid
touching the scroll PLM or its H/V-copy BTS. If you're unsure of the H/V-copy
BTS count, use the level editor's "Ctrl + left click + drag" hotkey.
- Know where every enemy in the room is capable of moving,
and if possible, how the player could possibly manipulate the enemy. Know where
every enemy in the room actually is! Make certain that there aren't
out-of-bounds enemies that you can't see; click "Tools > Off-Screen Enemies to
Screen" if you're unsure, and any out-of-bounds enemies will be moved to the
top-left of first screen in the room. Check every enemy's "Enemy Data" values,
and also look for enemies set to "Move Off-Screen" that shouldn't be.
- Delete any unused enemies and PLMs from the room.
Dragging them into the foreground will work if you are lazy (just make sure none
of the enemies have "Move Off-Screen" checked), but deleting them will free up
valuable space in bank $8F, and you also won't have to worry about the player
seeing them (or hearing them) in the foreground, which is just sloppy work. Red
arrow PLMs are useless, and can all be deleted and replaced with H-Copy/V-Copy
BTS.
- Having a few common-use pointers can make things easier.
Examples of common-use pointers would be 8000 for Enemy Set and Enemy GFX, which
you can use for all rooms (and alternate room states) with no enemies in them.
Sharing pointers can quickly become confusing and result in accidental
overwrites, so it's a trade-off for the bytes that you avoid wasting. If you
make a room that only has one enemy type in it, you could look for another room
with the same enemy type in it, and use that room's pointer instead.
- If the room uses room states, test them carefully and
double-check each alternate pointer, along with its data.
- Check the room's BTS. Look for ways to reduce level data
usage without negatively affecting the room's aesthetics, if possible. Things to
look for are unwanted X/Y flips, incorrect invisible air/solid tiles, incorrect
BTS numbers, square slopes that have been accidentally X-flipped.
- Get rid of needless foreground details in places that it
is impossible for the player to see during gameplay. An example of this is room
792B3 by default; notice how the very top and bottom rows of tiles are blacked
out in the level editor. Also, foregrounds should be totally solid, even if
their graphics don't look solid, so that out-of-bounds permastucks are less
likely to happen. For areas where there are large portions of visible
foreground, give the foreground more variation than just one or two tiles
repeating.
- The Up Scroller can usually be set to something a bit
higher than 70, which will reduce how much of the foreground is unnecessarily
displayed, giving more screen space to things that are actually happening around
Samus. 99 is a good value to use for rooms with very plain foregrounds, and 80
is a good value for rooms with more detailed foregrounds; higher values aren't
really recommended unless the room is purely an ascent room.
- Once you're reasonably sure you'll never need to edit
the room's level data again, you can finally adjust its ending point in
level_entries.txt so that the level data maximum only has a few bytes to spare,
leaving enough room only for fixing tiling errors if you find any, or making
very small adjustments. Save the room one more time, and then maybe make a
back-up copy of your ROM.
And with that, you've reached the end of the room creation
tutorial! You should now have great control over Super Metroid's rooms.
Everything else in this guide is reference material for non-room stuff that
doesn't require following any steps.
∧ PART
3: OTHER STUFF ∨
SAVE STATIONS
Save stations use 14 bytes in bank $80.
SMILE RF's PLM editor is able to edit them (select $B76F in the PLM selector,
then click the "Edit Save Station Data" button; more info below). By default,
areas can have many save stations without needing to repoint anything (as many
as you can see in SMILE RF's save station index drop-down list). Here are the
locations of the first eight save points for each area, and then how to edit
them:
44C5 - F8 91 6A 89 00 00 00 04 00 04 40 00 00 00 [Crateria save station #1]
44D3 - D5 93 9A 89 00 00 00 00 00 00 98 00 E0 FF [Crateria save station #2]
44E1 - 00 00 00 00 00 00 00 04 00 04 B0 00 00 00 [Crateria save station #3, unused]
44EF - 00 00 00 00 00 00 00 04 00 04 B0 00 00 00 [Crateria save station #4, unused]
44FD - 00 00 00 00 00 00 00 04 00 04 B0 00 00 00 [Crateria save station #5, unused]
450B - 00 00 00 00 00 00 00 04 00 04 B0 00 00 00 [Crateria save station #6, unused]
4519 - 00 00 00 00 00 00 00 04 00 04 B0 00 00 00 [Crateria save station #7, unused]
4527 - 00 00 00 00 00 00 00 04 00 04 B0 00 00 00 [Crateria save station #8, unused]

45CF - 84 A1 F6 8D 00 00 00 00 00 00 98 00 E0 FF [Brinstar save station #1]
45DD - 01 A2 12 8D 00 00 00 00 00 00 98 00 E0 FF [Brinstar save station #2]
45EB - 2A A2 52 8F 00 00 00 00 00 00 98 00 E0 FF [Brinstar save station #3]
45F9 - 0B A7 86 91 00 00 00 00 00 00 98 00 00 00 [Brinstar save station #4]
4607 - 34 A7 D2 90 00 00 00 00 00 00 98 00 00 00 [Brinstar save station #5]
4615 - 00 00 00 00 00 00 00 04 00 04 B0 00 00 00 [Brinstar save station #6, unused]
4623 - 00 00 00 00 00 00 00 04 00 04 B0 00 00 00 [Brinstar save station #7, unused]
4631 - 00 00 00 00 00 00 00 04 00 04 B0 00 00 00 [Brinstar save station #8, unused]

46D9 - B5 AA 56 94 00 00 00 00 00 00 98 00 00 00 [Norfair save station #1]
46E7 - DD B0 9A 95 00 00 00 00 00 00 98 00 E0 FF [Norfair save station #2]
46F5 - 67 B1 DA 97 00 00 00 00 00 00 98 00 00 00 [Norfair save station #3]
4703 - 92 B1 BA 93 00 00 00 00 00 00 98 00 00 00 [Norfair save station #4]
4711 - BB B1 02 97 00 00 00 00 00 00 98 00 E0 FF [Norfair save station #5]
471F - 41 B7 0E 9A 00 00 00 00 00 00 98 00 00 00 [Norfair save station #6]
472D - 00 00 00 00 00 00 00 04 00 04 B0 00 00 00 [Norfair save station #7, unused]
473B - 00 00 00 00 00 00 00 04 00 04 B0 00 00 00 [Norfair save station #8, unused]

481B - 8A CE 40 A2 00 00 00 00 00 00 98 00 00 00 [Wrecked Ship save station #1]
4829 - 00 00 00 00 00 00 00 04 00 04 B0 00 00 00 [Wrecked Ship save station #2, unused]
4837 - 00 00 00 00 00 00 00 04 00 04 B0 00 00 00 [Wrecked Ship save station #3, unused]
4845 - 00 00 00 00 00 00 00 04 00 04 B0 00 00 00 [Wrecked Ship save station #4, unused]
4B53 - 00 00 00 00 00 00 00 04 00 04 B0 00 00 00 [Wrecked Ship save station #5, unused]
4B61 - 00 00 00 00 00 00 00 04 00 04 B0 00 00 00 [Wrecked Ship save station #6, unused]
486F - 00 00 00 00 00 00 00 04 00 04 B0 00 00 00 [Wrecked Ship save station #7, unused]
487D - 00 00 00 00 00 00 00 04 00 04 B0 00 00 00 [Wrecked Ship save station #8, unused]

4917 - D2 CE 54 A3 00 00 00 00 00 00 98 00 00 00 [Maridia save station #1]
4925 - DF D3 88 A5 00 00 00 00 00 00 98 00 00 00 [Maridia save station #2]
4933 - 65 D7 44 A7 00 00 00 00 00 00 98 00 E0 FF [Maridia save station #3]
4941 - 1A D8 EC A7 00 00 00 00 00 00 98 00 00 00 [Maridia save station #4]
494F - 00 00 00 00 00 00 00 04 00 04 B0 00 00 00 [Maridia save station #5, unused]
495D - 00 00 00 00 00 00 00 04 00 04 B0 00 00 00 [Maridia save station #6, unused]
496B - 00 00 00 00 00 00 00 04 00 04 B0 00 00 00 [Maridia save station #7, unused]
4979 - 00 00 00 00 00 00 00 04 00 04 B0 00 00 00 [Maridia save station #8, unused]

4A2F - 23 DE BC AA 00 00 00 00 00 00 98 00 E0 FF [Tourian save station #1]
4A3D - 1B DF 9C A9 00 00 00 00 00 00 98 00 00 00 [Tourian save station #2]
4A4B - 00 00 00 00 00 00 00 04 00 04 B0 00 00 00 [Tourian save station #3, unused]
4A59 - 00 00 00 00 00 00 00 04 00 04 B0 00 00 00 [Tourian save station #4, unused]
4A67 - 00 00 00 00 00 00 00 04 00 04 B0 00 00 00 [Tourian save station #5, unused]
4A75 - 00 00 00 00 00 00 00 04 00 04 B0 00 00 00 [Tourian save station #6, unused]
4A83 - 00 00 00 00 00 00 00 04 00 04 B0 00 00 00 [Tourian save station #7, unused]
4A91 - 00 00 00 00 00 00 00 04 00 04 B0 00 00 00 [Tourian save station #8, unused]

4B2B - 45 DF 58 AB 00 00 00 00 00 00 48 00 00 00 [Ceres save station #1, unused]
4B39 - 45 DF 58 AB 00 00 00 00 00 00 40 00 00 00 [Ceres save station #2, unused]
4B47 - 45 DF 58 AB 00 00 00 00 00 00 40 00 00 00 [Ceres save station #3, unused]
4B55 - 45 DF 58 AB 00 00 00 00 00 00 40 00 00 00 [Ceres save station #4, unused]
4B63 - 45 DF 58 AB 00 00 00 00 00 00 40 00 00 00 [Ceres save station #5, unused]
4B71 - 45 DF 58 AB 00 00 00 00 00 00 40 00 00 00 [Ceres save station #6, unused]
4B7F - 45 DF 58 AB 00 00 00 00 00 00 40 00 00 00 [Ceres save station #7, unused]
4B8D - 45 DF 58 AB 00 00 00 00 00 00 40 00 00 00 [Ceres save station #8, unused]

4C19 - 2C E8 C4 AB 00 00 00 00 00 00 B0 00 00 00 [Debug save station #1, unused]
4C27 - 2C E8 C4 AB 00 00 00 00 00 00 B0 00 00 00 [Debug save station #2, unused]
4C35 - 2C E8 C4 AB 00 00 00 00 00 00 B0 00 00 00 [Debug save station #3, unused]
4C43 - 2C E8 C4 AB 00 00 00 00 00 00 B0 00 00 00 [Debug save station #4, unused]
4C51 - 2C E8 C4 AB 00 00 00 00 00 00 B0 00 00 00 [Debug save station #5, unused]
4C5F - 2C E8 C4 AB 00 00 00 00 00 00 B0 00 00 00 [Debug save station #6, unused]
4C6D - 2C E8 C4 AB 00 00 00 00 00 00 B0 00 00 00 [Debug save station #7, unused]
4C7B - 2C E8 C4 AB 00 00 00 00 00 00 B0 00 00 00 [Debug save station #8, unused]
Here is the data string for Crateria save station #2: D5 93 9A 89
00 00 00 00 00 00 98 00 E0 FF - and here are Crateria save station #2's bytes,
arranged vertically and labeled/explained:
D5 93  <-- Room ID
9A 89  <-- Door ID
00 00  <-- Door BTS (unused)
00 00  <-- Save X position
00 00  <-- Save Y position
98 00  <-- Samus screen X
E0 FF  <-- Samus screen Y
Room ID: the room that the
save station itself is located in. In the example above, D5 93 = room 793D5.
Door ID: address to a room's door data in bank $82. Must be
a door from a neighboring room or cell that connects directly to the room/cell
that the save station itself is in. In the example above, the door ID bytes are
9A 89 (82:899A). In room 792FD, if you press
Ctrl+D on any door and open the door editor, you'll see "Door $05 - $899A",
which is the door that leads into room 793D5.
Door BTS (unused): always keep this set to 0000 unless you
know how to program assembly. The BTS number of the door tiles that Samus
touches to enter the save station room/cell are written to this location, but
never actually read or used for anything after that.
Save X position: save point's horizontal positioning in the
room. Counted in pixels, starting from the very left. Add 0100 per whole screen.
Example: Crateria save station #1 uses 0400 for both its screen X and Y values,
which means it's located in room 791F8, four screens from the very left side of
the room, and four screens from the very top (Samus's ship). By default, 0000 is
used as the screen X and screen Y value for every save station in the game
except Samus's ship, because all save stations have their own single-screen
room.
Save Y position: save point's vertical positioning in the
room. Counted in pixels, starting from the very top.
Samus screen X: Samus's horizontal positioning on-screen
after loading at this save station. The screen that Samus appears in is
determined by the "Save X position" and "Save Y position" values.
Samus screen Y: Samus's vertical positioning
on-screen after loading at this save station.
SMILE RF's save station editor:
This editor is accessed through the PLM editor's "Edit Save Station Data"
button, which is only visible when the save station PLM is selected. It allows
you to edit a save station's 14 bytes without a hex editor. The "Find Door DDB"
button will detect a door ID from a neighboring room that connects to the room
that the save station PLM is located in and automatically place that door ID
into the "Door DDB" text field. The "Use Current Save Station PLM Location"
button will change the four "Screen X/Y" and "Samus X/Y" text fields directly
above it to reflect the save station PLM's current location in the room.
If you wanted to add three new save points to Crateria, all you'd
need to do is: 1) Enter some working data at the offsets for Crateria save
stations #3, #4 and #5. 2) Add three new save station PLMs. 3) Add three new
save station new map icons.
ELEVATORS
A working elevator is made up of two doors +
one elevator enemy, and both rooms that are connected by an elevator must have
them. Let's look at all of the data for the two elevators that take Samus to and
from the blue Morph Ball item room:
Room 797B5's elevator data:
Elevator door #1:
Door $01 ($8B9E; offset 18B9E) - 9F 9E F0 02 00 00 05 00 00 00 00
00
9F 9E = Room ID
F0    = Bitflag
02    = Direction
00    = Door cap X
00    = Door cap Y
05    = Screen X
00    = Screen Y
00 00 = Distance to spawn
00 00 = Door ASM pointer
Elevator door #2:
Door $02 ($88FC; offset 188FC) - 00 00
Elevator enemy:
Enemy $00 (offset 108B61) - 3F D7 80 00 A2 00 00 00 00 2C 00 00 00
00 40 01
3F D7 = $D73F (elevator)
80 00 = X position
A2 00 = Y position
00 00 = "Tilemaps"
00 2C = "Special"
00 00 = "Graphics"
00 00 = "Speed"
40 01 = "Speed 2"
Room 79E9F's elevator data:
Elevator door #1:
Door $02 ($8EB6; offset 18E6B) - B5 97 E0 03 00 00 00 00 00 00 00
00
B5 97 = Room ID
E0    = Bitflag
03    = Direction
00    = Door cap X
00    = Door cap Y
05    = Screen X
00    = Screen Y
00 00 = Distance to spawn
00 00 = Door ASM pointer
Elevator door #2:
Door $03 ($88FC; offset 188FC) - 00 00
Elevator enemy:
Enemy $02 (offset 1093CC) - 3F D7 80 05 C2 02 00 00 00 2C 00 00 01
00 18 00
3F D7 = $D73F (elevator)
80 05 = X position
C2 02 = Y position
00 00 = "Tilemaps"
00 2C = "Special"
00 00 = "Graphics"
01 00 = "Speed"
18 00 = "Speed 2"
Elevator door #1: basically a normal door, except
that it must use a bitflag of 80 or C0 (80 for elevators leading into the same
area, C0 for elevators leading into a different area). The "distance to spawn"
is usually set to 0000, but it's not actually used. The
door data array explains the exact purpose of all 12 door data bytes.
Elevator door #2: doesn't need a 12-byte door data string,
because its purpose isn't to transition Samus into another room. If 0000 is used
as the room ID value, the door BTS acts like a solid block instead, and also the
game will stop reading this door's data at that point instead of continuing on
to read the bitflag, direction, door cap X/Y, etc. Bytes 03-14 for elevator door
#2 should never be edited in SMILE, or else you will overwrite other stuff.
Because $83:8FCC is nothing but "00 00", it is used by elevator door #2 for
every elevator in the game. Never use 0000 as the room ID value for a door BTS
without placing an elevator enemy underneath it, or Samus will become unable to
move after going through a door.
Elevator enemy: pretty straightforward.
"Speed" should only be 0000 for elevators going down, and 0001 for elevators
going up.
"Speed 2" should be about 0#40 for elevators
going down (# = Screen Y + 0140; e.g, if a downward elevator is on screen Y 05,
you'd use Speed 2 = 0640), and about 0018 for elevators going up. 0#40 =
distance from top of screen to place Samus after going through an upward
elevator door, 0018 = distance from top of screen to place Samus after going
through a downward elevator door. Section 28's
enemy index data array explains the exact purpose of all 16 bytes used for
each enemy at the room's Enemy Set pointer.
ROOM MUSIC SELECTION
This section does NOT explain how
to create custom music. That requires advanced assembly, musical knowledge and
audio editing skill. This is simply a list of songs that you can use as the
background music for a room, and then some information on door and
event-triggered song changes.
Song list: first byte is the "song set" value,
and the second byte is the "play index" value, which can both be seen and edited
at the bottom of SMILE RF's Room MDB tab:
## = any value can be used

03 05 = Song: Title screen
03 06 = Song: Title screen (after pressing a button)
36 05 = Song: Intro story
2D 06 = Song: Ceres
06 05 = Song: Empty Crateria (with rain and thunder)
06 06 = Song: Empty Crateria (rain and thunder only)
06 07 = Song: Empty Crateria (no rain or thunder)
0C 05 = Song: Crateria
09 05 = Song: Space pirates
24 06 = Song: Bomb Torizo awakening
## 03 = Song: Elevator rooms
## 04 = Song: Hallway before golden boss statues
09 06 = Song: Golden boss statue room
0F 05 = Song: Green Brinstar
12 05 = Song: Red Brinstar
15 05 = Song: Upper Norfair
18 05 = Song: Lower Norfair
30 05 = Song: Wrecked Ship (boss = alive)
30 06 = Song: Wrecked Ship (boss = dead)
1B 05 = Song: Eastern Maridia
1B 06 = Song: Western Maridia
1E 05 = Song: Tourian
2A 05 = Song: Miniboss fight
27 06 = Song: Pre-boss tension (+ roaring sounds)
45 06 = Song: Pre-boss tension (+ metroid sounds)
27 05 = Song: Boss fight (+ roaring sounds)
45 05 = Song: Boss fight (+ metroid sounds)
24 05 = Song: Boss fight (Draygon and Ridley)
21 05 = Song: Mother Brain fight
24 07 = Song: Escape music
3C 05 = Song: Credits music, doesn't loop

00 00 = No change
## 00 = No music
00 05 = No change / song one
00 06 = No change / song two

3F 05 = Audio clip: "The last metroid is in captivity"
42 05 = Audio clip: "The galaxy is at peace"
2D 05 = Music clip: flying to Ceres and Zebes
## 01 = Music clip: Samus appears (loading a saved game)
## 02 = Music clip: Item fanfare (collecting an item)
33 05 = Audio clip: Zebes exploding
39 05 = Audio clip: Samus dying
00 00 and 00 05 ("no change") are used often to keep from
reloading the whole instrument set every time Samus transitions through a door,
which causes a short delay, so it's wasteful to reload the instruments if a
different song isn't meant to start playing. If you realize while testing your
hack that the wrong music (or no music) has been loaded, it's probably because a
room somewhere is using 00 00 or 00 05 when it should have loaded a song
instead. 00 00 defaults to the title screen theme, which is why you hear it in
most rooms that you QuickMet into.
HOW TO LOAD SONGS USING A DOOR'S ASM POINTER
This is
mainly for rooms with multiple cells, like 7E9A0. You could have a different
song play for each cell by just making the doors that lead into the cells load a
new song, and then make certain that the three rooms that are connected to each
cell aren't using 00 00 or 00 05.
To make doors load a song, you only have to find some free space in bank $8F
to paste-write these bytes: A9 00 00 22 C1 8F 80 A9 XX
FF 22 C1 8F 80 A9 YY 00 22 C1 8F 80 60 (XX = song
set, YY = play index) - after that, point to those bytes with a door's ASM
pointer.
That's three things that the door's ASM pointer has been used to
edit in this guide (the first two were scroll colors and scroller values), and
the potential becomes almost limitless once you learn how to program ASM. Here's
an example piece of door ASM data you can also paste-write somewhere in bank $8F
that changes all three types (up/down scrollers, scroll colors, and song
choice): 08 E2 20 A9 70 8D AD 07 A9
A0 8D AF 07 A9 01 8F 20
CD 7E A9 02 8F 21 CD 7E
28 A9 00 00 22 C1 8F 80 A9 1E FF 22 C1 8F 80 A9
05 00 22 C1 8F 80 60
Here are those same bytes, arranged vertically and labeled. The
red values are the only values that you should edit:
08 E2 20     <-- Begin ASM
A9 70        <-- Load "up scroller" value
8D AD 07     <-- Store up scroller value to room header
A9 A0        <-- Load "down scroller" value
8D AF 07     <-- Store down scroller value to room header

A9 01        <-- Load blue scroll
8F 20 CD 7E  <-- Store blue scroll to screen 00
A9 02        <-- Load green scroll
8F 21 CD 7E  <-- Store green scroll to screen 01

28           <-- End scroll color change ASM

A9 00 00     <-- Stop current song
22 C1 8F 80  <-- Play song-stop value
A9 1E FF     <-- Load new "song set" value
22 C1 8F 80  <-- Play "song set"
A9 05 00     <-- Load new "play index" value
22 C1 8F 80  <-- Play "play index"

60           <-- End ASM
The sections of code that change the up/down scrollers and music
will always stay the same length, but the section that changes scroll colors can
vary in length, depending how many scroll colors need to be changed at once by
the door, which has already been explained in section 17.
INGAME SONG CHANGES
Throughout the game, there are
moments where the background music changes to another song without the use of
door data or room headers. To do this anywhere you want at any time would most
likely require some assembly programming knowledge, but in the meantime, here is
a list of existing ingame song changes that you only need to hex-edit the song
set and play index values for:
List of music change events in Super Metroid:
59B6D  - 03 [song set]    <-- Title screen
59B80  - 05 [play index]  <-- Title screen
59A95  - 06 [play index]  <-- Title screen (after skipping intro)
5A5A0  - 3F [song set]    <-- "The last metroid is in captivity"
5A60C  - 05 [play index]  <-- "The last metroid is in captivity"
5A622  - 42 [song set]    <-- "The galaxy is at peace"
5A629  - 05 [play index]  <-- "The galaxy is at peace"
5A714  - 09 [song set]    <-- Intro story
5A70C  - 00 [play index]  <-- Intro story
5B221  - 00 [play index]  <-- Intro story music stopping before Ceres
5BDD3  - 2D [song set]    <-- Flying toward Ceres
5BDDA  - 05 [play index]  <-- Flying toward Ceres
13244E - 05 [play index]  <-- Ceres & Norfair Ridley fights
1340B4 - 07 [play index]  <-- Escape music after Ceres Ridley flies away
1345EB - 03 [play index]  <-- Elevator music after Norfair Ridley dies
100BD  - 07 [play index]  <-- Landing on rainy Zebes
1546E1 - 96 [song set]    <-- Bomb Torizo awakening
153952 - 98 [song set]    <-- Bomb Torizo fight
153098 - 05 [play index]  <-- Bomb Torizo fight
154AE3 - 05 [play index]  <-- Golden Torizo fight
153255 - 9A [song set]    <-- Elevator music after Bomb/Golden Torizos die
13C8B0 - 05 [play index]  <-- Kraid fight
13C81C - 03 [play index]  <-- Elevator music after Kraid dies
46259  - 03 [play index]  <-- Elevator music after collecting the Varia suit
1210AB - 06 [play index]  <-- Tense music after Crocomire dies
1217DE - 05 [play index]  <-- Crocomire destroying spike wall
121B9F - 06 [play index]  <-- Tense music after Crocomire's skeleton dies
13D543 - 05 [play index]  <-- Phantoon fight
13DB92 - 05 [play index]  <-- Elevator music after Phantoon dies
199B1B - 03 [play index]  <-- Elevator music after Botwoon dies
129254 - 03 [play index]  <-- Elevator music after Draygon dies
14F03D - 05 [play index]  <-- Giant metroid attacking sidehopper
14F29B - 07 [play index]  <-- Giant metroid releasing Samus
14880E - 06 [play index]  <-- Silence before Mother Brain fight
14885A - 21 [song set]    <-- Mother Brain fight
148E18 - 05 [play index]  <-- Mother Brain fight
14CC66 - 48 [song set]    <-- Hyper beam acquired
14CC6D - 05 [play index]  <-- Hyper beam acquired
14B1FF - 24 [song set]    <-- Escape music after Mother Brain dies
5D6C6  - 33 [song set]    <-- Planet Zebes exploding
5D6BE  - 00 [play index]  <-- Planet Zebes exploding
5DBAD  - 3C [song set]    <-- Credits
5DBB4  - 05 [play index]  <-- Credits

How to play elevator music after Spore Spawn dies:
12E8B4 - Replace 0A BB A0 with 5A F9 A5 -- points to free space at 12F95A
12F95A - Replace free space with 22 0A BB A0 A9 03 00 22 C1 8F 80 6B -- play index = 03
Most ingame song changes don't have a song set value, because
they only tend to use the play index to switch to an alternate version of the
same song. By default, this limits most of the song selections to maybe a couple
of variations. To be able to play any song you want at any of the addresses
above would require small assembly hacks, similar to what was used to add an
elevator music change after Spore Spawn's death.
Be careful if you decide to alter song choices. It's pretty easy to crash the
game, and even possibly do stuff to your emulator's sound. I don't know about
any other emulators besides Snes9X 1.43, which can sometimes end up with
muted/crashed audio, a grayed-out "Playback Rate" menu, and trying to use
QuickMet will result in a black screen. If this happens to your Snes9X, you can
fix it by loading a save state (or a different ROM), which should un-gray the
playback rate options, allowing you to re-select 32Khz.
SOUND EFFECTS
SMILE isn't capable of switching most
sound effects, but doing it with a hex editor is easy enough that it doesn't
matter. There are four main groups of sound effects: Samus projectile sounds,
hurt enemy sounds, active enemy sounds, and general ingame sounds. There are
also three different sound effect libraries, and two actual sound effect types
(independent and song-dependent).
Samus projectile sounds: sound effects for all of
Samus's beams and missiles. Samus's projectiles use library 1 sounds, which
can't be changed because they don't have a library JSL like most sounds.
Hurt enemy sounds: SMILE RF can edit these,
because this data is part of each enemy's Main Header AI array (called "Sound").
Most hurt enemy sounds use library 2.
Active enemy sounds: sounds that play while
certain enemies move around or use their attacks. Most active enemy sounds use
library 2.
General ingame sounds: all other sounds that are
used throughout the game.
Sound libraries 1, 2 and 3: the three different
sound effect libraries function mostly the same, with the main differences
between them being their priority over each other. Library 1 seems to have
priority over library 2, and library 2 seems to have priority over library 3.
Within each library, there are five JSLs, which also seem to have a different
order of priority that hasn't been fully tested and documented yet. Lower sound
priority means that the sound effect is more easily able to be cut off by other
sounds; this cut-off is what can cause space jumping and speed boost running to
occasionally become silent until Samus lands or stops running.
Song-dependent sounds: some sound effects
don't load their sound data from its own space in the ROM, but will instead
create a new sound effect by manipulating one of the background song's
instruments. Metroids are an obvious example. Using metroids in a room that
isn't playing the title screen theme, Maridia's music, or Tourian's music will
mess their sound effects up, usually creating beeping tones or strange rumbling
noises that sound glitchy. Most bosses use song-dependent sounds. Independent
sounds can be used no matter which background song is playing, because they load
actual audio data instead of instructions that repurpose a specific song
instrument.
The
sound effects section of the hex edits page lists most of the known sound
effect locations, along with how to edit them.
COLOR PALETTES
Each color in any palette uses two bytes
of data in the ROM.
This picture shows the default palettes for all of the main tilesets, and
then a numbered grid of all 256 ($FF) color indexes + palette lines. All
tilesets use colors $00-7F:
![[IMG_134.png: Super Metroid palettes]](./images/IMG_134.png "Default tileset palettes and color grid")
Grid #1 (palette lines 0-7, colors 00-7F):
These explanations are not hard rules that must always be followed (except
hot pink), but they do illustrate how the original developers chose to group and
use the SNES's limited amount of colors, which is a good format to follow
because it's consistent among all tilesets. The large black & gray numbers along
the right side of the two grids are the palette line numbers for each of the
16-color rows next to them. Palette line 0 = colors 00-0F, and so on.
CRE = Common Room Elements (palette lines 0-3, colors 00-3F)
SCE = Scenery (palette lines 4-7, colors 40-7F)
Hot pink: hard-coded to always be a
required transparent 'color' for every palette line.
Black: almost always set to solid black, though it's not
required. Likely to be used by many graphics. Edit with caution.
White: usually set to solid white, though it's not required.
Likely to be used by many graphics. Edit with caution.
Gray: temporary-use colors that are often rewritten during
gameplay. More info below (grid #2).
Blue: all of the door caps and door tunnel colors for every
tileset.
Red: main CRE colors. Used by many graphics for every
tileset. Edit with caution.
Yellow: HUD colors. Consistently shared among many graphics
for every tileset. Edit with caution.
Teal: used as the colors for water, lava, fog, spores and
rain if the room's FX has a palette blend value of 00. If a palette blend other
than 00 is used, then four colors from the palette blend color table are used
instead.
Green: intended CRE colors that are never actually used by
any CRE graphics (except color 08). Used by some SCE graphics for most tilesets.
Orange: intended SCE colors. Not used by any CRE graphics.
Different for each tileset.
REMINDER ABOUT CRE AND SCE TABLES: everything
above the pink line in
this picture
is the CRE tile table, and everything underneath the pink line is the SCE tile
table. This applies to all tilesets. Although palette lines 0-3 are intended to
be used by CRE graphics, there's no actual difference at all between palette
lines 0-3 and 4-7. There's no such thing as a CRE palette, however, there are
certain colors that should remain consistent throughout all or most tileset
palettes (i.e., doors caps, HUD icons), which might sometimes be referred to as
the CRE palette.
More info on specific color uses:
Color 00: main backdrop color, and
should always be solid black.
Colors 10, 20, 30, 40, 50, 60, 70, 80, 90, A0, B0, C0, D0, E0, F0:
used for transparency, and cannot be used for anything else.
Colors 01-03: yellow door caps, acid FX, power bomb items,
energy tank items, energy refill stations, flashing save stations, gate PLMs,
eye doors that guard bosses, glowing Chozo item orbs, and more.
Colors 04-07, 0C: Main structural CRE colors for all
tilesets: Chozo item statues, glowing Chozo item orbs, item PLMs, respawning
blocks, generic structures, gate PLMs, elevator platform PLMs, elevator shafts,
grapple blocks, spike blocks, energy and missile refill stations, save stations,
eye doors that guard bosses, super missile blocks, and more.
Color 08: super missile items and super missile
blocks.
Color 09: pink energy tanks in HUD, pink mini-map
in HUD, missile items, elevator platform PLMs.
Color 0A: pink energy tanks in HUD, pink mini-map
in HUD.
Color 0B: pink energy tanks in HUD.
Color 0D: blue mini-map in HUD, letters/numbers
in HUD, gray reserve 'AUTO' icon in HUD.
Color 0E: white for letters/numbers and mini-map
in HUD.
Color 0F: black HUD background, shouldn't edit.
Colors 11-13: green door caps, green HUD icons,
green gate PLMs.
Colors 14-17, 1C, 1F: gray door caps, door
tunnels.
Colors 18-1B: water, lava, fog, spores and rain
in rooms with FX palette blend 00.
Color 1D: yellow reserve 'AUTO' icon in HUD,
yellow blinking mini-map in HUD.
Color 1E: red blinking mini-map in HUD.
Colors 21-23: pink door caps, missile refill
stations, pink gate PLMs.
Colors 24-2F, 34-3F: general-use colors for
tilesets.
Colors 31-33: blue door caps, blue Brinstar area,
blue gate PLMs, elevator shafts.
Colors 41-7F: general-use colors for tilesets.
Colors 80-FF: general-use colors for almost
everything else except tilesets.
Grid #2 (palette lines 8-F, colors
80-FF):
Palette lines 8-F can't be displayed and edited all at once like
lines 0-7 can, because lines 8-F are almost constantly changed during gameplay,
and are used for coloring everything else in the game except for all of the
tileset's default palettes. That means that it's almost impossible to group and
illustrate all of the exact uses for colors 80-FF in a single image that isn't
just way too huge and unreasonably complex. Thankfully, each palette line's
purpose is pretty straightforward.
Palette lines 0-7: tilesets. Already
explained above.
Palette line 8: white flash for enemies taking damage, white
flash for ammo dropped by enemies
Palette line 9: enemy type palette #1 (0001 in the Room
Enemies list)
Palette line A: enemy type palette #2 (0002 in the Room
Enemies list)
Palette line B: enemy type palette #3 (0003 in the Room
Enemies list)
Palette line C: Samus's suits
Palette line D: lots of stuff. Energy and ammo dropped by
enemies, Samus's missiles and super missiles, along with their smoke trails and
explosions, enemy death explosions, and much more. See
palette locations for more.
Palette line E: Samus's beams
Palette line F: enemy type palette #4 (0007 in the Room
Enemies list)
Take Samus's suits, for example. Only one palette line is ever
used by her suit at any given time during gameplay, which is palette line C.
When Samus's colors change to bright blue while using the speed booster, this is
because of special code in the game that overwrites colors C0-CF with different
colors, then overwrites them again to change them back to what they originally
were once Samus has stopped running. To create the effect of Samus's colors
transitioning to blue instead of just changing colors instantly in a blink, the
game rapidly rewrites all of palette line C's colors four times in less than a
second. If you'll look at the "Samus Palettes" section of SMILE RF's palette
editor window, you'll see that all of the colors for the Power, Varia and
Gravity suits can be edited, along with all of the conditions that can
temporarily alter Samus's colors (beam charging, heated Norfair rooms, speed
booster, etc.) All of these Samus Palette edits will write to palette line C as
needed during gameplay.
If you're familiar with the 6-digit hexadecimal color codes for
red-green-blue (RRGGBB) that web pages, graphic editors and a lot of other
things use, you can convert those color codes to the closest SNES version of
that color by entering the hex color code into the "Hex" text field, located in
SMILE RF's tileset editor underneath the tileset's palette. Clicking on a color
to select it, then typing a new color code into "Hex" field will automatically
convert your color code if needed, and then change the selected color (i.e, type
00FF00 for bright green, which gets converted to 00F800 and changes the R/G/B
sliders to 00/1F/00).
Tileset palettes: already explained above.
Maximum size of a tileset palette is 259 ($103) bytes. Most tileset palettes
will need to be repointed if you plan to recolor a bunch of stuff (watch the
"Palette Compressed Size" number that appears in the tileset editor's window
title whenever you click the Save Palette button). Each color uses two bytes of
ROM data (as do all other colors in the game).
Duplicate tilesets: you've probably already
noticed how most tilesets have an exact duplicate that uses different colors and
nothing else. The only purpose of these duplicate tilesets by the original
creators of Super Metroid was to do just that, which is ineffecient, but it also
means that you can easily repoint these duplicate tilesets, effectively giving
you a completely new tileset to work with!
Samus's palettes: all of Samus's colors can be
changed in SMILE RF's palette editor (offsets are still documented on the
palette locations page).
Enemy & boss palettes: right-click on an enemy to
bring up the enemy editor, then click on the second of the four small
rectangular buttons (near the "Save DNA" and "Load DNA" buttons) to view the
enemy palette editor. Default enemy palettes are always 16 colors (32 bytes),
and can be edited right in SMILE RF's enemy editor without needing to be
repointed. An enemy's palette must be located in the same bank as the enemy's AI
(see "AI Bank" value). Boss palettes will likely require editing many palette
lines (see
palette locations).
Palette blends: already explained above. Palette
blends use 4 colors (8 bytes), and overwrite colors 18, 19, 1A and 1B in the
tileset if the room's FX palette blend value is 02+.
Colors for everything else: see
palette locations for information on all of the other palettes that appear
throughout the game.
If you plan to edit all or most of the game's colors for your hack, expect to
be at it for awhile. Besides the time spent editing the colors themselves, you
will probably need to test and re-edit them over and over until you get
everything looking just right.
TILE TABLE EDITING FOR TILESETS
A tileset tile table is
made up of four 8x8 graphics that are dragged and dropped from the tile sheet.
These tile tables are used to assemble the blocks that you then use to build
rooms with in SMILE RF's level editor.
Tileset table editing shouldn't be overlooked. Good use of the tile table
allows you to add much more detail in how your rooms are desingned and
structured. It can turn a few 8x8 graphics into many 16x16 tiles that Samus can
then interact with. Again,
here
is a picture of the CRE tile table, and the SCE tile table. Everything above
the pink line is CRE, and everything underneath it is SCE. The CRE tile table
(along with CRE's .GFX sheet) is shared among all tilesets, so editing one CRE
tile will affect that CRE tile in every room that it's used in throughout the
whole game, (hence "Common Room Elements"). SCE tile tables and their .GFX
sheets are different for each area.
Here is how to edit an existing tile table:
![[IMG_135.png: tile table editing]](./images/IMG_135.png "Editing an existing tile table")
Because the tile I edited was a CRE tile (circled red), the top and bottom
parts of every yellow door cap PLM in the game will now be gray, because I
picked a different palette number for it by changing the palette line that it
uses from 0 to 5 in the little yellow box (underlined red). THIS IS WHY
YOU SHOULD ALWAYS BE VERY CAREFUL WHEN YOU EDIT AN EXISTING TILE TABLE.
If you see a tile that doesn't look like it's used for anything, and then you
change it into something different with the tile table editor, you might find
those edited tiles in places they weren't meant to be later on because they
were used. Some tiles were only used in a couple of spots in the original
Super Metroid, and so it's easy to overlook/forget them.
Next, here is how a new tile table can be created:
![[IMG_136.png: new tile table]](./images/IMG_136.png "Creating a new tile table")
In case the above picture didn't make it clear, you can copy a tile with the
copy button, find a white XXXX that you want to overwrite, paste your copied
tile over it with the paste button, edit your pasted tile as desired, and then
click the save button. You can also just drag all four graphics from the tile
sheet and not bother with copying/pasting. In this example, I created a new
variation of the eroded gray brick. First, I copied one of the gray bricks,
pasted it over the white XXXX tile directly above it, then I dragged a different
quarter of each gray brick from the tile sheet (follow the pink arrows) onto the
newly pasted brick, then saved it. This results in a third unique brick, made up
of two parts of the existing graphics. You could make a fourth gray brick the
same way by copying the other one, then dragging a different set of corners from
the tile sheet.
Don't overwrite any of the XXXX tiles in the CRE table unless
you're using Scyzer's Multi-CRE patch. All of the SCE's XXXX tiles can be
overwritten, but only after you've repointed the SCE tile table. Each new tile
added to the tile table uses 8 bytes of data.
CRE/SCE Table Compressed Size: these numbers
appear for a few seconds in the tileset editor's window title after you click
the Save button. If your SCE Table Compressed Size is getting close to full, and
you don't want to repoint the tile table, you can 'delete' existing tile tables
by copy/pasting a white XXXX tile over it, which will reduce the SCE Table
Compressed Size number. Make certain that the tiles you delete aren't in use by
any rooms. The maximum size of a repointed SCE tile table is a compressed size
of 8192 bytes.
Layer priority & flipping: clicking on one of the tile table
quarters will apply and unapply a red square to it. Red square = tile draws
behind the sprite layer. No red square = tile draws in front of the sprite
layer. The sprite layer includes Samus and enemies. The eight rectangular
buttons that border the tile table quarters and run between the pale yellow
palette number buttons can be used to X or Y-flip each 8x8 tile, which marks
that button with a black arrow:
![[IMG_137.png: tile layer priority]](./images/IMG_137.png "Tile table priority & flipping")
Differenciating black from transparency:
turning SMILE's display brightness up will cause the color black to display as
dark gray, while transparency will always appear solid black, no matter how high
SMILE's brightness is turned up. With brightness up, it's easy to see any
misplaced dark pixels or rough edges (especially with layer 2 hidden). Turning
the brightness up can help with finding subtle tiling errors, because specks of
unwanted transparency will be clearly visible as black dots.
Default transparency tile: the CRE tile sheet contains the
8x8 graphic that is used throughout the game for transparent air tiles, which is
located directly under the Chozo statue's hand (circled red). At the very end of
the CRE tile table, you'll see the default 16x16 transparent level editor tile
that's made up of four 8x8 transparent tiles (circled blue):
![[IMG_138.png: default transparency]](./images/IMG_138.png "Default transparency tiles for tile sheet & tile table")
REPOINTING TILESETS (PALETTE, TILE TABLE, TILE SHEET)
Repointing tilesets works almost the same way as repointing anything else does,
except there are a couple of text files that you might have to also edit. You're
also not restricted to a specific bank like you are with most pointers, because
tileset data can go anywhere in the ROM. Along the left side of SMILE RF's
tileset editor window, you'll see five gray boxes with PC addresses in them,
called "CRE Table", "CRE Tiles", "SCE Table", "SCE Tiles", and "Palette."
If you switch back and forth between tilesets $00 and $01
(Crateria and red Crateria), you'll see that the only pointer that is different
between the two tilesets is the Palette address. This means that if you edit the
tile table or tile sheet for either Crateria or red Crateria, the changes will
affect both tilesets as long as they share those pointers. Let's repoint red
Crateria's palette, tile table, and tile sheet so that it can be totally edited
separately. The original Super Metroid does not use red Crateria for anything at
all, although it looks like it was once intended to be used during the escape
from Zebes.
Repointing tileset palettes:
repointing palettes is sometimes necessary if you're editing colors, because
their compressed length can vary, depending on how many consecutive colors are
used. Tileset palettes with a lot of gray/unused colors will have less palette
data than palettes with more color variety. If you change a string of
gray/unused colors into different colors, this adds more bytes to the palette
data (see "Palette Compressed Size" after you click the Save button), which
means you will usually be very limited in how many 'new' colors you can add to a
palette. The maximum size of a tileset's palette is 259 bytes ($103 if you're
counting in hex).
Red Crateria's palette data is located at offset 212E5D (LoROM $C2:AE5D), and
the pointer to that palette data is at offset 7E6B1. First, export red
Crateria's palette by clicking the Export button in SMILE's tileset editor.
After that, find some free space in the ROM with your hex editor; I'm going to
use the free space at offset 1C0000 (LoROM $B8:8000). Go to offset 7E6B1 and
change 5D AE C2 into 00 80 B8, then save the ROM. Now, back in SMILE, if you
refresh the room and look at red Crateria's tileset, the PC address inside of
the gray "Palette" box will change from 212E5D to 1C0000, and the colors will
look messed up. Import the red Crateria palette that you exported earlier, and
then click the Save button, which fixes the messed up colors, and also means
that you've repointed the palette!
Although the palette has been repointed successfully, the Palette Compressed
Size number still needs to be adjusted so SMILE RF can accurately tell us how
much tileset palette space is available. Open tileset_entries.txt, which is
located in SMILE RF\Files\Data\ to see a list of PC addresses. This works
exactly the same way that level_entries.txt does. All of the addresses in this
file are used to make SMILE RF keep track of data usage, and all of the
addresses must be arranged in ascending order (that means each address entry
listed must be higher than the one above it). This is required for SMILE RF to
accurately tell you how much data you're using, and much data you have left,
which prevents you from accidentally overwriting something else.
Because the free space I chose is at 1C0000, and thus is the
lowest offset in the list, it goes at the very top. That by itself still won't
give us an accurate Palette Compressed Size number, because there's nothing that
stops the data from being read between 1C0000 and 1C8000, so it's assuming that
there is $8000 (32768 in decimal) bytes of space devoted to this palette. The
most data that a tileset palette could ever use is 259 bytes, so this makes it
very easy to adjust palette size limits with certainty. In your hex editor,
starting from address 1C0000, select 259 ($103) bytes of data so that it says
"Block: 1C0000-1C0102" and "Length: 103" at the bottom. What you're looking for
is the offset where the 259-byte selection ends and adding +1 to that, which in
this case is 1C0103. There's your stopper offset.
This is what the top of your tileset_entries.txt file should now
look like:
1C0000  <--
1C0103  <--
1C8000
1CA09D
1CA634
Save your modified tileset_entries.txt, and then check the Palette
Compressed Size in SMILE RF again. It should now say ### /
259. Perfect. Now you can freely freely edit all of red Crateria's
colors.
OPTIONAL: clear out red Crateria old palette data that still
remains at offset 212E5D. Tileset $02's palette data begins at 212F43, so if we
highlight all of the bytes starting and ending at offsets 212E5D-212F42, this
gives us a selection that's 230 ($E6) bytes long. This is all of red Crateria's
old palette data, which can be replaced with free space because the palette is
now located at offset 1C0000. Normal Crateria's tileset palette still has a
Palette Compressed Size limit of ### / 225 because its palette pointer was not
changed.
Next, we're going to do the same thing with red Crateria's tile
table and tile sheet. The process is mostly the same as with tileset palettes,
except there are much larger chunks of data to consider, which can make finding
enough free space difficult unless you expand the ROM.
Repointing SCE tile tables: repointing a
tileset's SCE tile table allows you to use all
of the white XXXX tiles in that tile table, if you want to. As with tileset
palettes, because we know exactly how large a tile table can possibly be, we can
be certain about its placement in the tileset_entries.txt file. The maximum size
of a tileset's tile table is 6144 bytes ($1800 if you're counting in hex).
Red Crateria's SCE tile table data is located at offset 20B6F6
(LoROM: $C1:B6F6), and the pointer to that tile table data is at offset 7E6AB.
In SMILE's tileset editor, click "Tile Table > Export SCE Tile Table" to create
a .TTB file in the same folder that your currently opened ROM is in.
ROM EXPANSION: we could find some existing
free space in the ROM and place the tile tables there, but let's create some new
free space by expanding the ROM instead. In SMILE RF, if you click "ROM > Expand
ROM", offsets 300000-307FFF will immediately be available for use. Simple as
that! The Expand ROM option adds one extra bank of free space to the very end of
the ROM each time it is clicked (one bank = $8000 bytes). In an unedited Super
Metroid ROM, the final offset is 2FFFFF (LoROM: $DF:FFFF). Although Super
Metroid ends at bank $DF by default, A SNES LoROM is able to have up to $FF
banks - this means that Super Metroid can be expanded up to 32 times! The first
time you expand the ROM, bank $E0 is added. Expanding it again will add in bank
$E1, then bank $E2, $E3, etc., all the way up to bank $FF. The offsets for bank
$E0 are 300000-307FFF.
300000 will be the new offset for red Crateria's SCE tile table. Because the
largest that a SCE tile table can possibly be is $1800 bytes, we need to make a
selection starting from offset 300000 and going downwards until $1800 bytes are
selected (in HxD, the bottom should say "Block: 300000-3017FF" and "Length:
1800") - as with tileset palettes, once we've highlighted the maximum byte
amount, we add +1 to get our stopper offset, which is 301800.
Open tileset_entries.txt and add these two offsets to the very
bottom, then save the file:
300000
301800
In HxD, go to offset 7E6AB and change F6 B6 C1 into 00 80 E0,
then save the ROM.
All that's left to do now is copy red Crateria's tile table data over to
offset 300000. In SMILE, if you refresh red Crateria, the gray "SCE Table" box
should now say 300000. The tile table will appear majorly glitched up, which is
fixed by clicking "Tile Table > Import SCE Tile Table" and selecting the .TTB
file that you exported earlier. Red Crateria's SCE tile table has been fully
repointed! The "SCE Table Compressed Size" number should now be #### /
6144.
Unlike the tileset palette, we DON'T want to replace red
Crateria's old tile table data with free space, because normal Crateria (tileset
$00) still uses it. What we did was give red Crateria its own
tile table by making an exact copy of normal Crateria's tile table, and then we
pasted it at 300000. Normal Crateria still has a SCE Table Compressed Size limit
of #### / 2050 because its SCE Table pointer was not changed. If you wanted
normal Crateria's tile table to have 6144 bytes of available space as well, you
would need to repoint it like you just did with red Crateria's tile table (in
which case you could replace Crateria's old tile table data with free
space).
Repointing SCE tile sheets:
repointing a tileset's SCE tile sheet isn't necessary unless you're planning to
edit the actual tileset graphics themselves in some way, but let's repoint it
anyway. This can be done almost exactly the same way as repointing the SCE tile
table was. The maximum size of a tileset's SCE tile sheet is 18432 bytes ($4800
if you're counting in hex).
Red Crateria's SCE tile sheet is located at 1D4629 (LoROM: $BA:C629), and the
pointer to that tile sheet data is at offset 7A6AE. In SMILE's tile editor,
click "GFX > Export SCE Graphics" to create a .GFX file in the same folder that
your currently opened ROM is in.
In HxD, go to offset 7E6AE and change 29 C6 BA into 00 98 E0, then save the
ROM. In SMILE, click "GFX > Import SCE Graphics" and select the .GFX file that
you exported earlier, then refresh the tileset. The gray "SCE Tiles" box should
now say 301800. All that's left is to update tileset_entries.txt by adding the
stopper address. In HxD, go to offset 301800 and highlight the next $4800 bytes
("Block: 301800-305FFF" and "Length: 4800"), then add +1 to the address at the
end of the selection, which gives us 306000. Add 306000 to the very bottom of
level_entries.txt and save the file. The "SCE Tiles Compressed Size" number only
appears in the tileset editor's window title for a few seconds after you've
imported a .GFX file, so if you missed it, you can just import the .GFX file
again to see it. It should now say ##### / 18432.
The SCE tileset has been completely repointed! If you add all
three of them together, a SCE tileset's palette, tile table, and tile sheet can
use a maximum of $6100 bytes in total (24832 if you're counting in decimal).
Repointing the CRE tile table:
repointing the CRE tile table will allow you to use all 41 of the white XXXX
tiles in it, but NOT the line of eight blank black tiles that sit directly on
top of the gray door cap tiles. CRE pointers work a bit differently, but the
concept of repointing them is exactly the same. The maximum size of the CRE tile
table is 2048 bytes ($800 if you're counting in hex).
The CRE's tile table pointer is located at offset 1683D. The data at this
pointer location is "B9 85 48 A9
9D A0" - which is really just the LoROM address $B9:A09D (PC: 1CA09D).
Ignore the 85 48 49. If you'll look in tileset_entries.txt near the top, you'll
see 1CA09D and 1CA634. 1CA09D is where the CRE's tile table data is located, and
1CA634 is where it ends. With "Block: 1CA09D-1CA633 / Length: 597" highlighted
in HxD, copy those bytes to your clipboard, then replace all of them with free
space. Next, find $800 bytes of free space somewhere to paste-write these copied
CRE tile table bytes; I'm going paste them at offset 1C0100. After that, go to
offset 16830 and replace the bytes B9,
9D A0 with B8, 00 81
and save the ROM.
Lastly, open tileset_entries.txt and delete 1CA09D, and then
underneath 1C0100, add 1C0900 and save the file. Done! The gray "CRE Table" box
should say 1C0100, and if you click the tileset editor's Save button, the "CRE
Table Compressed Size" numbers should now say #### /
2048.
Repointing the CRE tile sheet:
repointing the CRE tile sheet most likely won't be something you need to do
unless you're doing a lot of thorough graphic editing. The two rows of white X
tiles along the bottom of the CRE tile sheet can NOT be edited, even after
repointing! The maximum size of the CRE graphic sheet is 12288 bytes ($3000 if
you're counting in hex).
The CRE's tile sheet pointers are located at offset 16415, and at
16797. The data at both of these pointer locations is "B9
85 48 A9 00 80" - which point to $B9:8000 (PC:
1C8000). Ignore the 85 48 A9. Highlight bytes 1C8000-1CA09C, copy them to your
clipboard, replace them with free space, then paste-write them at offset 1C0900.
Go to offsets 16415 and 16797, replace B9,
00 80 with B8, 00 89
at both of those spots and save the ROM. Open tileset_entries.txt again, replace
1C8000 with 1C3900 and save the file. Done.
Adding extra CRE tilesets (multi-CRE):
multiCRE is a patch by Scyzer that allows different CRE tables and sheets to be
loaded by using the room header's "Unused" pointer. MultiCRE requires some basic
assembly knowledge to use, so I won't be explaining that in this guide. The
patch can be downloaded
here.
IMPORTANT: QuickMet will appear glitched after you've
repointed either of the CRE. This is because QuickMet's generated test ROM,
QuickMet.SMC, still uses the old CRE pointers. This is easily fixed. If you've
repointed CRE, open the "QuickMet.bin" file that's loctated in the SMILE
RF\Files\TestRoom\ folder with a hex editor, and change the data at offsets 3C
(CRE tile sheet) and 53 (CRE tile table) to match the data that is at
16415/16797 (CRE tile sheet) and 1683D (CRE tile table) in your ROM.
List of tileset pointers and tileset data locations:
Tileset $00 (normal Crateria)
Pointer: 7E6A2    Data: 20B6F6  <-- Tile table
Pointer: 7E6A5    Data: 1D4629  <-- Graphics
Pointer: 7E6A8    Data: 212D7C  <-- Palette

Tileset $01 (red Crateria)
Pointer: 7E6AB    Data: 20B6F6  <-- Tile table
Pointer: 7E6AE    Data: 1D4629  <-- Graphics
Pointer: 7E6B1    Data: 212E5D  <-- Palette

Tileset $02 (old Crateria #1)
Pointer: 7E6B4    Data: 20BEEE  <-- Tile table
Pointer: 7E6B7    Data: 1D7911  <-- Graphics
Pointer: 7E6BA    Data: 212F43  <-- Palette

Tileset $03 (old Crateria #2)
Pointer: 7E6BD    Data: 20BEEE  <-- Tile table
Pointer: 7E6C0    Data: 1D7911  <-- Graphics
Pointer: 7E6C3    Data: 213015  <-- Palette

Tileset $04 (Wrecked Ship #1)
Pointer: 7E6C6    Data: 20C5CF  <-- Tile table
Pointer: 7E6C9    Data: 1DAE9E  <-- Graphics
Pointer: 7E6CC    Data: 2130E7  <-- Palette

Tileset $05 (Wrecked Ship #2)
Pointer: 7E6CF    Data: 20C5CF  <-- Tile table
Pointer: 7E6D2    Data: 1DAE9E  <-- Graphics
Pointer: 7E6D5    Data: 2131A6  <-- Palette

Tileset $06 (green Brinstar)
Pointer: 7E6D8    Data: 20CFA6  <-- Tile table
Pointer: 7E6DB    Data: 1DE6B0  <-- Graphics
Pointer: 7E6DE    Data: 213264  <-- Palette

Tileset $07 (red Brinstar)
Pointer: 7E6E1    Data: 20D8DC  <-- Tile table
Pointer: 7E6E4    Data: 1E25AA  <-- Graphics
Pointer: 7E6E7    Data: 21335F  <-- Palette

Tileset $08 (black Brinstar)
Pointer: 7E6EA    Data: 20D8DC  <-- Tile table
Pointer: 7E6ED    Data: 1E25AA  <-- Graphics
Pointer: 7E6F0    Data: 213447  <-- Palette

Tileset $09 (Norfair #1)
Pointer: 7E6F3    Data: 20E361  <-- Tile table
Pointer: 7E6F6    Data: 1EC3F9  <-- Graphics
Pointer: 7E6F9    Data: 2135E4  <-- Palette

Tileset $0A (Norfair #2)
Pointer: 7E6FC    Data: 20E361  <-- Tile table
Pointer: 7E6FF    Data: 1EC3F9  <-- Graphics
Pointer: 7E702    Data: 2136BB  <-- Palette

Tileset $0B (Maridia #1)
Pointer: 7E705    Data: 20F4B1  <-- Tile table
Pointer: 7E708    Data: 1F3130  <-- Graphics
Pointer: 7E70B    Data: 21383C  <-- Palette

Tileset $0C (Maridia #2)
Pointer: 7E70E    Data: 21055F  <-- Tile table
Pointer: 7E711    Data: 1F678D  <-- Graphics
Pointer: 7E714    Data: 21392E  <-- Palette

Tileset $0D (Tourian #1)
Pointer: 7E717    Data: 211B01  <-- Tile table
Pointer: 7E71A    Data: 1FD414  <-- Graphics
Pointer: 7E71D    Data: 213AED  <-- Palette

Tileset $0E (Tourian #2)
Pointer: 7E720    Data: 211B01  <-- Tile table
Pointer: 7E723    Data: 1FD414  <-- Graphics
Pointer: 7E726    Data: 213BC1  <-- Palette

Tileset $0F (Ceres #1, arrival)
Pointer: 7E729    Data: 21275E  <-- Tile table
Pointer: 7E72C    Data: 203004  <-- Graphics
Pointer: 7E72F    Data: 214104  <-- Palette

Tileset $10 (Ceres #2, escape)
Pointer: 7E732    Data: 21275E  <-- Tile table
Pointer: 7E735    Data: 203004  <-- Graphics
Pointer: 7E738    Data: 2141E3  <-- Palette

Tileset $11 (mode 7 Ceres)
Pointer: 7E73B    Data: 21275E  <-- Tile table
Pointer: 7E73E    Data: 20622A  <-- Graphics
Pointer: 7E741    Data: 214104  <-- Palette

Tileset $12 (mode 7 Ceres)
Pointer: 7E744    Data: 21275E  <-- Tile table
Pointer: 7E747    Data: 20622A  <-- Graphics
Pointer: 7E74A    Data: 2141E3  <-- Palette

Tileset $13 (mode 7 Ridley)
Pointer: 7E74D    Data: 21275E  <-- Tile table
Pointer: 7E750    Data: 208DA9  <-- Graphics
Pointer: 7E753    Data: 214104  <-- Palette

Tileset $14 (mode 7 Ridley)
Pointer: 7E756    Data: 21275E  <-- Tile table
Pointer: 7E759    Data: 208DA9  <-- Graphics
Pointer: 7E75C    Data: 2141E3  <-- Palette

Tileset $15 (save rooms #1)
Pointer: 7E75F    Data: 21227B  <-- Tile table
Pointer: 7E762    Data: 20060B  <-- Graphics
Pointer: 7E765    Data: 213C9C  <-- Palette

Tileset $16 (save rooms #2)
Pointer: 7E768    Data: 21227B  <-- Tile table
Pointer: 7E76B    Data: 20060B  <-- Graphics
Pointer: 7E76E    Data: 213D7B  <-- Palette

Tileset $17 (save rooms #3)
Pointer: 7E771    Data: 21227B  <-- Tile table
Pointer: 7E774    Data: 20060B  <-- Graphics
Pointer: 7E777    Data: 213E58  <-- Palette

Tileset $18 (save rooms #4)
Pointer: 7E77A    Data: 21227B  <-- Tile table
Pointer: 7E77D    Data: 20060B  <-- Graphics
Pointer: 7E780    Data: 213F3D  <-- Palette

Tileset $19 (save rooms #5)
Pointer: 7E783    Data: 21227B  <-- Tile table
Pointer: 7E786    Data: 20060B  <-- Graphics
Pointer: 7E789    Data: 214021  <-- Palette

Tileset $1A (Kraid's room)
Pointer: 7E78C    Data: 20E189  <-- Tile table
Pointer: 7E78F    Data: 1E5FF0  <-- Graphics
Pointer: 7E792    Data: 213510  <-- Palette

Tileset $1B (Crocomire's room)
Pointer: 7E795    Data: 20F3AF  <-- Tile table
Pointer: 7E798    Data: 1EFE2A  <-- Graphics
Pointer: 7E79B    Data: 213798  <-- Palette

Tileset $1C (Draygon's room)
Pointer: 7E79E    Data: 1F9DEA  <-- Tile table
Pointer: 7E7A1    Data: 1F9DEA  <-- Graphics
Pointer: 7E7A4    Data: 213A2C  <-- Palette

CRE
Pointer: 1683D    Data: 1CA09D  <-- Tile table
Pointer: 16415    Data: 1C8000  <-- Graphics
Pointer: 16797    Data: 1C8000  <-- Graphics
ABOUT COMPRESSION: all of the tilest sizes that
I listed above are uncompressed numbers. It's possible for compressed numbers
become just slightly larger, but this would never happen under normal
circumstances, unless you were generating random data completely without
patterns, which wouldn't look like anything coherent or playable anyway. To
determine the maximum possible compressed
amount of data that a tileset can use, just add +2 for every $100 bytes, and
then +1 to that number as an ending byte (i.e., the CRE tile table can be up to
$800 bytes uncompressed, which is $810 bytes compressed; that works out as $800
+ $0F + $01).
TILE SHEET EDITING FOR TILESETS ("GFX EDITING")
Even if
you're not a pixel artist, there are edits you can make to the graphic sheet
that SMILE RF cannot do, such as rotate tiles 90 degrees, mix tilesets together,
and re-assign colors.
Tile Layer Pro
is the program I use because I don't do much graphic editing, and it's really
simple to understand and use (although primitive and very lacking in features),
but there are other options such as YY-CHR, which is newer and has more
features. Tile Layer Pro (TLP) is what I'll be using in the picture examples
below. First, here is a quick walkthrough of the graphic editing process:
1.) In SMILE's tileset editor, export a tile sheet that you
would like to edit by clicking "GFX > Export SCE Graphics" (I'll be using
Crateria for my example as usual), and then export its palette as well by
clicking the Export button.
2.) Open the exported tile sheet .GFX file in Tile Layer
Pro. When you open the .GFX file, four editing windows will appear within the
gray TLP program window, called Palette Editor, Tile Editor and Tile Arranger,
and then the main file window. The largest of the four windows, the main file
window, has the contents of the tile sheet that you just exported from SMILE,
which right now will probably look like green and black jibberish.
3.) Click "View > Format > SNES", and the jibberish will
suddenly not look like jibberish anymore, but the colors are still messed up.
4.) Click "Palette > Load" and open the .TPL palette file
that you exported with SMILE, which fixes the colors. In the Palette Editor
window, click the small up and down arrow buttons next to the 16 colors to cycle
through palette lines 0-7.
REMINDER: if TLP can't load the palette because it's the wrong file type (or
if the palette file that you exported from SMILE doesn't seem to be in the
folder that it should be in), go back into SMILE and make sure "Preferences >
Palette Format > TLP" is checked, and then export the palette again to get the
correct file type. The palette format you need is .TPL, not .FPL or .PAL.
5.) In the main file window, click on any tile, and it will
appear as a close-up in Tile Editor window for editing. Your mouse cursor will
turn into a large " + " to let you know that clicking will edit the pixels.
6.) In the Palette Editor window, click on a color, and you
will be able to draw in the Tile Editor window using that color. The R/G/B
sliders can be used to change the palette color itself if you want. The palette
colors are arranged the same way that they are in SMILE, so the first color in
each palette line will always be transparent.
About TLP's color values: in SMILE, the RGB sliders go from 0-1F, but in TLP,
they go from 0-255, which means that if you create a palette in TLP and import
it into SMILE, the colors might be slightly altered from what they were, because
SNES palettes will be rounded to the nearest compatible color value. If you want
to keep palettes accurate between the two programs, in TLP, you only have to
adjust colors in multiples of 8 (e.g., 02 for a color in SMILE = 16 in TLP).
7.) The Tile Arranger window can be used to preview what
you're editing by dragging tiles onto it from the main file window. I don't
bother with it because it's annoying to use.
8.) After making your desired edits, click "File > Save" in
TLP, which will of course save the .GFX file. If you changed any of the colors
and want to bring those over to SMILE, click "Palette > Save".
9.) In SMILE, click "GFX > Import SCE Graphics"
and select the tile sheet .GFX file that you just edited with TLP. After
selecting the file, the tileset editor's window title will tell you the SCE
Graphics Compressed Size as usual. If you look at the tile sheet on the right,
your edits will now be visible; to make them visible in the level editor and
everywhere else, refresh the tileset by clicking one of the tileset editor's
Save buttons. Done.
That's all you need to do to start giving Super Metroid custom
graphics. Most of the work is in actually drawing or editing the graphics
themselves, which I can't teach here, because that would mean basically teaching
pixel art, which there are a lot of good tutorials out there for. There are some
really effective ways to edit graphics that don't require any artistic ability,
which I'll briefly go over now:
Rotating tiles 90 degrees: SMILE is able to
flip tiles up/down and left/right, but it cannot rotate them. To rotate tiles,
you must make a copy of the 8x8 graphics in the tile sheet in TLP, rotate
those, and then assemble them as new tile table in SMILE. As a simple
example, I'm going to make a 90-degree version of a grassy floor tile. The four
'P' tiles are unused tile sheet graphics that can be overwritten:
![[IMG_139.png: tile rotation]](./images/IMG_139.png "How to rotate a tile 90 degrees")
Unfortunately, because it requires making a copy of a graphic in
the tile sheet before it can be rotated, there are limitations on how many
graphics in a tileset you can rotate, unless you start replacing existing
graphics.
Mixing tilesets together: tileset mixing
is great for making familiar graphics feel new again. A tileset mix can be
something simple, like carrying a few tiles over from one tileset to another, or
they can become complex fusions that seem like totally new areas. In the picture
example below, I'm going to carry the brick from tilesets $02 and $03 over to
Crateria:
![[IMG_140.png: tileset mixing]](./images/IMG_140.png "How to mix tilesets together")
As you can see, I have outer Crateria's tile sheet open on the
left, and inner Crateria's tile sheet open on the right. Both tile sheets have
outer Crateria's palette loaded, with palette line 5 visible. From there, all I
had to do was drag & drop the bricks over to outer Crateria. You can also
hopefully see how much further this can go than just my little example above,
especially once you know how to re-assign colors.
Re-assigning colors: in the above example
with moving the brick from inner Crateria to outer Crateria, I didn't have to
make any kind of actual graphical edits, besides just dragging & dropping the
tiles over. As you'll quickly find out if you get deeper into tileset mixing,
most tilesets are not very compatible with palettes from different tilesets.
Some graphics will look fine, but most will not look good for any of the palette
lines because the graphics were drawn and colored differently between each
tileset. This can be fixed, but it takes a bit of work.
In this example, I'm going to make the unused outer Crateria tiles (outlined
in red) match the metallic gray blocks and pipes:
![[IMG_141.png: replace color]](./images/IMG_141.png "How to re-assign colors")
These graphics use colors $04-07, but we want it to use colors $01-03 and $0E
(white) instead. If you're doing it by hand in TLP, then you must 'trace' over
the original pixels using a different color. This is how you re-assign
individual colors for a 8x8 tile within the same palette line. This process can
become very time-consuming if you're doing it with many graphics.
TIP: if you're having difficulty seeing which color to
replace with a different color, you can temporarily change the color being
replaced into a new color in TLP's Palette Editor window so that it's easier to
see. In the picture below, I'm replacing color $07 (dark gray) with color $03
(slightly lighter gray), so I temporarily changed color $07 into bright neon
green. Now all I have to do is replace each neon green pixel with a gray pixel
for each of the tiles that I'm re-assigning colors for (outlined in red):
![[IMG_142.png: temporary color replacement]](./images/IMG_142.png "Dark color temporarily changed green")
Using a bright stand-in color is also VERY useful when the color you're
needing to replace is only one shade lighter or darker than the color you're
currently using. Also, notice how transparency is shown as blue instead of
black, and that no other colors in the palette line are even close to blue,
making the transparent background for each tile much easier to see.
If you're recoloring a graphic completely (which is what you will be doing
most of the time when re-assigning colors), then it's important to know that you
absolutely must match the number of shades for the graphic that you're
recoloring! If you don't, then you will end up in a situation where there are
two colors left to replace, but you only have one color left to use. Not good,
and a possibly huge, frustrating waste of time that could have been prevented by
just counting a few colors. Sometimes you can get away with using one less
shade, but this is usually because there is a color that was only used by a few
pixels, so its absence isn't as noticeable.
YY-CHR has a feature that can instantly swap color assignments
called "Replace Color". Keep in mind that if you re-assign a graphic's colors,
it will look different for other palette lines as well. You will need to
duplicate a graphic before altering its color assignments if you want to still
be able to use the graphic with its original colors (i.e., the unused outer
Crateria tiles that I colored gray above were originally brown to match the
tiles that are used around the entrance of the Wrecked Ship, so if you still
wanted brown versions, you would need to find twelve 8x8 tiles to drag & drop a
copy of them over, so both brown and gray versions exist in the tile sheet at
the same time).
Editing other graphics: once you've gotten
comfortable with editing tile sheets, it's not hard to change other graphics. If
you know a graphic's location in the ROM, you can simply use TLP's goto function
and jump right to them, just as you would with data in a hex editor. In TLP,
open your ROM, click "Edit > Go to...", make sure the round "Hex" and "Absolute"
buttons are selected, enter one of the offsets below, and then click the "Go!"
button. You'll be taken to where the graphics are, which should now be visible
at the top of the main file window.
After the .GFX file is open, you only need to load the correct
.TPL file, make your edits, and then save the ROM. To get the correct .TPL file,
enter the Palette offsets below into the "Address" and "#" text fields in SMILE
RF's palette editor, then click the Export button to have a .TPL file created of
only the colors that are currently visible under the Palette Chooser (which will
be the only colors needed to correctly view the graphics that you're editing).
List of graphic and palette locations:
"Tileset" = Graphics or palette are part of their respective tile sheet or tileset palette.
"FX blend" = Palette is determined by the room's FX palette blend value.
"Export" = Compressed graphics that SMILE's tileset editor can export/import ("Special GFX" section).
"Mode 7" = Requires FaTILEty or some other program to edit because TLP doesn't support mode 7.
"GameBoy mode" = Select "View > Format > GameBoy" instead of SNES format.


Graphics: 38564     Palette: Tileset    <-- Animated tiles, Crateria ocean
Graphics: 39964     Palette: Tileset    <-- Animated tiles, red Brinstar's carnivorous plants
Graphics: 38B64     Palette: Tileset    <-- Animated tiles, unused lava
Graphics: 38E64     Palette: Tileset    <-- Animated tiles, Wrecked Ship conveyors
Graphics: 38EE4     Palette: Tileset    <-- Animated tiles, Wrecked Ship green backgrounds
Graphics: 39164     Palette: Tileset    <-- Animated tiles, Maridia sandfalls
Graphics: 396E4     Palette: Tileset    <-- Animated tiles, Maridia sandfalls, ceiling part
Graphics: 39C04     Palette: Tileset    <-- Animated tiles, CRE spikes moving
Graphics: 39364     Palette: 155765-0F  <-- Animated tiles, golden Phantoon statue's eye glow
Graphics: 394E3     Palette: 155745-0F  <-- Animated tiles, golden Ridley statue's eye glow
Graphics: 395A4     Palette: Tileset    <-- Animated tiles, golden Draygon statue's eye glow
Graphics: 39724     Palette: Tileset    <-- Animated tiles, golden Kraid statue's eye glow

Graphics: 397E4     Palette: Tileset    <-- Golden boss statue faces after eyes have exploded
Graphics: 3C564     Palette: 155785-0F  <-- Greenish base of golden boss statues
Graphics: 3AD64     Palette: Tileset    <-- Golden Phantoon/Ridley statues
Graphics: Tileset   Palette: Tileset    <-- Golden Kraid/Draygon statues

Graphics: 70000     Palette: 765E0-0F   <-- File selection and game over screen
Graphics: 74000     Palette: 76480-0F   <-- Planet Zebes (file select menu background)
Graphics: 73400     Palette: A410-5F    <-- Hexagon area maps when loading a save file
Graphics: 1B0000    Palette: 1B7040-0F  <-- Pause screens #1
Graphics: 1B2000    Palette: 1B7020-0F  <-- Pause screens #2
Graphics: 1B4000    Palette: 765E0-0F   <-- Pause screens #3 (file selection screens, map icons)
Graphics: D5600     Palette: D01A0-0F   <-- Common sprites (explosions, enemy drops, etc.)
Graphics: 48000     Palette: Tileset    <-- Non-CRE item graphics

Graphics: D0200     Palette: DC687-00   <-- Grappling beam's blue beam [GameBoy mode]
Graphics: D1A00     Palette: 669A9-0F   <-- Grappling beam's arm cannon
Graphics: DEA00     Palette: 6DB6B-0F   <-- Samus's graphics
Graphics: F7200     Palette: 843E1-4F   <-- Samus's beams
Graphics: D8000     Palette: DA120-8F   <-- Samus's death animation
Graphics: A4800     Palette: 66689-0F   <-- Samus's ship taking off after escape
                             D01A0-0F

Graphics: 3A564     Palette: FX blend   <-- Layer 3 FX (lava, acid, spores, rain) [GameBoy mode]
Graphics: D3200     Palette: FX blend   <-- Layer 3 FX (water, fog), HUD [GameBoy mode]
                             Tileset

Graphics: 73E00     Palette: 765E0-0F   <-- Unused map icons


You can export the .GFX files below from the "Special GFX" section of SMILE's tileset editor:

Graphics: Export    Palette: 661E9-FF   <-- Title screen #1 (blue Ceres room) [mode 7]
Graphics: Export    Palette: 662E9-2F   <-- Title screen #2 ("Super Metroid" logo)
Graphics: Export    Palette: 661E9-FF   <-- Title screen #3 (metroid larva) [mode 7]
Graphics: Export    Palette: 663E9-0F   <-- Text #1 [GameBoy mode]
Graphics: Export    Palette: 66CE9-2F   <-- Text #2
Graphics: Export    Palette: 66CE9-2F   <-- Japanese text [GameBoy mode]
Graphics: Export    Palette: 669A9-0F   <-- Ending #1 (Samus with suit)
Graphics: Export    Palette: 66989-0F   <-- Ending #2 (Samus without suit)
Graphics: Export    Palette: 669A9-0F   <-- Ending #3 (Samus shooting camera)
Graphics: Export    Palette: 66DCB-0F   <-- Ending #4 (Zebes exploding)
Graphics: Export    Palette: 76480-0F   <-- Ending #5 (Zebes zoom-out) [mode 7]
Graphics: Export    Palette: 664C9-0F   <-- Story intro #1
Graphics: Export    Palette: 66429-0F   <-- Story intro #2
                             66449-0F

Graphics: Export    Palette: 66689-0F   <-- Samus's ship and Ceres [mode 7]
                             667A9-08

Graphics: Export    Palette: 76480-0F   <-- Planet Zebes and "PLANET ZEBES" text
Graphics: Export    Palette: 66429-0F   <-- Ceres, outer space, and "SPACE COLONY" text
                             66769-0F

Graphics: Export    Palette: 66FE9-0F   <-- Ending (large "S" logo)
                             671E9-0F


Samus's graphics: DE000, D8000
Palettes can be exported from "Samus Palettes" in the palette editor. Death palette: DA120-0F
Samus's beams: D7200
Beam palettes can be exported from SMILE's palette editor.
Enemy/boss graphics: 158000 and 1B8000
SMILE's enemy editor can export enemy palettes. Palette locations has the rest.
Look at the "Enemy Graphics Pointer" if you need to find the location of a specific enemy's graphics.
Graphics tend to be separated into 16x16-tile 'pages', which
perfectly fit TLP's default main file window size. Each 16x16 page is $2000
bytes, each row of 16 tiles is $200 bytes, and each individual tile is $20
bytes. Opening your .SMC ROM in TLP allows you to see uncompressed graphics. All
other data will look like jibberish. The reason you can't see tilesets and a lot
of other graphics by simply scrolling through the ROM with TLP is because they
are compressed. Even knowing where they are located in the ROM, they won't look
like anything editable until they've been decompressed and exported as .GFX
files by SMILE.
TLP HEADER FIX AND .BIN SUPPORT: there is a flaw
with TLP that omits the top row of tiles because it always assumes that the file
being opened will have a header, which has been fixed, and also a hack that
allows .BIN files to be opened and edited. The
TLP.exe file that you can download from here already has both of these fixes
applied to it.
OPENED FILE WARNING: don't leave your ROM open in TLP for
long periods of time, unless you're willing to risk accidentally saving the
ROM with TLP and undoing all edits that you've made with SMILE or a hex editor
since the last time the ROM was saved with TLP! Disasterous.
APPLYING AND CREATING IPS/ASM PATCHES
For IPS, download
Lunar IPS (optional). For ASM, there's
xkas 0.06, which you don't need to download because it is already included
with SMILE RF ("Xkas.exe"). There are other IPS patchers and assemblers out
there, but these are the two that I've always used.
Applying .IPS patches:
in SMILE RF's main window, click "ROM > IPS / ASM Patch > Apply IPS Patch" and
select the IPS file that you want patched onto the ROM that SMILE currently has
open. After you choose the file, it will look like nothing happened, but the IPS
file has actually been patched. Done. Before you do this, make certain that the
patch and ROM are both headered or unheadered. Also remember to always make a
back-up of your ROM before you apply any kind of patch to it.
OPTIONAL: instead of using SMILE RF, you can
download and run Lunar IPS, then click the "Apply IPS Patch" button, which will
open a file selection window. In the first file selection window ("Select IPS
File to Use"), choose the IPS patch. In the second file selection window
("Select File to Patch"), choose the SMC file to apply that IPS patch to.
Creating .IPS patches: in SMILE RF's main
window, click "ROM > IPS / ASM Patch > Create IPS Patch", and you'll be given a
file selection window ("Choose *unchanged* ROM.") that usually requires an
unedited, unheadered Super Metroid ROM (the filename of ROM doesn't matter).
Done. A pop-up will appear ("IPS saved!") that lets you know where the new IPS
file is located. This small IPS file can then be applied to any unheadered Super
Metroid ROM. This is mainly how people distribute their hacks and patches.
OPTIONAL: creating an IPS patch in Lunar IPS
works almost exactly the same way as applying one. For the first file selection
window ("Select ORIGINAL UNMODIFIED File to Use"), you must choose what is
essentially an untouched copy Super_Metroid_(JU)[!].SMC (the checksum should be
white in Snes9x, not yellow). For the second file selection window ("Select NEW
MODIFIED File to Use"), choose any edited copy of Super Metroid that you want.
There will be a third file selection window ("Select IPS File to Save As"),
requiring you to enter a filename for the new IPS patch that is about to be
created. Enter a name, and you're done. There creates a .IPS file in the same
folder as the edited ROM that you chose in the second file selection window,
which others can apply to their Super Metroid ROMs or hacks.
Any edit to the ROM can be turned into a patch. You could create a
patch that recolors two pixels and absolutely nothing else, if you wanted to.
Patch creation works by comparing every single byte between both ROMs and
outputting a single .IPS file that ONLY contains the byte changes that you've
made to the ROM with SMILE, a hex editor, a tile editor, or any other tool. The
IPS file itself is not a ROM, and it cannot really do anything unless you're
using Lunar IPS or some other IPS patcher. For ROM hacking, IPS's main purpose
is overwriting specific parts of a file, although .ASM files are generally
preferred among hackers if the patch being created involves custom programming,
so that the assembly code can be edited or fixed directly before it's compiled.
Applying .ASM patches: in SMILE RF's main
window, click "ROM > IPS / ASM Patch > Apply ASM Patch" - if you haven't set a
default assembler, then you will be given a file selection window that says
"Choose your assembler." Choose the xkas.exe file. After you've done that, all
you will need to do to apply an ASM patch is choose the .ASM file, just as you
would with IPS patches. Done. The ASM patch is applied instantly and
unceremoniously, as with IPS patches.
OPTIONAL: in the xkas folder, have a .SMC and
.ASM file with the exact filenames (e.g., supermetroid.SMC and
supermetroid.ASM), then drag+drop the ASM file over the "xkas.exe" file. Done.
There is no need to do anything else, because xkas will run and compile
automatically after you place an ASM file over it.
Creating .ASM patches:
.ASM files are exactly the same as .TXT files. The only difference is their
.TXT/.ASM file extensions, which can easily be changed by renaming the file. If
you're copying/pasting assembly code to a new file, type ".asm" after any
filename that you give it, and it will be a saved as valid ASM file.
Headered vs. Unheadered:
almost all Super Metroid patches that exist are unheadered, so if you don't know
whether a patch is headered or not, assume that it's unheadered. If a patch
breaks your ROM, and you think it's because of a headered/unheadered mix-up, the
fix is easy: use SMILE to give the ROM a header, then apply the patch. If it
works after doing that, then the patch was headered. If the patch still doesn't
work, it's possible that you've applied other patches before it that wrote new
code to the same offsets, which would create a conflict and easily cause
crashes. ASM patches are unheadered only.
File compare: this can be a
life-saving feature for finding and fixing bugs. File compare also lets you see
exactly which offsets/bytes that IPS patches have written new code to, which can
be extremely helpful if the creator of an IPS patch hasn't provided (or created)
an ASM version of that patch. If you use file compare and generate a large text
file, just remember that even a few level edits could produce a text file that's
hundreds of bytes large, and that most of the byte addresses are going to be
grouped together, so short edits to isolated parts of the ROM won't be too
difficult to find.
ASM code commenting:
you'll often see small comments often added into the code once you start looking
at ASM code. This is done using semicolons, and they are the ONLY character that
can be used for commenting inside of ASM files. Everything after a semicolon is
ignored by the assembler, until the start of the next line of code.
ASM data overwrites: always make certain that
the LoROM address following all "$org" instances in all ASM files does not
already have data at that location. If there is already data there, you must
choose a new offset with free space within the same bank. To check, simply go to
the $org offset(s) with a hex editor and make sure there are lot of FF bytes at
that spot before applying the ASM file.
When new ASM patches are written, the creators will usually just place their
new code at a commonly known free space address, leaving it your responsibility
to adjust it to a new address if another patch has already written code at that
address. All it takes is accidentally overwriting ONE byte with another wrong
byte to make the game start crashing in weird ways, which becomes harder to find
and fix over time if the crash isn't apparent right away.
BASIC ASM AND BEYOND
This won't be a very long section
because I don't know too much about ASM (assembly) myself just yet. There is
documentation below that should help you step into it if you really want to
write complex new code for Super Metroid. ASM is what Super Metroid itself is
written/programmed in. Technically, almost every edit you've made to the game
until now has been an ASM edit, even if you don't know actual ASM programming.
Something you learned repeatedly if you followed part 2 of this guide was
repointing, moving data, and then replacing the old data with free space, which
I've attempted to illustrate below:
![[IMG_143.png: understanding pointers]](./images/IMG_143.png "Pointer and repointed code")
A step up from that might be branching code that only runs when certain
conditions are met. The warning beep that turns on when Samus's energy runs low
is an example of conditional checking to run code. Any time Samus's amount of
energy is modified (hurt by enemies, collecting energy, etc.), the current
energy value is checked against different energy values that determine if the
low-energy warning beep should be switched on or off. Here's what a basic
branching sub-routine might look like:
![[IMG_144.png: visualizing branching code]](./images/IMG_144.png "Branching code")
There is also hijacking, which hackers often need to do in order to make
their new code run properly. It is very similar in concept to repointing, except
that finding a good hijack point is sometimes the first stumper for people
trying to run new code, because a hijack point is the 'entrance point' for it.
Unless you know everything about the routine you're hijacking part of, there's a
chance the code that you hijacked will run in ways you didn't expect, resulting
in strange errors or crashes.
A basic hijack might be used to expand the functionality of some existing
code (in the repointing picture above, imagine that the three pink "Pointer"
boxes say "Hijack point" instead). A good example of a hijack I once did was
forcing save stations to check for more poses. By default, save stations will
only wait for Samus to be standing still while facing left or right before
asking you if you want to save the game, which is two different poses. To allow
more than two poses to be checked, I hijacked the code that ordinarily only
checks for two poses by changing it into a what is basically pointer to new
code that checks for the two poses, plus as many extra poses as I wanted.
By making changes with a hex editor, you rewrote tiny sections of
assembly. If you learn ASM programming, you will probably move away from using
hex editors often, and start preferring to write your code in a text file.
Regardless of how you edit the game, the final result always ends up as machine
code that can be viewed and edited with a hex editor. "LDA #$0001" and "A9 01
00" mean exactly the same thing.
Here is an example piece of ASM code by Scyzer:
  JSR $8D64
  PHP : STZ $16
--  LDA $16 : TAX : SEP #$20 : LDA $7F6402,X : BEQ ++
    ASL #5 : STA $10
    LDA $7F6403,X : ASL A : CLC : ADC $7F6403,X : TAY : REP #$20
    LDA ColorTable,Y : STA $00
    LDA ColorTable+1,Y : STA $01
  LDY #$0000 : LDX $10
-	LDA [$00],Y : STA $7EC300,X
  INX #2 : INY #2 : CPY #$0020 : BCC -
    INC $16 : INC $16 : BRA --
++  PLP : RTS
Now, here's that exact same piece of ASM by Scyzer, seen as hex
bytes, but with the same number of line separations added in so you can see the
similarities to the written code above:
20 64 8D
08 64 16
A5 16 AA E2 20 BF 02 64 7F F0 38
0A 0A 0A 0A 0A 85 10
BF 03 64 7F 0A 18 7F 03 64 7F A8 C2 20
B9 00 00 85 00
B9 01 00 85 01
A0 00 00 A6 10
B7 00 9F 00 C3 7E
E8 E8 C8 C8 C0 20 00 90 F1
E6 16 E6 16 80 BD
28 60
Without the line separations and color, you're left with what
would normally look like a bunch of random bytes: 20 64 8D 08 64 16 A5 16 AA E2
20 BF 02 64 7F F0 38 0A 0A 0A 0A 0A 85 10 BF 03 64 7F 0A 18 7F 03 64 7F A8 C2 20
B9 00 00 85 00 B9 01 00 85 01 A0 00 00 A6 10 B7 00 9F 00 C3 7E E8 E8 C8 C8 C0 20
00 90 F1 E6 16 E6 16 80 BD 28 60 - that's mostly all there is to viewing and
editing ASM as code and as hex bytes. Actually understanding ASM is the
hard part. All data comes down to raw bytes, even the graphics and audio. If you
were crazy enough, you could open a blank file in a hex editor and type a fully
functioning SNES game into existence from scratch.
Every single hex byte, from 00 all the way up to FF, corresponds with what's
called an ASM instruction. These instructions are used to compose routines and
sub-routines. This is why if you've looked through hex data a lot, you might
have noticed trends in when certain bytes appear. Certain instructions are
needed for certain tasks.
At the very end of the ASM example above, it says RTS, which is byte 60. The
instruction for 60 is "Return To Subroutine", which is used for ending a
routine. There is also byte 6B, "Return To Subroutine Long", which is needed for
routines that end in a different than the bank that they started in.
I gathered some ASM documents and put them in a .zip file, which you can
download
here. Also Google "Programming the 65816" by David Eyes and Ron Lichty and
download that .PDF file if you're serious about this stuff.
You've reached the end of this guide! That's all! It's over!
Finalium! ▲
RESOURCES (MIRRORED)
▲ ∨
More useful Super Metroid documents:
Guides for SMILE 2.5:
Super Metroid disassemblies:
Disassemblies are chunks of game code that have been re-arranged in a way
that's easier to read and understand than raw hex bytes are. Comments are also
usually added to 'narrate' the code as it runs through its whole routine. Most
disassemblies cannot be compiled by xkas (even if it seems like they can)
because they are strictly informational. Geiger's debugger and ASMDev are able
to view ROM code as ASM instructions.
Super Metroid hacking tools:
ROM hacking tools:
FAQ ("FREQUENTLY ASKED QUESTIONS")
▲ ∧ ∨
Most of these questions were taken from the Metroid Construction forum.
Why are the RAM and ROM maps so
important?
Think of RAM as a flat surface with an exact number of holes in
it, and ROM as large groups of pegs that are inserted and removed from the RAM
holes as needed. Knowing which areas of RAM are unused is helpful, because new
game functions can be written to make use of that RAM, and knowing which areas
of RAM are used (and what exactly uses the RAM, and when) lets you quickly know
what sort of data you're looking at when you're poking around with a hex editor
or looking at uncommented code. The ROM map is also important, and could be seen
as the other half of the RAM map. Having complete RAM/ROM maps of a game allows
for the possibility of massive optimization, bug fixes, and much more powerful
features for editors like SMILE.
How do I change the starting save area?
The simplest answer is to just use
this ASM file. Edit the "Area" and "Save" values at the top, then apply the
ASM. Be sure to back your ROM up first in case something goes wrong.
Can I use the Ceres/Debug area?
The short answer is no. The slightly longer answer is yes, but not
without a lot of ASM. Thankfully, JAM has created a
patch
that allows full use of the Ceres/Debug areas. The maximum number of areas that
Super Metroid can have are the eight that currently exist (Crateria, Brinstar,
Norfair, Wrecked Ship, Maridia, Tourian, Ceres, Debug).
Can I make a spike block that kills Samus instantly?
Spike blocks ordinarily cannot have a damage value high enough to
always kill Samus in one hit. At offset A188C, change 8D 50 0A to 9C C2 09. This
makes Air(x-ray) with a BTS number of 02 kill Samus the moment she touches it,
no matter how much energy she has.
Why is my map messed up?
More than likely, you only need to apply Scyzer's map fix to fix
your issue. Doors and elevators leading into new areas must use a bitflag of 40
(doors) and C0 (elevators), or the map won't save properly.
How do I copy a room from one ROM to another?
This can be done in a few different ways. If both rooms are the
same exact size in screens, you only need to copy/paste the level data with a
hex editor. If the rooms are different sizes, you'll need to use a much slower
way of doing it, which is selecting each screen individually and saving/loading
each of the .CLP files with SMILE RF.
How do I add more layers to my room?
It cannot be done. The SNES has 4 backgrounds or layers available:
BG0 is Layer 1. Supports 16 colours with 4 Bits Per Pixel (4BPP)
BG1 is Layer 2. Also supports 16 colours with 4BPP
BG2 is Layer 3 (FX). Only supports 4 colours with 2BPP.
BG3 cannot be used in Super Metroid.
A room's "Background" pointer and layer 2 both use BG1, so it's not possible
to have both at once.
How do I move Samus's ship?
Moving Samus's ship is fairly easy. Just make sure you have "Move
Possessors Together" checked, and that you also copy the green slopes that are
behind Samus's ship.
Why are some blocks becoming power bomb block types by
default?
This has been fixed in recent versions of SMILE RF, but older
versions of SMILE will still do it. It can be easily fixed by double-clicking on
the tile in the tile table, and setting a new default BTS type for it. These
default block types are settings within SMILE itself, so it won't affect
anything in the ROM.
How do I mute all of the game's songs, and keep only
the sound effects?
Go to offset 278413 with a hex editor and change CD into 6F (or
you can download and apply
this patch).
Why is this room's background glitchy looking?
Most likely, you need to either check the "Layer 2" checkbox in
SMILE RF's Room MDB tab, or change the room's Background pointer to 0000. If
it's neither of those, try changing the Setup ASM pointer to 91D3, and the Main
ASM pointer to 0000. Crateria's scrolling sky backgrounds will always look pink
and glitchy in QuickMet, but not during normal gameplay, which is fine. Moving
doors around in scrolling-sky areas can cause the sky to glitch out, which
hasn't been totally fixed yet (the best way around this in the meantime is to
just have the sky not scroll, which doesn't look bad).
Why don't colors show up correctly when I open .GFX
files in Tile Layer Pro?
You need to export the appropriate .TPL file, which is the
palette. Depending on the graphics you're editing, the correct .TPL can be
exported easily, while others require entering a specific PC address and byte
length into the palette editor before they can be exported. All of this and much
more is covered in the graphic editing section above.
Why doesn't Tile Layer Pro show the top row of
graphics?
This is a bug with TLP itself that has been fixed. Download
this TLP.exe file, which has the top-row fix already patched in, along with
the ability to open/save .BIN files.
Why does the Bomb Torizo "Bosses 1" event not work?
In SMILE 2.5 (and probably some earlier versions), the checkbox is
labeled incorrectly. In the "State Properties" editor in the Edit menu, the
second checkbox is labeled Bomb Torizo, but it's actually the third checkbox
that goes to Bomb Torizo's event. The second checkbox is for minibosses, not
Bomb Torizo.
Why can't I see my enemies/bosses/PLMs in SMILE, even
though they're set to be visible?
Click "Tools > Offscreen Enemies to Screen" or "Offscreen PLMs to
Screen" and see if they were simply out of bounds in SMILE. If they are, all
out-of-bounds enemies/PLMs will be moved to the very top-left screen of the
room. It's possible another room is mistakenly using the same enemy or PLM
pointer, which could cause things to be moved out of bounds. If an out-of-bounds
error keeps happening to the same room after you've fixed it, then it's most
likely a shared pointer. Also, if you edit enemy data or enemy positions with a
hex editor, you will need to reload the room in SMILE before the changes will
update.
Why did all of the elevators and Samus's ship stop
working?
You probably changed some data that is shared between all of the
game's elevators. All elevators require two sets of door BTS tiles to function.
In both sets, one of the BTS tiles isn't an actual door (the one underneath the
yellow flashing elevator itself), which all use $88FC as its door data pointer.
The data at 188FC should be "00 00" unless you decide to point to another
instance of 00 00 somewhere else in the same bank.
Will this Game Genie cheat / Pro Action Replay cheat /
hex edit / patch also work on hacks?
Almost all cheats and hex edits for Super Metroid will also work
on hacks of Super Metroid, with only a few exceptions. Most patches will work,
but you should make sure that no data will be overwritten when you apply the
patch (unless you know exactly what's being overwritten).
Can cheat codes be permanently applied to the ROM?
Download
GGencoder
and enter the cheat code(s) that you want permanently applied to the ROM.
You'll see an address and a value. Open the ROM in a hex editor, go to the
address and change the value at that address to the value shown in GGencoder,
then save the ROM.
How do I make it so that a blue door cap DOESN'T close
behind Samus?
This is determined by the value that's used as the door's
"Direction" value. 00, 01, 02, 03 = no door cap. 04, 05, 06, 07 = door cap. See
door data
for much more info on this. Also, the door editor's preview picture of Samus
(with the red arrows) functions as a large button that you can click to switch
the door cap on or off.
Why do my doors open backwards when I shoot them?
The direction that a blue door cap opens is determined by the main
BTS, which can only be $40 (facing left), $41 (facing right), $42 (facing up) or
$43 (facing down).
Why won't Crateria's landing site colors change from
gray?
You'll need to uncheck the first "Palette Options" checkbox in
SMILE RF's FX editor for the landing site. This effect is only used for stormy
Crateria. The gray is also used for the lightning flash, so if you want to keep
the lightning, you will need to edit the colors instead of unchecking the box
(see
palette locations).
How do I change which area a room belongs to?
In SMILE RF's Room MDB tab, near the very top, choose a different
area from the "Area" drop-down menu, then save the room. In SMILE 2.5, click
"Edit > Room Properties" and choose another area from the drop-down menu. You
will need to move the room to a better spot with the map editor after it has
been assigned to a different area, because it still has the same X/Y positioning
that it had in its original area.
Why do my rooms / graphics get all messed up after I
go through a door?
Usually, this will be a scrolling issue. Either you've used a Door
ASM pointer that points to bad data, or the door BTS wasn't placed at the very
edge of the screen that it's in. Incorrect use of blue/green scrolls for
ceiling/floor doors can also break the game.
Why won't SMILE open my ROM?
Either you do not have the correct ROM type (JU), or you have
corrupted the ROM in some way by hex editing or repointing incorrectly. In SMILE
RF, this is less of an issue, but older versions of SMILE are more likely to
have problems opening a corrupted ROM. Some things that can cause older versions
of SMILE to crash are corrupted level data or tiletables, the ROM header getting
corrupted ($81:FFC0-$81:FFFF), attempting to edit door properties for a door BTS
that does not exist in that room, or the ROM is not made of full banks (last
byte is at 7FFF or FFFF).
Why is SMILE saying that I have a ridiculously high
number of available level data for this room?
This is due to level_entries.txt not having the correct starting
and ending points for that room's level data. See
level data section.
How do I add enemies or items to rooms that don't have
any?
Change the Enemy Set, Enemy GFX and PLM pointers to addresses to
free space in their respective banks. All of this is explained in great detail
throughout the
PLM and enemy
sections.
Why is Draygon moving strangely in my hack?
You probably moved one of Draygon's pieces by mistake. The four
bytes at offsets 10D316, 10D326, 10D336 and 10D346 should all be "B0 FF B0 FF".
If this isn't the cause, then it's possible you've changed a movement routine
somewhere else that might also be affecting other enemies.
How do I make Samus start the game with items and
beams?
This can be done easily by using a small piece of ASM. Go to
offset B2FD with a hex editor and replace "9C A2 09" with "20 20 EF". Next, go
to offset EF20 and paste-write these bytes: A9 XX XX
8D A2 09 8D A4 09 A9 YY YY 8D A6 09 8D A8 09 60 -
XX XX = items to start with, and YY YY = beams to start with. See
item bitflags
list. To have multiple items, you simply add the values together. For example,
if you wanted Samus to start with hi-jump boots + varia suit, and charge beam +
wave beam, you would use 01 01 for XX XX, and 11 00 for YY YY.
How do I make remote switches that open doors and
gates, like the ones used in Redesign?
You will need to use H-Copy and V-Copy BTS. See
H-Copy/V-Copy.
I tried to play a hack, but all applying the patch did
was destroy my ROM.
Make certain that "Super Metroid (JU)[!]" is the ROM that you're
patching, and that the patch is unheadered. If you're unsure about the header,
use SMILE to remove the header, then apply the patch. If that doesn't work, that
means that the patch is for headered ROMs. Use SMILE to add a header to the ROM
and then patch it.
How do I make item graphics that aren't in the CRE
table use different palette lines?
You only need to edit a few bytes or so. Here's a list of the item PLM
palettes by squishy_ichigo:
ITEM              NORMAL     CHOZO BALL     HIDDEN     DEFAULT VALUES
Bombs             26131      26516          269F5      00 00 00 00 00 00 00 00
Charge Beam       2615F      26551          26A36      00 00 00 00 00 00 00 00
Ice Beam          2618D      2658C          26A77      00 03 00 00 00 03 00 00
Hi-Jump Boots     261BB      265C7          26AB8      00 00 00 00 00 00 00 00
Speed Booster     261E9      26602          26AF9      00 00 00 00 00 00 00 00
Wave Beam         26217      26646          26B3A      00 02 00 00 00 02 00 00
Spazer            26245      26681          26B7B      00 00 00 00 00 00 00 00
Spring Ball       26273      266BC          26BBC      00 00 00 00 00 00 00 00
Varia Suit        262A5      266F7          26BFD      00 00 00 00 00 00 00 00
Gravity Suit      262DA      26739          26C45      00 00 00 00 00 00 00 00
X-Ray Scope       2630F      2677B          26C8D      01 01 00 00 03 03 00 00
Plasma Beam       2633C      267B5          26CCD      00 01 00 00 00 01 00 00
Grappling Beam    2636A      267F0          26D0E      00 00 00 00 00 00 00 00
Space Jump        26397      2682A          26D4E      00 00 00 00 00 00 00 00
Screw Attack      263C5      26865          26D8F      00 00 00 00 00 00 00 00
Morphing Ball     263F3      268A0          26DD0      00 00 00 00 00 00 00 00
Reserve Tank      26421      268DB          26E11      00 00 00 00 00 00 00 00
Item PLMs can use palettes 00-0F. The eight default values are
the palette lines used by each quarter of an item tile. Bytes 1-4 = non-glowing
animation frame. Bytes 5-8 = glowing animation frame. For example, notice that
the ice beam's default values are 00 03 00 00 00 03 00 00. Palette line 03 has
the bright blue that's used by all of the tileset's blue door caps. If you
changed both of those 03 bytes into 00, 01 or 02, you would have a yellow, red
or green ice beam item instead. The six 00 bytes are for the gray parts of the
ice beam item that use palette line 00.
Why does my room break when I try to play
my hack normally, but work fine when I test with QuickMet?
The room probably has an alternate state with pointers that are
still pointing to old data that no longer works with your room. To fix the
problem, you can either delete the alternate state, or copy all of the desired
state's pointers over to the state that's using old pointers.
Can I make hidden items not re-hide after they've been
revealed?
To make hidden items behave the same way chozo ball items do after being
opened by Samus, first get the PLM ID and find it's instruction pointer. PLM IDs
point to a four-byte header for most PLMs. The first two bytes form a pointer to
ASM which runs when the PLM loads, and the second two bytes form a pointer to
the instructions for that PLM.
For example, the hidden missile item PLM ID is $EF83. If we look
at this location in bank $84 (offset 26F83 in a hex editor), we find 7C EE
($EE7C) and 49 E9 ($E949). Following the second instruction pointer in bank $84,
we come to LoROM address $84:E949 (which is PC offset 26949). From here, we need
to search for instruction $873F after this location, which is bytes 3F 87 (the
bytes are a few lines down at offset 26964). Change instruction $873F into $8724
(which is 3F 87 into 24 87), and you're done. Now, any hidden missiles that
Samus reveals will stop re-hiding themselves after a few seconds. You will need
to do this for any other hidden-in-scenery items that you want staying revealed.
What version of SMILE should I use?
SMILE RF is the most advanced editor so far, and its the version that this
guide was written for.
SMILE 2.5 is the next most popular version after that, because it was the
most stable version around for a long time, and so a lot of documentation was
written for it.
SMILE JX has been getting more users lately, and is a good
alternate to SMILE RF if you prefer the classic layout of SMILE over the
multi-window layout that SMILE RF uses.
Why is QuickMet acting weird (Samus dying instantly,
equipment not updating, etc.)?
Try deleting QuickMet.SRM from your emulator's game saves folder.
You may need to redo your QuickMet settings again after this (you might also
need to delete another copy at \SMILE RF\Files\Temp\QuickMet.SRM). If deleting
those doesn't work, try deleting QuickMet.ini and download/replace it with a new
one from Scyzer's site.
I saved my ROM with SMILE/hex editor, but the changes
aren't showing up in the game!
This is probably just your SNES emulator soft-patching an IPS file
(or you're just editing the wrong ROM). If the SMC file that you're working on
has the exact filename as an IPS file, then that IPS file will be temporarily
used on the SMC file when you try to play it, which can cause a lot of confusion
(e.g., Super_Metroid_Hack.IPS and Super_Metroid_Hack.SMC). Soft-patching means
that no actual changes are being made to your SMC file, so it is harmless.
Hard-patching means that changes are being made to your SMC file
(applying an IPS patch with SMILE or Lunar IPS is hard-patching).
登場してくるであろう拡張子についての説明
.SMC =スーパーファミコンのROMファイル
.SFC = .SMCと同じです。あまり知られていない/サポートされていない
.IPS =ハッキングに使用されるパッチ適用形式( "International Patching System")
.ASM =アセンブリファイル、IPSよりも柔軟
.GFX =さまざまなプログラムが編集できる非圧縮グラフィック
.TPL = Tile Layer Proパレット。通常GFXを正しく表示するために必要です。
.PAL = TPLよりも汎用的なパレットフォーマット
.FPL = FaTILEtyのパレットフォーマット
.HEX = 16進バイトの保存済み選択
.BIN =生のバイナリデータ。 ASMファイルはコンパイル時に適用できます。
.TTB =タイルテーブルフォーマット。SMILEでのみ使用されます。
.CLP = SMILE RFでのみ使用されるレベルデータクリップボードフォーマット
.RFTT = SMILE RFモード7タイルテーブルフォーマット
.BRR =オーディオをROMに挿入するために使用されるビットレート削減
.SRM =保存を維持するためにエミュレータによって使用されるRAMファイルの保存
.ZST = ZSNES保存ファイル(追加の状態:.ZS1、.ZS2、.ZS3など)
.000 = Snes9X保存ファイル(追加状態:.001、.002、.003など)
.VAL = SMILE RFは、デフォルトのBTSタイプなどの設定を記憶するためにこれらを使用します。
.BAK =安全に削除できる自動作成されたバックアップファイル
.INI =プログラム設定(例:SMILE RFのエディタウィンドウ位置)
Something broke somewhere and I don't know
what I did to break it!
Unfortunately, everybody who edits Super Metroid will have to go through
this. If you've been keeping mostly inside of SMILE and not making tons of hex
edits, then your problem should be easier to find and fix (it's probably just a
bad pointer in the room header, or an enemy/PLM with bad values). The more you
learn about ASM and start writing new code, the weirder and more subtle your
game-breaking bugs will start to become. Awesome.
What kind of crash? Black-out? Game freeze? Graphical
glitch? Does the audio screw up? Try to remember exactly HOW THE CRASH HAPPENED.
Did Samus shoot something to cause it? Did something hit Samus and cause it?
Does it happen the same way every time, or does it not crash reliably? Figure
out the details of a crash as soon as you can. If you can make the crash happen
anytime you want, then that's a good start in figuring out how to fix it.
Does the game freeze halfway through a door transition when entering
a new room? It might be a bad door ASM pointer, or an off-screen
enemy/PLM with bad values.
When does the crash happen? Consistent? At random? Only in
one room or multiple rooms? If multiple rooms, then a shared bad pointer maybe?
Off-screen enemy/PLM with bad values?
Does the black HUD bar at the top of the screen go transparent?
A lot of things can cause this type of crash. Does the crash happen in just one
room, or many? Any badly placed multi-piece/possessor enemies?
Check for pointer data that doesn't have the required "00 00" or "FF
FF" bytes at the end.
This could cause some rooms to start crashing the game, or cause
enemies/PLMs/doors/etc, to 'spill' out of one room and into another. If the door
editor suddenly says that your room has like 30+ doors, then the Doors pointer's
00 00 ending bytes were probably forgotten. If a room suddenly has more enemies
than it did before, then the FF FF ending bytes for Enemy Set were probably
forgotten.
Did you repoint or move the room's PLMs? If doing this
breaks the room's scrolling, then it was probably because the "00 00" that's
required at the end of a PLM data string was also being used to change the first
two screens of the room into red screens. Easily fixed.
Is it a bad pointer? Change each pointer in the room header
to something else and test the room each time to see if it suddenly starts
working again. Enemies/PLMs moving around in rooms that you didn't edit? Shared
pointer.
Overwritten Room Scrolls data? Does the camera immediately
push Samus off-screen after coming through a door and completely destroy the
room? Does this happen with every door that leads into the room? The Room
Scrolls data for that room might have been overwritten. There could also be door
ASM or a scroll PLM making unwanted scroll color changes. The original Super
Metroid has lots of shared pointers in bank $8F that are easy to overwrite, so
it's almost inevitable that you will eventually affect another room in ways that
you didn't mean to.
File compare will always work... eventually. File compare is
perfect for finding tiny unintentional edits, typoed hex edits, and other
game-breaking mistakes - but only if you very frequently make back-up copies
of your ROM! Can't use file compare effectively without lots of files.
Tabbing back and forth between ROMs with a hex editor.
Basically the same thing as File Compare, but done in a different way.
If you're desperate, you can copy banks from a clean Super
Metroid ROM.
Make a back-up of your ROM, then start copying and pasting entire banks over
from an unedited Super Metroid ROM one at a time and test the game each time
until you discover which bank is causing the crash. Once you know the bank, you
can do the same exact thing over again with the bank itself by copying and
pasting smaller chunks from it, testing, and repeatedly narrowing it down until
you know the exact offset of your crash. From there, the fix is usually as
simple as replacing that one edited piece of data with the data that was
originally there.
Something is causing SMILE to crash! / SMILE won't
run!
Sometimes you can figure out what's crashing SMILE by looking at the error
numbers that the crash notification tells you. Most of these are for older SMILE
versions:
Runtime Error 6: running SMILE 2.5 after running Parlor or equivalent can
cause this error. Delete your SMILE .INI file to use SMILE 2.5 again.
Runtime Error 9: happens with SMILE Parlor and probably other versions when
you try to open a ROM with corrupted room header data. Try deleting and creating
a blank new SMILE .INI file (in SMILE RF, doing this will also reset all of your
settings, such as window positions).
Runtime Error 75: happens when SMILE can't access the data in your ROM file
due to lack of file permissions. This will happen if there are unsaved edits
made with HxD, and if you try to edit the ROM with SMILE while it's being synced
to Dropbox. This crash affects all versions of SMILE, including RF.
Runtime Error 76: happens with SMILE 2.5 and probably some other
older versions. Create an empty new folder called "Plugins" in SMILE\files\ to
fix this crash.
GLOSSARY ▲ ∧ ∨
Words and stuff that we use and stuff. Not listed in any particular order.
Enemy ID / enemy header
The starting offset of an enemy's 64-byte pointer set in bank $A0.
CRE (Common Room Elements)
The table of 'general-use' tiles that contain the different
colored door caps, respawning block graphics, certain item graphics, etc.
Tile map / tilemap
A chunk of code that organizes, displays and usually animates 8x8
tiles to form a larger moving graphic. Tile maps are responsible for piecing
together and animating Samus, enemies, pause screens, option menus, the intro,
the title screen, etc. Editing tile maps requires some assembly knowledge.
PLM (Post-Load Modification)
PLMs can run code after a room has already been loaded. Red,
green, yellow and gray doors are PLMs. Every item in the game is also a PLM,
along with save/map/missile/recharge stations and several other things. New PLMs
can be made by experienced hackers that run all kinds of custom code.
BTS (Behind The Scenes)
BTS is the code behind every single 16x16 tile that is placed
using the Level Editor. BTS is often called "block type" or just "block."
GFX (Graphics)
GFX is usually used in the context of pixel-editing the game's
appearance in any way.
Scrolling
Generally involves the camera following Samus around, also called
"camera scrolling".
HUD (Heads-Up Display)
The black bar along the top of Super Metroid's screen that
displays energy tanks, weapon icons, and the minimap.
Screen / scroll
Screens make up the dimensions of a room. An individual screen is
256x256 pixels in size, which breaks down to 16x16 blocks, and each block is
16x16 pixels. Every single screen has a red, blue or green scrolling attribute
set to it. Sometimes called scrolls instead of screens.
SMILE (Super Metroid Integrated Level Editor)
The first Super Metroid editor. Created by Jathys.
SMILE Parlor
The last version of SMILE by Jathys that was supposed to become
SMILE 3.0, but is no longer being worked on.
SMILE RF (SMILE ReFormed)
Built from a hacked version of SMILE 2.5 by Scyzer, with many
improvements added.
SMILE JX
Built from a hacked version of SMILE Parlor by JAM, with many
improvements added.
SMALL (Super Metroid ALLocator)
Created by DFPercush with some help from Silver_Skree and others.
Its purpose was to move chunks of data around using a visual interface, and
automatically adjusting all the related pointers. It was never properly tested
and bugfixed. This tool doesn't get enough love.
Cheesy
A Super Metroid editor by interdpth that was never got anywhere.
I'm A Genius
Part of SMILE's palette editor that lets you jump to a specific
offset (PC address) in the ROM and display up to 128 colors at once for editing.
SABS (Samus Aran Beauty Salon)
A small program by Jathys that lets you edit Samus's colors and
not much else. It was later improved greatly and integrated into SMILE.
xkas (Cross-Knight Assembler)
The most well-known assembler used for patching ASM files to Super
Metroid ROMs, even though it is an older version.
Value
All kinds of things can have a value(s) assigned to them, which
can be adjusted. Example values are things like how high Samus can jump, how
fast she can run and shoot weapons, etc.
Opcode
You won't run into these often unless you start learning assembly.
Opcode is short for "operation code" and they are basically used for telling the
game what it needs to do with the next few bytes after it. Opcodes themselves
are represented by a single hex byte that is unique to it.
Instruction
Instructions usually consist of 2-4 bytes, starting with an
opcode. In assembly, "JSL $A0F0B0" is a single instruction. That same
instruction written out as raw hex bytes would be "22 B0 F0 A0".
Routine
Routines are a series of instructions that make up larger chunks
of code. They can be as simple as a stand-alone function that's no more than a
handful of bytes long, to something that branches out to specific parts of many
other routines across many banks, spanning thousands of bytes.
NOP
NOP is short for "no operation", and it is an opcode that is
represented by the hex byte "EA". Many interesting changes have been found for
Super Metroid by simply replacing instructions with this opcode.
Aegis
The title of an abandoned hack that people waited aegis for.
DDB (Door Data Bytes)
Another name for the 12-byte strings of data that each door uses
in bank $83.
Room ID / room header / room MDB (Main Data Bytes)
The main setup bytes for each room in bank $8F.
改訂履歴
▲ ∧
2017年10月 日本語版の仮公開と翻訳作業を開始しました。
2018年03月 翻訳とともに少し分かりやすくしてみました。
2018年10月 少々問題がありそうな箇所等を削除しました。
2019年03月 最新版への切り替えなど対応を開始しました。
スペシャルサンクス ▲
Scyzer, Jathys, Kejardon, PJBoy, Black Falcon, Crashtour99, DSO, JAM,
FullOfFail, DChronos, GF_Kennon, Cardweaver, squishy_ichigo, Flamestar666,
BlackTelomeres, Digital_Mantra, Drewseph, RealRed, RaccoonSam, personitis,
itsblah, Quietus,
それと、これを眺めている皆様です。
順次追加できればと思います。
改造で分からないこととかありませんか?おまかせください
▲
分からないことがあったらこちらでスレッドを立てて改造チームに聞いてみましょう!!

IRCチャットなんかもあります
#metconst
#CloudIRC
![[IMG_001.png: Tiles & BTS]](./images/IMG_001.png "SMILE RF main window (Tiles & BTS)")
![[IMG_002.png: Room MDB]](./images/IMG_002.png "SMILE RF window (Room MDB)")
![[IMG_003.png: ROM Stuff]](./images/IMG_003.png "SMILE RF window (ROM Stuff)")
![[IMG_004.png: FX editor]](./images/IMG_004.png "FX Editor")
![[IMG_005.png: enemy editor]](./images/IMG_005.png "Enemy Editor")
![[IMG_006.png: PLM editor]](./images/IMG_006.png "PLM Editor")
![[IMG_007.png: door editor]](./images/IMG_007.png "Door Editor")
![[IMG_008.png: map editor]](./images/IMG_008.png "Map Editor")
![[IMG_009.png: tileset editor part 1]](./images/IMG_009.png "Tileset editor (part 1)")
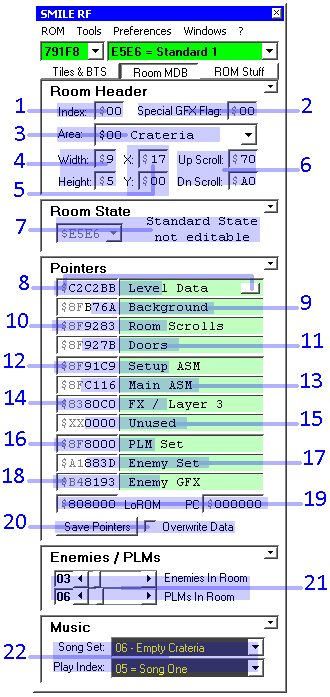
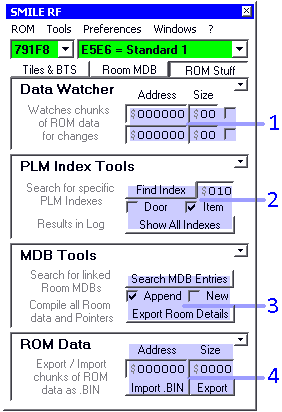
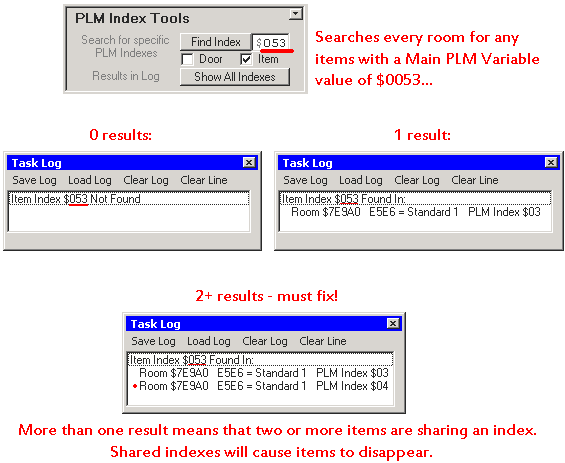
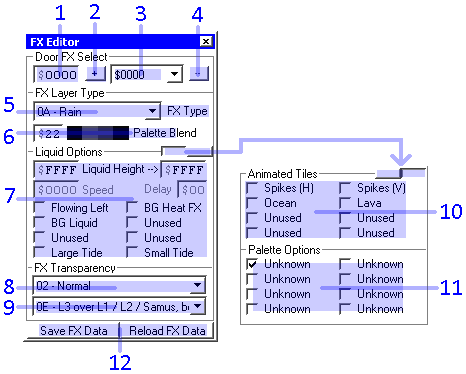
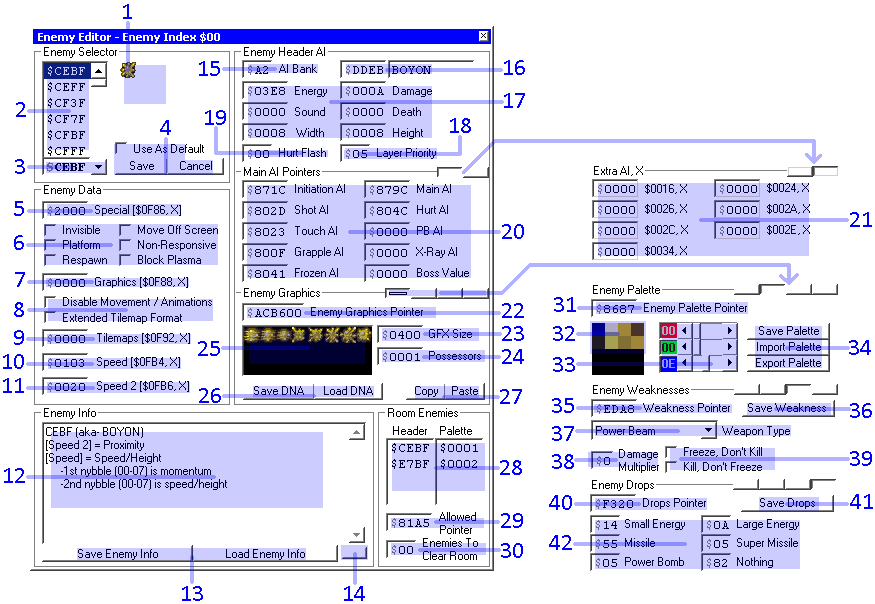
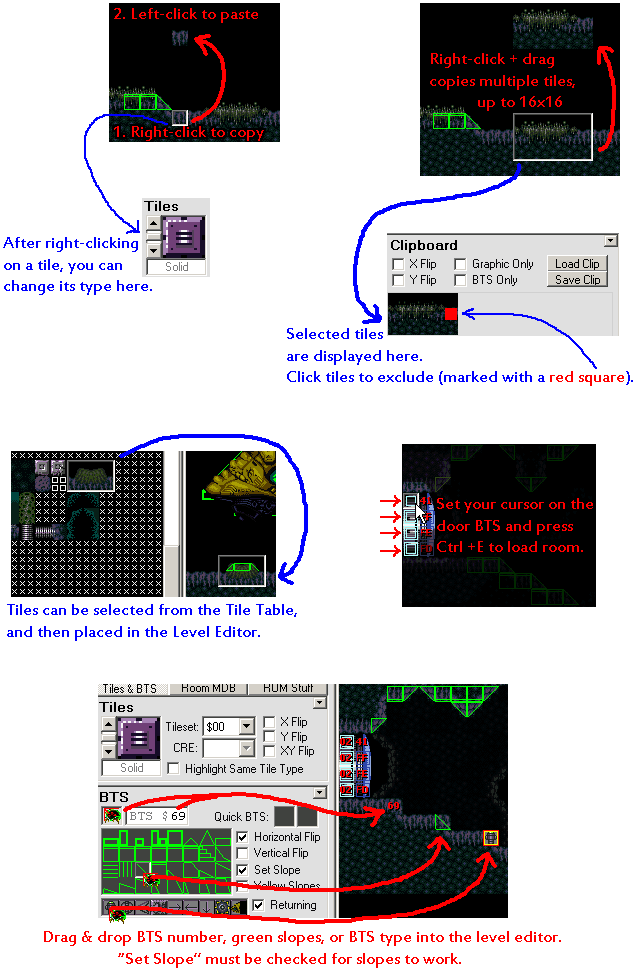
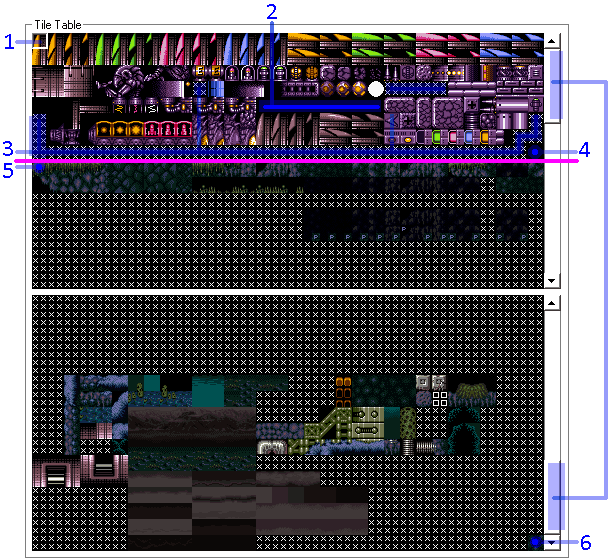